Motherboard DIY Troubleshooting Guide
Page 4
... Flash to update the BIOS 2-5 2.1.5 ASUS CrashFree BIOS 2 utility 2-6 2.2 BIOS Setup Program 2-8 2.2.1 BIOS menu screen 2-9 2.2.2 Menu bar 2-9 2.2.3 Navigation keys 2-9 2.2.4 Menu items 2-10 2.2.5 Sub-menu... 2.4.4 Onboard Devices Configuration 2-21 2.4.5 PCIPnP 2-22 2.5 Power Menu 2-23 2.5.1 APM Configuration 2-24 2.5.2 Hardware Monitor 2-25 2.6 Boot Menu 2-26 2.6.1 Boot Device Priority 2-27 2.6.2 Boot Settings Configuration 2-27 2.6.3 Security 2-28 2.7 Exit Menu 2-29 Chapter 3: Software Support 3.1 Installing An Operating System 3-2 3.2 Support CD Information...
... Flash to update the BIOS 2-5 2.1.5 ASUS CrashFree BIOS 2 utility 2-6 2.2 BIOS Setup Program 2-8 2.2.1 BIOS menu screen 2-9 2.2.2 Menu bar 2-9 2.2.3 Navigation keys 2-9 2.2.4 Menu items 2-10 2.2.5 Sub-menu... 2.4.4 Onboard Devices Configuration 2-21 2.4.5 PCIPnP 2-22 2.5 Power Menu 2-23 2.5.1 APM Configuration 2-24 2.5.2 Hardware Monitor 2-25 2.6 Boot Menu 2-26 2.6.1 Boot Device Priority 2-27 2.6.2 Boot Settings Configuration 2-27 2.6.3 Security 2-28 2.7 Exit Menu 2-29 Chapter 3: Software Support 3.1 Installing An Operating System 3-2 3.2 Support CD Information...
Motherboard DIY Troubleshooting Guide
Page 12
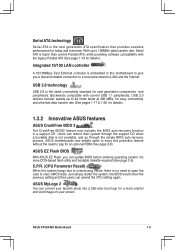
...favorite photo into a 256-color boot logo for today and tomorrow. C.P.R. (CPU Parameter Recall) When the system hangs due to overclocking failure, there is the latest connectivity standard for an optional ROM (See page 2-6). ASUS P4V8X-MX Motherboard 1-3 ASUS motherboards now enable users to ...enjoy this motherboard to a local area network (LAN) and the Internet. ASUS EZ Flash BIOS With ASUS EZ Flash, you a fast and reliable connection to give...
...favorite photo into a 256-color boot logo for today and tomorrow. C.P.R. (CPU Parameter Recall) When the system hangs due to overclocking failure, there is the latest connectivity standard for an optional ROM (See page 2-6). ASUS P4V8X-MX Motherboard 1-3 ASUS motherboards now enable users to ...enjoy this motherboard to a local area network (LAN) and the Internet. ASUS EZ Flash BIOS With ASUS EZ Flash, you a fast and reliable connection to give...
Motherboard DIY Troubleshooting Guide
Page 24
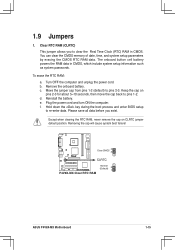
...2-3 for about 5~10 seconds, then move the cap back to pins 2-3. Removing the cap will cause system boot failure! You can clear the CMOS memory of date, time, and system setup parameters by erasing the CMOS ...RTC RAM data. c. e. Hold down the key during the boot process and enter BIOS setup to clear the Real Time Clock (RTC) RAM in CMOS, which include ...ON the computer. 1.9 Jumpers 1. b. Remove the onboard battery. Clear CMOS 3 2 R CLRTC P4V8X-MX P4V8X-MX Clear RTC RAM Normal (Default) 2 1 ASUS P4V8X-MX Motherboard 1-15
...2-3 for about 5~10 seconds, then move the cap back to pins 2-3. Removing the cap will cause system boot failure! You can clear the CMOS memory of date, time, and system setup parameters by erasing the CMOS ...RTC RAM data. c. e. Hold down the key during the boot process and enter BIOS setup to clear the Real Time Clock (RTC) RAM in CMOS, which include ...ON the computer. 1.9 Jumpers 1. b. Remove the onboard battery. Clear CMOS 3 2 R CLRTC P4V8X-MX P4V8X-MX Clear RTC RAM Normal (Default) 2 1 ASUS P4V8X-MX Motherboard 1-15
Motherboard DIY Troubleshooting Guide
Page 35
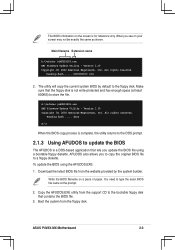
... sure that the floppy disk is a DOS-based application that contains the BIOS file. 3. Reading flash ..... ASUS P4V8X-MX Motherboard 2-3 The utility will copy the current system BIOS by the system builder. To update the BIOS using a bootable floppy ...disk that lets you see on a piece of paper. Reading flash ..... 0x0008CC00 (9%) 2. A:\>afudos /oMYBIOS03.rom AMI Firmware Update Utility - Boot the system from the support CD to a floppy diskette. Version 1.10 Copyright (C) 2002 American Megatrends, Inc. Copy the AFUDOS.EXE utility ...
... sure that the floppy disk is a DOS-based application that contains the BIOS file. 3. Reading flash ..... ASUS P4V8X-MX Motherboard 2-3 The utility will copy the current system BIOS by the system builder. To update the BIOS using a bootable floppy ...disk that lets you see on a piece of paper. Reading flash ..... 0x0008CC00 (9%) 2. A:\>afudos /oMYBIOS03.rom AMI Firmware Update Utility - Boot the system from the support CD to a floppy diskette. Version 1.10 Copyright (C) 2002 American Megatrends, Inc. Copy the AFUDOS.EXE utility ...
Motherboard DIY Troubleshooting Guide
Page 36
.... The BIOS information on your screen may not be exactly the same as shown. Reading file ..... Doing so can cause system boot failure! Reading file ..... A:\>afudos /iP4V8X-MX.rom AMI Firmware Update Utility - 4. Version 1.10 Copyright (C) 2002 American Megatrends, Inc. done Writing flash .... 0x0008CC00 (9%) DO NOT shut down or...
.... The BIOS information on your screen may not be exactly the same as shown. Reading file ..... Doing so can cause system boot failure! Reading file ..... A:\>afudos /iP4V8X-MX.rom AMI Firmware Update Utility - 4. Version 1.10 Copyright (C) 2002 American Megatrends, Inc. done Writing flash .... 0x0008CC00 (9%) DO NOT shut down or...
Motherboard DIY Troubleshooting Guide
Page 37
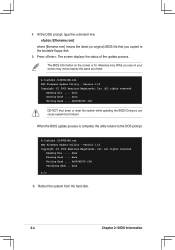
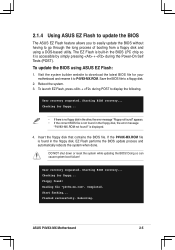
...le. Doing so can cause system boot failure! Starting BIOS recovery... Checking for your motherboard and rename it is found in the floppy disk, the error message "P4V8X-MX.ROM not found !" Rebooting. 2.1.4 Using ASUS EZ Flash to update the BIOS The ASUS EZ Flash feature allows you to easily... update the BIOS without having to go through the long process of booting from a floppy disk and using ASUS EZ Flash: 1. Save the...
...le. Doing so can cause system boot failure! Starting BIOS recovery... Checking for your motherboard and rename it is found in the floppy disk, the error message "P4V8X-MX.ROM not found !" Rebooting. 2.1.4 Using ASUS EZ Flash to update the BIOS The ASUS EZ Flash feature allows you to easily... update the BIOS without having to go through the long process of booting from a floppy disk and using ASUS EZ Flash: 1. Save the...
Motherboard DIY Troubleshooting Guide
Page 38
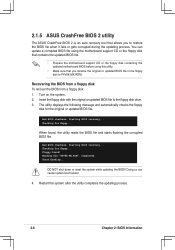
You can cause system boot failure! 4. Insert the floppy disk with the original or updated BIOS file to P4V8X-MX.ROM. Checking for floppy... Start flashing... 2.1.5 ASUS CrashFree BIOS 2 utility The ASUS CrashFree BIOS 2 is an auto recovery tool that you to restore the ... the BIOS from a floppy disk To recover the BIOS from a floppy disk: 1. Starting BIOS recovery... Reading file "P4V8X-MX.ROM". Bad BIOS checksum. DO NOT shut down or reset the system while updating the BIOS! Completed. Restart the system after the utility completes...
You can cause system boot failure! 4. Insert the floppy disk with the original or updated BIOS file to P4V8X-MX.ROM. Checking for floppy... Start flashing... 2.1.5 ASUS CrashFree BIOS 2 utility The ASUS CrashFree BIOS 2 is an auto recovery tool that you to restore the ... the BIOS from a floppy disk To recover the BIOS from a floppy disk: 1. Starting BIOS recovery... Reading file "P4V8X-MX.ROM". Bad BIOS checksum. DO NOT shut down or reset the system while updating the BIOS! Completed. Restart the system after the utility completes...

Motherboard DIY Troubleshooting Guide
Page 39
...Completed. Restart the system after the utility completes the updating process. Floppy not found ! Checking for floppy... Visit the ASUS website (www.asus.com) to the optical drive. 3. Insert the support CD to download the latest BIOS file. Starting BIOS recovery... ... and automatically checks the floppy disk for this motherboard. Reading file "P4V8X-MX.ROM". Bad BIOS checksum. CD-ROM found ! Doing so can cause system boot failure! 4. ASUS P4V8X-MX Motherboard 2-7 The recovered BIOS may not be the latest BIOS version for the original or...
...Completed. Restart the system after the utility completes the updating process. Floppy not found ! Checking for floppy... Visit the ASUS website (www.asus.com) to the optical drive. 3. Insert the support CD to download the latest BIOS file. Starting BIOS recovery... ... and automatically checks the floppy disk for this motherboard. Reading file "P4V8X-MX.ROM". Bad BIOS checksum. CD-ROM found ! Doing so can cause system boot failure! 4. ASUS P4V8X-MX Motherboard 2-7 The recovered BIOS may not be the latest BIOS version for the original or...
Motherboard DIY Troubleshooting Guide
Page 41
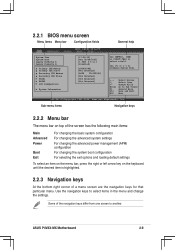
Use the navigation keys to another. Some of a menu screen are the navigation keys for that particular menu. ASUS P4V8X-MX Motherboard 2-9 2.2.1 BIOS menu screen Menu items Menu bar Configuration fields General help System Time System Date Legacy Diskette A Legacy ... Sub-menu items Navigation keys 2.2.2 Menu bar The menu bar on top of the screen has the following main items: Main Advanced Power Boot Exit For changing the basic system configuration For changing the advanced system settings For changing the advanced power management (APM) confi...
Use the navigation keys to another. Some of a menu screen are the navigation keys for that particular menu. ASUS P4V8X-MX Motherboard 2-9 2.2.1 BIOS menu screen Menu items Menu bar Configuration fields General help System Time System Date Legacy Diskette A Legacy ... Sub-menu items Navigation keys 2.2.2 Menu bar The menu bar on top of the screen has the following main items: Main Advanced Power Boot Exit For changing the basic system configuration For changing the advanced system settings For changing the advanced power management (APM) confi...

Motherboard DIY Troubleshooting Guide
Page 42
... for that the item has a sub-menu. To change the value of a field, select it then press to display the other items (Advanced, Power, Boot, and Exit) on the menu bar have their respective menu items. 2.2.5 Sub-menu items A solid triangle before each item on the screen. 2.2.9 General help At...
... for that the item has a sub-menu. To change the value of a field, select it then press to display the other items (Advanced, Power, Boot, and Exit) on the menu bar have their respective menu items. 2.2.5 Sub-menu items A solid triangle before each item on the screen. 2.2.9 General help At...

Motherboard DIY Troubleshooting Guide
Page 47
...Auto] CPU Host Frequency Actual Frequency (MHz) [Auto] [133] Boot Failure Guard Spread Spectrum [Enabled] [Auto] This should be enabled in this menu show the CPU-related information that the BIOS automatically detects. ASUS P4V8X-MX Motherboard 2-15 Enter F1 F10 ESC Select Screen Select Item Go to ...Sub Screen General Help Save and Exit Exit v02.58 (C)Copyright 1985-2004, American Megatrends, Inc. 2.4.1 CPU Configuration The items in order to boot legacy OSes unable...
...Auto] CPU Host Frequency Actual Frequency (MHz) [Auto] [133] Boot Failure Guard Spread Spectrum [Enabled] [Auto] This should be enabled in this menu show the CPU-related information that the BIOS automatically detects. ASUS P4V8X-MX Motherboard 2-15 Enter F1 F10 ESC Select Screen Select Item Go to ...Sub Screen General Help Save and Exit Exit v02.58 (C)Copyright 1985-2004, American Megatrends, Inc. 2.4.1 CPU Configuration The items in order to boot legacy OSes unable...
Motherboard DIY Troubleshooting Guide
Page 48
...figuration options: [Auto] [Disabled] CPU Host Frequency [Auto] While entering setup, BIOS auto detects the present CPU host frequency of this item to boot legacy operating systems that cannot support CPUs with extended CPUID functions. Configuration options: [Auto] [Manual] Spread Spectrum [Auto] Allows you to keep the.... Configuration options: [Enabled] [Disabled] Max CPUID Value Limit: [Disabled] Enable this motherboard. Max CPUID Value Limit [Disabled] Enable this item to boot legacy operating systems that cannot support CPUs with extended CPUID functions.
...figuration options: [Auto] [Disabled] CPU Host Frequency [Auto] While entering setup, BIOS auto detects the present CPU host frequency of this item to boot legacy operating systems that cannot support CPUs with extended CPUID functions. Configuration options: [Auto] [Manual] Spread Spectrum [Auto] Allows you to keep the.... Configuration options: [Enabled] [Disabled] Max CPUID Value Limit: [Disabled] Enable this motherboard. Max CPUID Value Limit [Disabled] Enable this item to boot legacy operating systems that cannot support CPUs with extended CPUID functions.
Motherboard DIY Troubleshooting Guide
Page 54
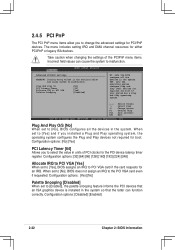
... configures the Plug and Play devices not required for the PCI device latency timer register. The menu includes setting IRQ and DMA channel resources for boot if your system has a Plug and Play operating system. ←→ Select Screen ↑↓ Select Item +- Configuration options: [32] [... [192] [224] [248] Allocate IRQ to PCI VGA [Yes] When set to malfunction. Take caution when changing the settings of PCI clocks for boot. YES: lets the operating system configure Plug and Play (PnP) devices not required for either PCI/PnP or legacy ISA devices. Advanced PCI...
... configures the Plug and Play devices not required for the PCI device latency timer register. The menu includes setting IRQ and DMA channel resources for boot if your system has a Plug and Play operating system. ←→ Select Screen ↑↓ Select Item +- Configuration options: [32] [... [192] [224] [248] Allocate IRQ to PCI VGA [Yes] When set to malfunction. Take caution when changing the settings of PCI clocks for boot. YES: lets the operating system configure Plug and Play (PnP) devices not required for either PCI/PnP or legacy ISA devices. Advanced PCI...
Motherboard DIY Troubleshooting Guide
Page 58
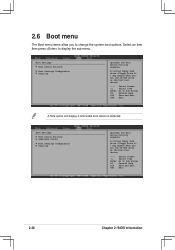
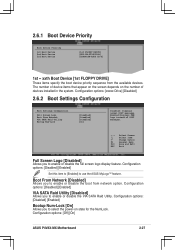
...Megatrends, Inc. 2-26 Chapter 2: BIOS Information A Hide option will display if removable boot device is detected. Boot Settings Boot Device Priority Removable Drives Boot Settings Configuration Security Specifies the Boot Device Priority sequence. A virtual floppy disk drive (Floppy Drive B: ) may... appear when you to display the sub-menu. Boot Settings Boot Device Priority Boot Settings Configuration Security Specifies the Boot Device Priority sequence. Enter F1 F10 ESC Select Screen Select Item Go to Sub Screen General...
...Megatrends, Inc. 2-26 Chapter 2: BIOS Information A Hide option will display if removable boot device is detected. Boot Settings Boot Device Priority Removable Drives Boot Settings Configuration Security Specifies the Boot Device Priority sequence. A virtual floppy disk drive (Floppy Drive B: ) may... appear when you to display the sub-menu. Boot Settings Boot Device Priority Boot Settings Configuration Security Specifies the Boot Device Priority sequence. Enter F1 F10 ESC Select Screen Select Item Go to Sub Screen General...
Motherboard DIY Troubleshooting Guide
Page 59
... messages. ←→ Select Screen ↑↓ Select Item +- Configuration options: [Off] [On] ASUS P4V8X-MX Motherboard 2-27 Configuration options: [xxxxx Drive] [Disabled] 2.6.2 Boot Settings Configuration Boot Settings Configuration Full Screen Logo Boot From Network VIA SATA Raid Utility Bootup Num-Lock [Disabled] [Disabled] [Disabled] [On] Disabled: Displays...
... messages. ←→ Select Screen ↑↓ Select Item +- Configuration options: [Off] [On] ASUS P4V8X-MX Motherboard 2-27 Configuration options: [xxxxx Drive] [Disabled] 2.6.2 Boot Settings Configuration Boot Settings Configuration Full Screen Logo Boot From Network VIA SATA Raid Utility Bootup Num-Lock [Disabled] [Disabled] [Disabled] [On] Disabled: Displays...
Motherboard DIY Troubleshooting Guide
Page 68
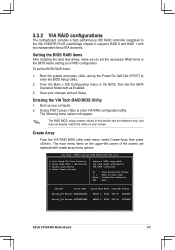
... system and press during the Power-On Self-Test (POST) to enter VIA RAID configuration utility. Boot up your changes and exit Setup. The following menu options will appear. Setting the BIOS RAID items After installing the hard disk drives, make sure ... Channel Drive Name Array Name Mode Size(GB) Status Serial_Ch0 Master XXXXXXXXXXX ARRAY 0 SATA 999.99 XXXXXXX Serial_Ch1 Master XXXXXXXXXXX ARRAY 0 SATA 999.99 XXXXXXX ASUS P4V8X-MX Motherboard 3-7 To set the necessary RAID items in the BIOS, then Set the SATA Operation Mode item as Enabled. 3. From the Main > IDE Confi...
... system and press during the Power-On Self-Test (POST) to enter VIA RAID configuration utility. Boot up your changes and exit Setup. The following menu options will appear. Setting the BIOS RAID items After installing the hard disk drives, make sure ... Channel Drive Name Array Name Mode Size(GB) Status Serial_Ch0 Master XXXXXXXXXXX ARRAY 0 SATA 999.99 XXXXXXX Serial_Ch1 Master XXXXXXXXXXX ARRAY 0 SATA 999.99 XXXXXXX ASUS P4V8X-MX Motherboard 3-7 To set the necessary RAID items in the BIOS, then Set the SATA Operation Mode item as Enabled. 3. From the Main > IDE Confi...


