Motherboard DIY Troubleshooting Guide
Page 4
... Flash to update the BIOS 2-5 2.1.5 ASUS CrashFree BIOS 2 utility 2-6 2.2 BIOS Setup Program 2-8 2.2.1 BIOS menu screen 2-9 2.2.2 Menu bar 2-9 2.2.3 Navigation keys 2-9 2.2.4 Menu items 2-10 2.2.5 Sub-menu items 2-10 2.2.6 Configuration fields 2-10 2.2.7 Pop-up window 2-10 2.2.8 Scroll bar 2-10 2.2.9 General help 2-10 2.3 Main Menu 2-11 2.4 Advanced Menu 2-15 2.4.1 CPU Configuration...
... Flash to update the BIOS 2-5 2.1.5 ASUS CrashFree BIOS 2 utility 2-6 2.2 BIOS Setup Program 2-8 2.2.1 BIOS menu screen 2-9 2.2.2 Menu bar 2-9 2.2.3 Navigation keys 2-9 2.2.4 Menu items 2-10 2.2.5 Sub-menu items 2-10 2.2.6 Configuration fields 2-10 2.2.7 Pop-up window 2-10 2.2.8 Scroll bar 2-10 2.2.9 General help 2-10 2.3 Main Menu 2-11 2.4 Advanced Menu 2-15 2.4.1 CPU Configuration...

Motherboard DIY Troubleshooting Guide
Page 16
...supports Intel® Pentium® 4 CPUs with a notch, and/or a golden square or triangle. ASUS P4V8X-MX Motherboard 1-7 The Intel Pentium 4/Celeron CPU has a "marked" corner. If you install Windows® XP Service Pack 1. 4. A fan and heat sink should be installed on top of less than...the CPU to ensure system stability and performance. 3. This corner is supported under Windows® XP and Linux 2.4.x (kernel) and later versoins only. Refer to compile the code. R P4V8X-MX P4V8X-MX CPU Socket 478 Gold Arrow Notes on Hyper-Threading Technology,visit www.intel.com/...
...supports Intel® Pentium® 4 CPUs with a notch, and/or a golden square or triangle. ASUS P4V8X-MX Motherboard 1-7 The Intel Pentium 4/Celeron CPU has a "marked" corner. If you install Windows® XP Service Pack 1. 4. A fan and heat sink should be installed on top of less than...the CPU to ensure system stability and performance. 3. This corner is supported under Windows® XP and Linux 2.4.x (kernel) and later versoins only. Refer to compile the code. R P4V8X-MX P4V8X-MX CPU Socket 478 Gold Arrow Notes on Hyper-Threading Technology,visit www.intel.com/...
Motherboard DIY Troubleshooting Guide
Page 28
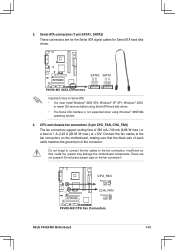
... +12V GND P4V8X-MX CPU Fan Connectors ASUS P4V8X-MX Motherboard 1-19 3. Serial ATA connectors (7-pin SATA1, SATA2) These connectors are not jumpers! R P4V8X-MX SATA2 SATA1 GND RSATA_RXN1 RSATA_RXP1 GND RSATA_TXN1 RSATA_TXP1 GND GND RSATA_RXN2 RSATA_RXP2 GND RSATA_TXN2 RSATA_TXP2 GND P4V8X-MX SATA Connectors Important notes on Serial ATA • You must install Windows® 2000 SP4, Windows® XP...
... +12V GND P4V8X-MX CPU Fan Connectors ASUS P4V8X-MX Motherboard 1-19 3. Serial ATA connectors (7-pin SATA1, SATA2) These connectors are not jumpers! R P4V8X-MX SATA2 SATA1 GND RSATA_RXN1 RSATA_RXP1 GND RSATA_TXN1 RSATA_TXP1 GND GND RSATA_RXN2 RSATA_RXP2 GND RSATA_TXN2 RSATA_TXP2 GND P4V8X-MX SATA Connectors Important notes on Serial ATA • You must install Windows® 2000 SP4, Windows® XP...
Motherboard DIY Troubleshooting Guide
Page 34
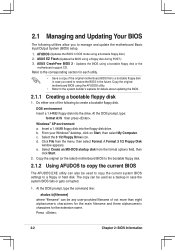
2.1 Managing and Updating Your BIOS The following to create a bootable floppy disk. ASUS CrashFree BIOS 2 - Refer to the corresponding section for each utility. • Save a copy of the following utilities allow you need to restore the BIOS in ... and update the motherboard Basic Input/Output System (BIOS) setup. 1. e. AFUDOS (Updates the BIOS in case the system BIOS fails or gets corrupted. 1. From your Windows® desktop, click on Start, then select My Computer. Do either one of the original motherboard BIOS file to a bootable floppy disk in...
2.1 Managing and Updating Your BIOS The following to create a bootable floppy disk. ASUS CrashFree BIOS 2 - Refer to the corresponding section for each utility. • Save a copy of the following utilities allow you need to restore the BIOS in ... and update the motherboard Basic Input/Output System (BIOS) setup. 1. e. AFUDOS (Updates the BIOS in case the system BIOS fails or gets corrupted. 1. From your Windows® desktop, click on Start, then select My Computer. Do either one of the original motherboard BIOS file to a bootable floppy disk in...

Motherboard DIY Troubleshooting Guide
Page 42
... items. If an item is user-configurable, you can change the value of a field, select it then press to display a pop-up window with the configuration options for that is highlighted when selected. You cannot select an item that menu. To change the value of a menu... highlighted item on the screen. A configurable field is enclosed in brackets, and is not user-configurable. Refer to "2.2.7 Pop-up window". 2.2.7 Pop-up window Select a menu item then press to display a list of the selected item. 2-10 Chapter 2: BIOS Information
... items. If an item is user-configurable, you can change the value of a field, select it then press to display a pop-up window with the configuration options for that is highlighted when selected. You cannot select an item that menu. To change the value of a menu... highlighted item on the screen. A configurable field is enclosed in brackets, and is not user-configurable. Refer to "2.2.7 Pop-up window". 2.2.7 Pop-up window Select a menu item then press to display a list of the selected item. 2-10 Chapter 2: BIOS Information
Motherboard DIY Troubleshooting Guide
Page 61
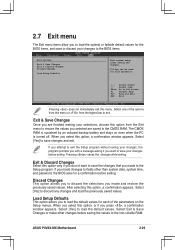
...ESC Select Screen Select Item Go to load the default values. Pressing saves the changes while exiting. ASUS P4V8X-MX Motherboard 2-29 Select one of the parameters on even when the PC is sustained by an onboard...be used for each of the options from this option, a confirmation window appears. When you select this menu. Pressing does not immediately exit this option, or if you press ,... a confirmation window appears. If you attempt to exit the Setup program without saving your changes, the program ...
...ESC Select Screen Select Item Go to load the default values. Pressing saves the changes while exiting. ASUS P4V8X-MX Motherboard 2-29 Select one of the parameters on even when the PC is sustained by an onboard...be used for each of the options from this option, a confirmation window appears. When you select this menu. Pressing does not immediately exit this option, or if you press ,... a confirmation window appears. If you attempt to exit the Setup program without saving your changes, the program ...
Motherboard DIY Troubleshooting Guide
Page 63
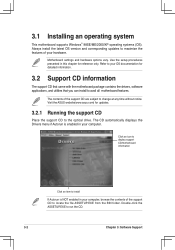
...CD/motherboard information Click an item to install If Autorun is enabled in this chapter for reference only. Visit the ASUS website(www.asus.com) for detailed information. 3.2 Support CD information The support CD that came with the motherboard package contains the drivers...3-2 Chapter 3: Software Support Motherboard settings and hardware options vary. Refer to your computer. 3.1 Installing an operating system This motherboard supports Windows® 98SE/ME/2000/XP operating systems (OS). Use the setup procedures presented in your OS documentation for updates. 3.2.1 Running the...
...CD/motherboard information Click an item to install If Autorun is enabled in this chapter for reference only. Visit the ASUS website(www.asus.com) for detailed information. 3.2 Support CD information The support CD that came with the motherboard package contains the drivers...3-2 Chapter 3: Software Support Motherboard settings and hardware options vary. Refer to your computer. 3.1 Installing an operating system This motherboard supports Windows® 98SE/ME/2000/XP operating systems (OS). Use the setup procedures presented in your OS documentation for updates. 3.2.1 Running the...
Motherboard DIY Troubleshooting Guide
Page 67
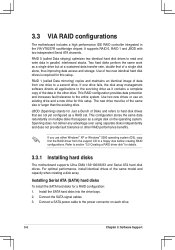
... but at a sustained data transfer rate, double that appear as a single disk on the operating system. Use two new drives or use either Windows® XP or Windows® 2000 operating system (OS), copy first the RAID driver from one drive fails, the disk array management software directs all applications to...
... but at a sustained data transfer rate, double that appear as a single disk on the operating system. Use two new drives or use either Windows® XP or Windows® 2000 operating system (OS), copy first the RAID driver from one drive fails, the disk array management software directs all applications to...
Motherboard DIY Troubleshooting Guide
Page 71
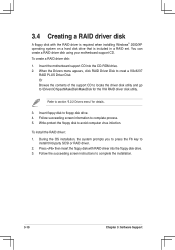
... disk utility. Refer to \Drivers\Chipset\MakeDisk\MakeDisk for details. 3. Press then insert the floppy disk with the RAID driver is required when installing Windows® 2000/XP operating system on a hard disk drive that is included in a RAID set. Insert floppy disk to complete the installation. 3-10 Chapter...
... disk utility. Refer to \Drivers\Chipset\MakeDisk\MakeDisk for details. 3. Press then insert the floppy disk with the RAID driver is required when installing Windows® 2000/XP operating system on a hard disk drive that is included in a RAID set. Insert floppy disk to complete the installation. 3-10 Chapter...


