Motherboard DIY Troubleshooting Guide
Page 4
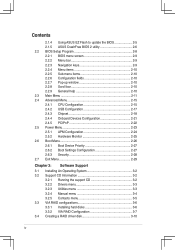
... Flash to update the BIOS 2-5 2.1.5 ASUS CrashFree BIOS 2 utility 2-6 2.2 BIOS Setup Program 2-8 2.2.1 BIOS menu screen 2-9 2.2.2 Menu bar 2-9 2.2.3 Navigation keys 2-9 2.2.4 Menu items 2-10 2.2.5 Sub-menu items 2-10 2.2.6 Con... Support 3.1 Installing An Operating System 3-2 3.2 Support CD Information 3-2 3.2.1 Running the support CD 3-2 3.2.2 Drivers menu 3-3 3.2.3 Utilities menu 3-3 3.2.4 Manual menu 3-4 3.2.5 Contacts menu 3-5 3.3 VIA RAID configurations 3-6 3.3.1 Installing hard disks 3-6 3.3.2 VIA RAID Configuration 3-7 3.4 Creating a RAID driver disk 3-10 iv
... Flash to update the BIOS 2-5 2.1.5 ASUS CrashFree BIOS 2 utility 2-6 2.2 BIOS Setup Program 2-8 2.2.1 BIOS menu screen 2-9 2.2.2 Menu bar 2-9 2.2.3 Navigation keys 2-9 2.2.4 Menu items 2-10 2.2.5 Sub-menu items 2-10 2.2.6 Con... Support 3.1 Installing An Operating System 3-2 3.2 Support CD Information 3-2 3.2.1 Running the support CD 3-2 3.2.2 Drivers menu 3-3 3.2.3 Utilities menu 3-3 3.2.4 Manual menu 3-4 3.2.5 Contacts menu 3-5 3.3 VIA RAID configurations 3-6 3.3.1 Installing hard disks 3-6 3.3.2 VIA RAID Configuration 3-7 3.4 Creating a RAID driver disk 3-10 iv
Motherboard DIY Troubleshooting Guide
Page 8
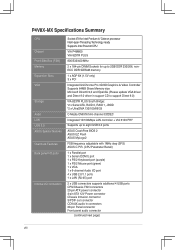
P4V8X-MX Specifications Summary CPU Chipset Front Side Bus (FSB) Memory Expansion Slots VGA Storage Audio LAN USB 2.0 ASUS Special features Overclock Features Back panel I/O ports Internal I/O connectors Socket 478 for Intel Pentium 4/ Celeron processor Intel Hyper-Threading Technology...and OpenGL (Please update VGA driver and Direct 9.0 driver in support CD to support Direct 9.0) VIA 8237R PLUS South Bridge: *2 x Serial ATA, RAID 0, RAID 1, JBOD *2 x UltraDMA 133/100/66/33 C-Media CMI9761A 6-channel CODEC Integrated 10/100Mbps LAN controller + VIA 6103 PHY Supports up to eight USB 2.0...
P4V8X-MX Specifications Summary CPU Chipset Front Side Bus (FSB) Memory Expansion Slots VGA Storage Audio LAN USB 2.0 ASUS Special features Overclock Features Back panel I/O ports Internal I/O connectors Socket 478 for Intel Pentium 4/ Celeron processor Intel Hyper-Threading Technology...and OpenGL (Please update VGA driver and Direct 9.0 driver in support CD to support Direct 9.0) VIA 8237R PLUS South Bridge: *2 x Serial ATA, RAID 0, RAID 1, JBOD *2 x UltraDMA 133/100/66/33 C-Media CMI9761A 6-channel CODEC Integrated 10/100Mbps LAN controller + VIA 6103 PHY Supports up to eight USB 2.0...
Motherboard DIY Troubleshooting Guide
Page 45
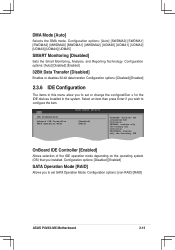
...: disables the integrated IDE Controller. Configuration options: [non-RAID] [RAID] ASUS P4V8X-MX Motherboard 2-13 Configuration options: [Disabled] [Enabled] 2.3.6 IDE Configuration The items in the system. Configuration options: [Disabled] [Enabled] SATA Operation Mode [RAID] Allows you to set or change the configurat5ion s for the IDE devices installed in...
...: disables the integrated IDE Controller. Configuration options: [non-RAID] [RAID] ASUS P4V8X-MX Motherboard 2-13 Configuration options: [Disabled] [Enabled] 2.3.6 IDE Configuration The items in the system. Configuration options: [Disabled] [Enabled] SATA Operation Mode [RAID] Allows you to set or change the configurat5ion s for the IDE devices installed in...
Motherboard DIY Troubleshooting Guide
Page 59
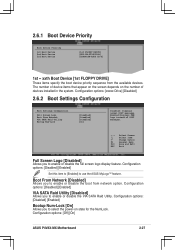
...xxxxx Drive] [Disabled] 2.6.2 Boot Settings Configuration Boot Settings Configuration Full Screen Logo Boot From Network VIA SATA Raid Utility Bootup Num-Lock [Disabled] [Disabled] [Disabled] [On] Disabled: Displays normal POST messages. 2.6.1 Boot Device Priority Boot ...[Off] [On] ASUS P4V8X-MX Motherboard 2-27 Boot From Network [Disabled] Allows you to use the ASUS MyLogo™ feature. Full Screen Logo [Disabled] Allows you to enable or disable the VIA SATA Raid Utility. Configuration options: [Disabled] [Enabled] VIA SATA Raid Utility [Disabled] Allows...
...xxxxx Drive] [Disabled] 2.6.2 Boot Settings Configuration Boot Settings Configuration Full Screen Logo Boot From Network VIA SATA Raid Utility Bootup Num-Lock [Disabled] [Disabled] [Disabled] [On] Disabled: Displays normal POST messages. 2.6.1 Boot Device Priority Boot ...[Off] [On] ASUS P4V8X-MX Motherboard 2-27 Boot From Network [Disabled] Allows you to use the ASUS MyLogo™ feature. Full Screen Logo [Disabled] Allows you to enable or disable the VIA SATA Raid Utility. Configuration options: [Disabled] [Enabled] VIA SATA Raid Utility [Disabled] Allows...

Motherboard DIY Troubleshooting Guide
Page 64
SATA Driver Install SATA Driver. RAID Driver Disk Install RAID Driver Disk. 3.2.2 Drivers menu The drivers menu shows the available device drivers if the system detects installed devices. USB 2.0 Driver Install USB 2.0 Driver. Install the ... safe. C-Mediaʼs Xear 3D Driver Install C-Mediaʼs Xear 3D Driver. LAN Driver Install LAN Driver. ASUS PC Probe ASUS PC Probe can monitor Fan Speed, Voltage, and CPU Temperature to activate the devices. ASUS P4V8X-MX Motherboard 3-3 Via Chipset Driver Install Chipset Driver. The screen display and drivers option may not be the...
SATA Driver Install SATA Driver. RAID Driver Disk Install RAID Driver Disk. 3.2.2 Drivers menu The drivers menu shows the available device drivers if the system detects installed devices. USB 2.0 Driver Install USB 2.0 Driver. Install the ... safe. C-Mediaʼs Xear 3D Driver Install C-Mediaʼs Xear 3D Driver. LAN Driver Install LAN Driver. ASUS PC Probe ASUS PC Probe can monitor Fan Speed, Voltage, and CPU Temperature to activate the devices. ASUS P4V8X-MX Motherboard 3-3 Via Chipset Driver Install Chipset Driver. The screen display and drivers option may not be the...

Motherboard DIY Troubleshooting Guide
Page 66
ASUS P4V8X-MX Motherboard 3-5 Raid Userʼs Manual Please install first Adobe Acrobat, then open the VIA8237 SATA Quick Setup Guide. 3.2.5 Contacts menu Click the Contact tab to display the ASUS contact information. You can also find this information on the inside front cover of this user guide.
ASUS P4V8X-MX Motherboard 3-5 Raid Userʼs Manual Please install first Adobe Acrobat, then open the VIA8237 SATA Quick Setup Guide. 3.2.5 Contacts menu Click the Contact tab to display the ASUS contact information. You can also find this information on the inside front cover of this user guide.
Motherboard DIY Troubleshooting Guide
Page 67
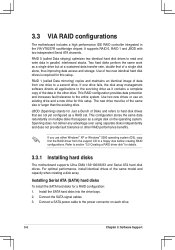
... drive bays. 2. Use of a single disk alone, thus improving data access and storage. Connect a SATA power cable to section "5.5 Creating a RAID driver disk" for this setup. The new drive must be of the same model and capacity when creating a disk array. Connect the SATA signal ... same size or larger than the existing drive. Installing Serial ATA (SATA) hard disks To install the SATA hard disks for a RAID configuration: 1. RAID 0 (called Data mirroring) copies and maintains an identical image of the data in the VIA VT8237R southbridge chipset. Two hard disks...
... drive bays. 2. Use of a single disk alone, thus improving data access and storage. Connect a SATA power cable to section "5.5 Creating a RAID driver disk" for this setup. The new drive must be of the same model and capacity when creating a disk array. Connect the SATA signal ... same size or larger than the existing drive. Installing Serial ATA (SATA) hard disks To install the SATA hard disks for a RAID configuration: 1. RAID 0 (called Data mirroring) copies and maintains an identical image of the data in the VIA VT8237R southbridge chipset. Two hard disks...
Motherboard DIY Troubleshooting Guide
Page 68
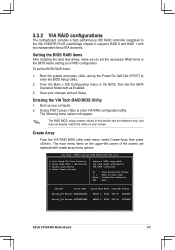
....99 XXXXXXX Serial_Ch1 Master XXXXXXXXXXX ARRAY 0 SATA 999.99 XXXXXXX ASUS P4V8X-MX Motherboard 3-7 From the Main > IDE Configuration menu in the VIA VT8237R PLUS southbridge chipset. Boot up your changes and exit Setup. VIA Tech. To set the necessary RAID items in this section are replaced with the hard disks attached...
....99 XXXXXXX Serial_Ch1 Master XXXXXXXXXXX ARRAY 0 SATA 999.99 XXXXXXX ASUS P4V8X-MX Motherboard 3-7 From the Main > IDE Configuration menu in the VIA VT8237R PLUS southbridge chipset. Boot up your changes and exit Setup. VIA Tech. To set the necessary RAID items in this section are replaced with the hard disks attached...
Motherboard DIY Troubleshooting Guide
Page 69
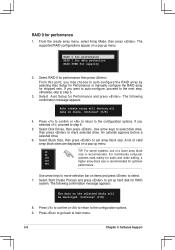
...to return to mark selected drive. Use arrow keys to select disk drive, then press to the configuration options. 9. Select RAID 0 for Performance and press . Auto create array will be destroyed. Use arrow keys to set array block size. The following con...rmation message appears: The data on items and press to auto-configure the RAID array by selecting Auto Setup for Performance or manually configure the RAID array for RAID system. RAID 0 for performance RAID 1 for data protection RAID SPAN for performance 1. If you may choose to select. 7. A list...
...to return to mark selected drive. Use arrow keys to select disk drive, then press to the configuration options. 9. Select RAID 0 for Performance and press . Auto create array will be destroyed. Use arrow keys to set array block size. The following con...rmation message appears: The data on items and press to auto-configure the RAID array by selecting Auto Setup for Performance or manually configure the RAID array for RAID system. RAID 0 for performance RAID 1 for data protection RAID SPAN for performance 1. If you may choose to select. 7. A list...
Motherboard DIY Troubleshooting Guide
Page 70
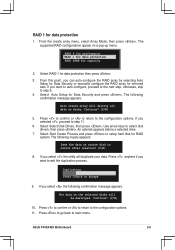
... to confirm or to return to step 11. 6. Select Select Disk Drives, then press . Duplicating... RAID 0 for performance RRAAIIDD 11 ffoorr ddaattaa pprrootteeccttiioonn RAID SPAN for Data Security and press . The following confirmation message appears. If you want to auto.... 3. The data on the selected disks will destroy all data on a pop-up menu. Select RAID 1 for RAID system. If you selected , proceed to the configuration options. ASUS P4V8X-MX Motherboard 3-9 Auto create array will be destroyed. An asterisk appears before a selected drive. 7. From ...
... to confirm or to return to step 11. 6. Select Select Disk Drives, then press . Duplicating... RAID 0 for performance RRAAIIDD 11 ffoorr ddaattaa pprrootteeccttiioonn RAID SPAN for Data Security and press . The following confirmation message appears. If you want to auto.... 3. The data on the selected disks will destroy all data on a pop-up menu. Select RAID 1 for RAID system. If you selected , proceed to the configuration options. ASUS P4V8X-MX Motherboard 3-9 Auto create array will be destroyed. An asterisk appears before a selected drive. 7. From ...
Motherboard DIY Troubleshooting Guide
Page 71
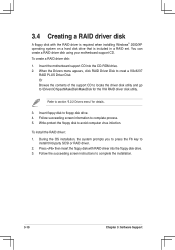
...Software Support Follow the succeeding screen instructions to floppy disk drive. 4. Write-protect the floppy disk to install third-party SCSI or RAID driver. 2. During the OS installation, the system prompts you to press the F6 key to avoid computer virus infection. When the Drivers menu appears,... click RAID Driver Disk to creat a VIA 8237 RAID PLUS Driver Disk Or Browse the contents of the support CD to locate the driver disk utility and go to section ...
...Software Support Follow the succeeding screen instructions to floppy disk drive. 4. Write-protect the floppy disk to install third-party SCSI or RAID driver. 2. During the OS installation, the system prompts you to press the F6 key to avoid computer virus infection. When the Drivers menu appears,... click RAID Driver Disk to creat a VIA 8237 RAID PLUS Driver Disk Or Browse the contents of the support CD to locate the driver disk utility and go to section ...


