Motherboard DIY Troubleshooting Guide
Page 2
..., AND SHOULD NOT BE CONSTRUED AS A COMMITMENT BY ASUS. ASUS ASSUMES NO RESPONSIBILITY OR LIABILITY FOR ANY ERRORS OR INACCURACIES THAT MAY APPEAR IN THIS MANUAL, INCLUDING THE PRODUCTS AND SOFTWARE DESCRIBED IN IT. IN NO EVENT SHALL ASUS, ITS DIRECTORS, OFFICERS, EMPLOYEES OR AGENTS BE LIABLE... or altered, unless such repair, modification of alteration is defaced or missing. No part of ASUSTeK COMPUTER INC. (" ASUS"). ASUS PROVIDES THIS MANUAL "AS IS" WITHOUT WARRANTY OF ANY KIND, EITHER EXPRESS OR IMPLIED, INCLUDING BUT NOT LIMITED TO THE IMPLIED WARRANTIES OR CONDITIONS ...
..., AND SHOULD NOT BE CONSTRUED AS A COMMITMENT BY ASUS. ASUS ASSUMES NO RESPONSIBILITY OR LIABILITY FOR ANY ERRORS OR INACCURACIES THAT MAY APPEAR IN THIS MANUAL, INCLUDING THE PRODUCTS AND SOFTWARE DESCRIBED IN IT. IN NO EVENT SHALL ASUS, ITS DIRECTORS, OFFICERS, EMPLOYEES OR AGENTS BE LIABLE... or altered, unless such repair, modification of alteration is defaced or missing. No part of ASUSTeK COMPUTER INC. (" ASUS"). ASUS PROVIDES THIS MANUAL "AS IS" WITHOUT WARRANTY OF ANY KIND, EITHER EXPRESS OR IMPLIED, INCLUDING BUT NOT LIMITED TO THE IMPLIED WARRANTIES OR CONDITIONS ...
Motherboard DIY Troubleshooting Guide
Page 4
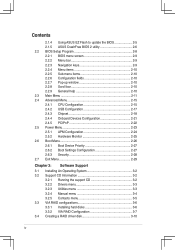
... Flash to update the BIOS 2-5 2.1.5 ASUS CrashFree BIOS 2 utility 2-6 2.2 BIOS Setup Program 2-8 2.2.1 BIOS menu screen 2-9 2.2.2 Menu bar 2-9 2.2.3 Navigation keys 2-9 2.2.4 Menu items 2-10 2.2.5 Sub-menu...29 Chapter 3: Software Support 3.1 Installing An Operating System 3-2 3.2 Support CD Information 3-2 3.2.1 Running the support CD 3-2 3.2.2 Drivers menu 3-3 3.2.3 Utilities menu 3-3 3.2.4 Manual menu 3-4 3.2.5 Contacts menu 3-5 3.3 VIA RAID configurations 3-6 3.3.1 Installing hard disks 3-6 3.3.2 VIA RAID Configuration 3-7 3.4 Creating a RAID driver disk 3-10 iv
... Flash to update the BIOS 2-5 2.1.5 ASUS CrashFree BIOS 2 utility 2-6 2.2 BIOS Setup Program 2-8 2.2.1 BIOS menu screen 2-9 2.2.2 Menu bar 2-9 2.2.3 Navigation keys 2-9 2.2.4 Menu items 2-10 2.2.5 Sub-menu...29 Chapter 3: Software Support 3.1 Installing An Operating System 3-2 3.2 Support CD Information 3-2 3.2.1 Running the support CD 3-2 3.2.2 Drivers menu 3-3 3.2.3 Utilities menu 3-3 3.2.4 Manual menu 3-4 3.2.5 Contacts menu 3-5 3.3 VIA RAID configurations 3-6 3.3.1 Installing hard disks 3-6 3.3.2 VIA RAID Configuration 3-7 3.4 Creating a RAID driver disk 3-10 iv
Motherboard DIY Troubleshooting Guide
Page 6
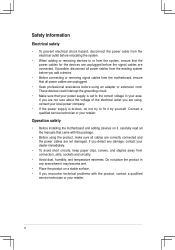
... power supply is set to the correct voltage in any damage, contact your retailer. If you detect any area where it , carefully read all the manuals that came with the package. • Before using the product, make sure all power cables from the existing system before you encounter technical problems with...
... power supply is set to the correct voltage in any damage, contact your retailer. If you detect any area where it , carefully read all the manuals that came with the package. • Before using the product, make sure all power cables from the existing system before you encounter technical problems with...

Motherboard DIY Troubleshooting Guide
Page 7
... BIOS Setup menus. Conventions used throughout this guide is organized This manual contains the following sources for additional information and for product and software updates. 1. Refer to complete a task. ASUS websites The ASUS websites worldwide provide updated information on the motherboard. • Chapter ...the standard package. Detailed descriptions of the BIOS parameters are not part of the support CD that you MUST follow to the ASUS contact information. 2. NOTE: Tips and additional information to the following parts: • Chapter 1: Product Introduction This chapter ...
... BIOS Setup menus. Conventions used throughout this guide is organized This manual contains the following sources for additional information and for product and software updates. 1. Refer to complete a task. ASUS websites The ASUS websites worldwide provide updated information on the motherboard. • Chapter ...the standard package. Detailed descriptions of the BIOS parameters are not part of the support CD that you MUST follow to the ASUS contact information. 2. NOTE: Tips and additional information to the following parts: • Chapter 1: Product Introduction This chapter ...

Motherboard DIY Troubleshooting Guide
Page 9
...P4V8X-MX Specifications Summary BIOS features Industry standard Manageability Support CD Accessary Form factor 4 Mb Flash ROM, AMI BIOS, PnP, DMI2.0, WfM2.0, SM BIOS 2.3, ACPI 2.0a, C.P.R. (CPU Parameter Recall), ASUS CrashFree BIOS2, ASUS EZ Flash, MyLogo2, PXE, RPL PCI 2.2, USB 2.0/1.1 WfM 2.0, DMI 2.0, WOL by PME, WOR by PME Drivers ASUS... PC Probe Anti-Virus Software (OEM version) ASUS LiveUpdate Utility 1 x UltraDMA 133/100/66 cable 1 x Serial ATA / Power cable 1 x FDD cable Userʼs Manual I/O shield Micro ATX Form Factor, 9.6" x 8" (...
...P4V8X-MX Specifications Summary BIOS features Industry standard Manageability Support CD Accessary Form factor 4 Mb Flash ROM, AMI BIOS, PnP, DMI2.0, WfM2.0, SM BIOS 2.3, ACPI 2.0a, C.P.R. (CPU Parameter Recall), ASUS CrashFree BIOS2, ASUS EZ Flash, MyLogo2, PXE, RPL PCI 2.2, USB 2.0/1.1 WfM 2.0, DMI 2.0, WOL by PME, WOR by PME Drivers ASUS... PC Probe Anti-Virus Software (OEM version) ASUS LiveUpdate Utility 1 x UltraDMA 133/100/66 cable 1 x Serial ATA / Power cable 1 x FDD cable Userʼs Manual I/O shield Micro ATX Form Factor, 9.6" x 8" (...
Motherboard DIY Troubleshooting Guide
Page 32
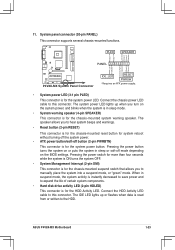
...disk drive activity LED (2-pin HDLED) This connector is for the chassis-mounted system warning speaker. Connect the HDD Activity LED cable to manually place the system into a suspend mode, or "green" mode. Pressing the power switch for more than four seconds while the system ...or soft-off button (2-pin PWRBTN) This connector is for the system power LED. ASUS P4V8X-MX Motherboard 1-23 PLED SPEAKER PLED+ PLED+5V Ground Ground Speaker PANEL R +5V IDELED PWR Ground Reset Ground P4V8X-MX P4V8X-MX System Panel Connector IDE_LED RESET PWRSW * Requires an ATX power supply. • System...
...disk drive activity LED (2-pin HDLED) This connector is for the chassis-mounted system warning speaker. Connect the HDD Activity LED cable to manually place the system into a suspend mode, or "green" mode. Pressing the power switch for more than four seconds while the system ...or soft-off button (2-pin PWRBTN) This connector is for the system power LED. ASUS P4V8X-MX Motherboard 1-23 PLED SPEAKER PLED+ PLED+5V Ground Ground Speaker PANEL R +5V IDELED PWR Ground Reset Ground P4V8X-MX P4V8X-MX System Panel Connector IDE_LED RESET PWRSW * Requires an ATX power supply. • System...
Motherboard DIY Troubleshooting Guide
Page 48
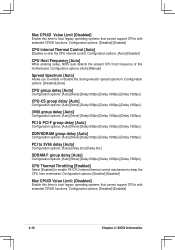
... enable P4 CPU internal thermal control mechanism to boot legacy operating systems that cannot support CPUs with extended CPUID functions. Configuration options: [Auto] [Manual] Spread Spectrum [Auto] Allows you to boot legacy operating systems that cannot support CPUs with extended CPUID functions. Configuration options: [Disabled] [Enabled] CPU...
... enable P4 CPU internal thermal control mechanism to boot legacy operating systems that cannot support CPUs with extended CPUID functions. Configuration options: [Auto] [Manual] Spread Spectrum [Auto] Allows you to boot legacy operating systems that cannot support CPUs with extended CPUID functions. Configuration options: [Disabled] [Enabled] CPU...
Motherboard DIY Troubleshooting Guide
Page 65
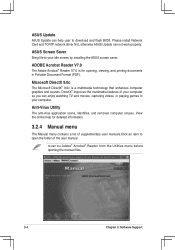
...Card and TCP/IP network driver first, otherwise ASUS Update can help for opening the manual files. 3-4 Chapter 3: Software Support Anti-Virus Utility The anti-virus application scans, identifies, and removes computer viruses. ASUS Screen Saver Bring life to your computer. ADOBE Acrobat... DirectX® improves the multimedia features of the user manual Install the Adobe® Acrobat® Reader from the Utilities menu before opening , viewing, and printing documents in your idle screen by installing the ASUS screen saver. View the online help user to open ...
...Card and TCP/IP network driver first, otherwise ASUS Update can help for opening the manual files. 3-4 Chapter 3: Software Support Anti-Virus Utility The anti-virus application scans, identifies, and removes computer viruses. ASUS Screen Saver Bring life to your computer. ADOBE Acrobat... DirectX® improves the multimedia features of the user manual Install the Adobe® Acrobat® Reader from the Utilities menu before opening , viewing, and printing documents in your idle screen by installing the ASUS screen saver. View the online help user to open ...

Motherboard DIY Troubleshooting Guide
Page 66
You can also find this information on the inside front cover of this user guide. ASUS P4V8X-MX Motherboard 3-5 Raid Userʼs Manual Please install first Adobe Acrobat, then open the VIA8237 SATA Quick Setup Guide. 3.2.5 Contacts menu Click the Contact tab to display the ASUS contact information.
You can also find this information on the inside front cover of this user guide. ASUS P4V8X-MX Motherboard 3-5 Raid Userʼs Manual Please install first Adobe Acrobat, then open the VIA8237 SATA Quick Setup Guide. 3.2.5 Contacts menu Click the Contact tab to display the ASUS contact information.
Motherboard DIY Troubleshooting Guide
Page 69
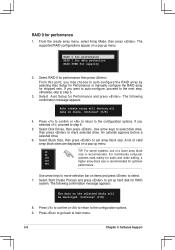
... 9. 5. Auto create array will be destroyed. Press to confirm or to return to auto-configure the RAID array by selecting Auto Setup for Performance or manually configure the RAID array for optimum 64K performance. A list of valid array block sizes are displayed on disks, Continue? (Y/N) 4. Select Start Create Process...
... 9. 5. Auto create array will be destroyed. Press to confirm or to return to auto-configure the RAID array by selecting Auto Setup for Performance or manually configure the RAID array for optimum 64K performance. A list of valid array block sizes are displayed on disks, Continue? (Y/N) 4. Select Start Create Process...
Motherboard DIY Troubleshooting Guide
Page 70
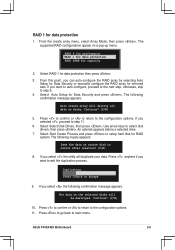
...the configuration options. 11. If you can auto-configure the RAID array by selecting Auto Setup for Data Security or manually configure the RAID array for mirrored sets. Select Start Create Process and press to exit the duplication process. Continue?...menu. RAID 1 for RAID system. Select RAID 1 for Data Security and press . If you select the utility will duplicate your data. Duplicating... ASUS P4V8X-MX Motherboard 3-9 Auto create array will be destroyed. Select Select Disk Drives, then press . An asterisk appears before a selected drive. 7. Select Auto...
...the configuration options. 11. If you can auto-configure the RAID array by selecting Auto Setup for Data Security or manually configure the RAID array for mirrored sets. Select Start Create Process and press to exit the duplication process. Continue?...menu. RAID 1 for RAID system. Select RAID 1 for Data Security and press . If you select the utility will duplicate your data. Duplicating... ASUS P4V8X-MX Motherboard 3-9 Auto create array will be destroyed. Select Select Disk Drives, then press . An asterisk appears before a selected drive. 7. Select Auto...


