
Motherboard DIY Troubleshooting Guide
Page 3
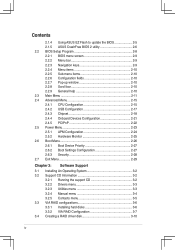
Contents Notices ...v Safety Information vi About This Guide vii P4V8X-MX Specifications Summary viii Chapter 1: Product Introduction 1.1 Welcome 1-2 1.2 Package Contents 1-2 1.3 Special Features 1-2 1.3.1 Product highlights 1-2 1.3.2 Innovative ASUS features 11.4 Before You Proceed 1-4 1.5 Motherboard Overview 1-5 1.5.1 Motherboard layout 1-5 1.5.2 Placement direction 1-6 1.5.3 Screw ... 1-17 1.10.2 Internal connectors 1-18 Chapter 2: BIOS Setup 2.1 Managing and Updating Your BIOS 2-2 2.1.1 Creating a bootable floppy disk 2-2 2.1.2 Using AFUDOS to copy the current...
Contents Notices ...v Safety Information vi About This Guide vii P4V8X-MX Specifications Summary viii Chapter 1: Product Introduction 1.1 Welcome 1-2 1.2 Package Contents 1-2 1.3 Special Features 1-2 1.3.1 Product highlights 1-2 1.3.2 Innovative ASUS features 11.4 Before You Proceed 1-4 1.5 Motherboard Overview 1-5 1.5.1 Motherboard layout 1-5 1.5.2 Placement direction 1-6 1.5.3 Screw ... 1-17 1.10.2 Internal connectors 1-18 Chapter 2: BIOS Setup 2.1 Managing and Updating Your BIOS 2-2 2.1.1 Creating a bootable floppy disk 2-2 2.1.2 Using AFUDOS to copy the current...
Motherboard DIY Troubleshooting Guide
Page 4
... Flash to update the BIOS 2-5 2.1.5 ASUS CrashFree BIOS 2 utility 2-6 2.2 BIOS Setup Program 2-8 2.2.1 BIOS menu screen 2-9 2.2.2 Menu bar 2-9 2.2.3 Navigation keys 2-9 2.2.4 Menu items 2-10 2.2.5 Sub-menu items 2-10 2.2.6 Configuration fields 2-10 2.2.7 Pop-up window 2-10 2.2.8 Scroll bar 2-...
... Flash to update the BIOS 2-5 2.1.5 ASUS CrashFree BIOS 2 utility 2-6 2.2 BIOS Setup Program 2-8 2.2.1 BIOS menu screen 2-9 2.2.2 Menu bar 2-9 2.2.3 Navigation keys 2-9 2.2.4 Menu items 2-10 2.2.5 Sub-menu items 2-10 2.2.6 Configuration fields 2-10 2.2.7 Pop-up window 2-10 2.2.8 Scroll bar 2-...

Motherboard DIY Troubleshooting Guide
Page 7
... the standard package. Where to find more information Refer to the ASUS contact information. 2. ASUS websites The ASUS websites worldwide provide updated information on the motherboard. • Chapter 2: BIOS Information This chapter tells how to complete a task. vii Conventions used throughout...of the following parts: • Chapter 1: Product Introduction This chapter describes the features of the jumpers and connectors on ASUS hardware and software products. It includes description of the motherboard and the new technology it supports. WARNING: Information to prevent...
... the standard package. Where to find more information Refer to the ASUS contact information. 2. ASUS websites The ASUS websites worldwide provide updated information on the motherboard. • Chapter 2: BIOS Information This chapter tells how to complete a task. vii Conventions used throughout...of the following parts: • Chapter 1: Product Introduction This chapter describes the features of the jumpers and connectors on ASUS hardware and software products. It includes description of the motherboard and the new technology it supports. WARNING: Information to prevent...
Motherboard DIY Troubleshooting Guide
Page 8
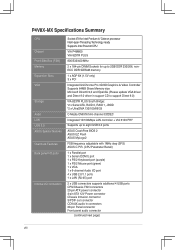
P4V8X-MX Specifications Summary CPU Chipset Front Side Bus (FSB) Memory Expansion Slots VGA Storage Audio LAN USB 2.0 ASUS Special features Overclock Features Back panel I/O ports Internal I/O connectors Socket 478 for Intel Pentium 4/ Celeron .../66/33 C-Media CMI9761A 6-channel CODEC Integrated 10/100Mbps LAN controller + VIA 6103 PHY Supports up to eight USB 2.0 ports ASUS CrashFree BIOS 2 ASUS EZ Flash ASUS MyLogo2 FSB frequency adjustable with 1MHz step (SFS) ASUS C.P.R. (CPU Parameter Recall) 1 x Parallel port 1 x Serial (COM1) port 1 x PS/2 Keyboard port (purple) 1 x PS/2 Mouse ...
P4V8X-MX Specifications Summary CPU Chipset Front Side Bus (FSB) Memory Expansion Slots VGA Storage Audio LAN USB 2.0 ASUS Special features Overclock Features Back panel I/O ports Internal I/O connectors Socket 478 for Intel Pentium 4/ Celeron .../66/33 C-Media CMI9761A 6-channel CODEC Integrated 10/100Mbps LAN controller + VIA 6103 PHY Supports up to eight USB 2.0 ports ASUS CrashFree BIOS 2 ASUS EZ Flash ASUS MyLogo2 FSB frequency adjustable with 1MHz step (SFS) ASUS C.P.R. (CPU Parameter Recall) 1 x Parallel port 1 x Serial (COM1) port 1 x PS/2 Keyboard port (purple) 1 x PS/2 Mouse ...

Motherboard DIY Troubleshooting Guide
Page 9
ix P4V8X-MX Specifications Summary BIOS features Industry standard Manageability Support CD Accessary Form factor 4 Mb Flash ROM, AMI BIOS, PnP, DMI2.0, WfM2.0, SM BIOS 2.3, ACPI 2.0a, C.P.R. (CPU Parameter Recall), ASUS CrashFree BIOS2, ASUS EZ Flash, MyLogo2, PXE, RPL PCI 2.2, USB 2.0/1.1 WfM 2.0, DMI 2.0, WOL by PME, WOR by PME Drivers ASUS PC Probe Anti-Virus Software (OEM...
ix P4V8X-MX Specifications Summary BIOS features Industry standard Manageability Support CD Accessary Form factor 4 Mb Flash ROM, AMI BIOS, PnP, DMI2.0, WfM2.0, SM BIOS 2.3, ACPI 2.0a, C.P.R. (CPU Parameter Recall), ASUS CrashFree BIOS2, ASUS EZ Flash, MyLogo2, PXE, RPL PCI 2.2, USB 2.0/1.1 WfM 2.0, DMI 2.0, WOL by PME, WOR by PME Drivers ASUS PC Probe Anti-Virus Software (OEM...
Motherboard DIY Troubleshooting Guide
Page 12
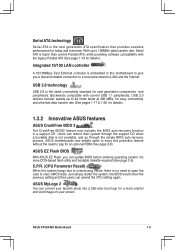
...boot logo for next generation components and peripherals. ASUS P4V8X-MX Motherboard 1-3 ASUS motherboards now enable users to enjoy this motherboard to give you can convert your screen. Just simply restart the system, the BIOS would show the previous setting and then users...controller is embedded in a support CD. ASUS MyLogo 2 You can update BIOS before entering operating system. With up to pay for details). 1.3.2 Innovative ASUS features ASUS CrashFree BIOS 2 The CrashFree BIOS2 feature now includes the BIOS auto-recovery function in this protection feature without...
...boot logo for next generation components and peripherals. ASUS P4V8X-MX Motherboard 1-3 ASUS motherboards now enable users to enjoy this motherboard to give you can convert your screen. Just simply restart the system, the BIOS would show the previous setting and then users...controller is embedded in a support CD. ASUS MyLogo 2 You can update BIOS before entering operating system. With up to pay for details). 1.3.2 Innovative ASUS features ASUS CrashFree BIOS 2 The CrashFree BIOS2 feature now includes the BIOS auto-recovery function in this protection feature without...

Motherboard DIY Troubleshooting Guide
Page 14
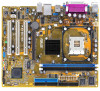
... 19.6cm(8.0in) Socket 478 Super I/O 4Mb BIOS PARALLEL PORT VGA USB1 USB56 USB2 CPU_FAN Bottom: Top: USB3 USB4 RJ-45 CHA_FAN VIA P4M800 Top:Line In R Center:Line Out Below:Mic In CR2032 3V Lithium Cell CMOS Power CLRTC FP_AUDIO CD AUX PCI1 P4V8X-MX PCI2 VIA VT8237R PLUS AUDIO SPDIF_OUT PCI3... CHASSIS SB_PWR USB78 PANEL SATA2 SATA1 PRI_IDE SEC_IDE ASUS P4V8X-MX Motherboard 1-5
... 19.6cm(8.0in) Socket 478 Super I/O 4Mb BIOS PARALLEL PORT VGA USB1 USB56 USB2 CPU_FAN Bottom: Top: USB3 USB4 RJ-45 CHA_FAN VIA P4M800 Top:Line In R Center:Line Out Below:Mic In CR2032 3V Lithium Cell CMOS Power CLRTC FP_AUDIO CD AUX PCI1 P4V8X-MX PCI2 VIA VT8237R PLUS AUDIO SPDIF_OUT PCI3... CHASSIS SB_PWR USB78 PANEL SATA2 SATA1 PRI_IDE SEC_IDE ASUS P4V8X-MX Motherboard 1-5

Motherboard DIY Troubleshooting Guide
Page 16
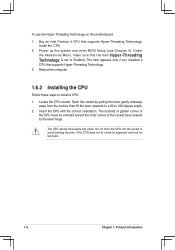
...systems, disable the Hyper-Threading Technology item in BIOS to enable the Hyper-Threading Technology item in BIOS before installing a supported operating system. 5. A fan and heat sink should be installed on Intel Hyper-Threading Technology 1. R P4V8X-MX P4V8X-MX CPU Socket 478 Gold Arrow Notes on top .... This motherboard supports Intel® Pentium® 4 CPUs with core speeds of the CPU to this indicator when orienting the CPU. ASUS P4V8X-MX Motherboard 1-7 It is usually indicated with a notch, and/or a golden square or triangle. Refer to prevent overheating. Under Linux, ...
...systems, disable the Hyper-Threading Technology item in BIOS to enable the Hyper-Threading Technology item in BIOS before installing a supported operating system. 5. A fan and heat sink should be installed on Intel Hyper-Threading Technology 1. R P4V8X-MX P4V8X-MX CPU Socket 478 Gold Arrow Notes on top .... This motherboard supports Intel® Pentium® 4 CPUs with core speeds of the CPU to this indicator when orienting the CPU. ASUS P4V8X-MX Motherboard 1-7 It is usually indicated with a notch, and/or a golden square or triangle. Refer to prevent overheating. Under Linux, ...
Motherboard DIY Troubleshooting Guide
Page 17
... an Intel Pentium 4 CPU that the item Hyper-Threading Technology is set to install a CPU: 1. Locate the CPU socket. Power up the system and enter BIOS Setup (see Chapter 4). The notched or golden corner of the CPU must be oriented toward the inner corner of the socket base nearest to 100...
... an Intel Pentium 4 CPU that the item Hyper-Threading Technology is set to install a CPU: 1. Locate the CPU socket. Power up the system and enter BIOS Setup (see Chapter 4). The notched or golden corner of the CPU must be oriented toward the inner corner of the socket base nearest to 100...
Motherboard DIY Troubleshooting Guide
Page 18
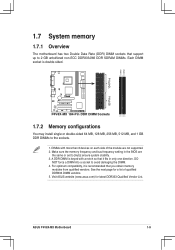
... a DIMM into a socket to [Auto] ensure system stability. 3. See the next page for latest DDR333 Qualified Vendor List. ASUS P4V8X-MX Motherboard 1-9 DIMMs with a notch so that it is recommended that support up to the sockets. 1. Make sure the memory frequency and bus... compatibility, it fits in the BIOS are not supported. 2. DIMM1 DIMM2 104 Pins 80 Pins 1.7 System memory 1.7.1 Overview The motherboard has two Double Data Rate (DDR) DIMM sockets that you obtain memory modules from qualified vendors. R P4V8X-MX P4V8X-MX 184-Pin DDR DIMM Sockets 1.7.2 Memory con...
... a DIMM into a socket to [Auto] ensure system stability. 3. See the next page for latest DDR333 Qualified Vendor List. ASUS P4V8X-MX Motherboard 1-9 DIMMs with a notch so that it is recommended that support up to the sockets. 1. Make sure the memory frequency and bus... compatibility, it fits in the BIOS are not supported. 2. DIMM1 DIMM2 104 Pins 80 Pins 1.7 System memory 1.7.1 Overview The motherboard has two Double Data Rate (DDR) DIMM sockets that you obtain memory modules from qualified vendors. R P4V8X-MX P4V8X-MX 184-Pin DDR DIMM Sockets 1.7.2 Memory con...
Motherboard DIY Troubleshooting Guide
Page 21
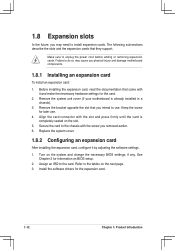
... they support. See Chapter 2 for the expansion card. 1-12 Chapter 1: Product Introduction Install the software drivers for information on the system and change the necessary BIOS settings, if any. Make sure to the card. Failure to do so may need to the tables on the slot. 5. Keep the screw for the... the documentation that came with the slot and press firmly until the card is already installed in a chassis). 3. Refer to install expansion cards. Turn on BIOS setup. 2.
... they support. See Chapter 2 for the expansion card. 1-12 Chapter 1: Product Introduction Install the software drivers for information on the system and change the necessary BIOS settings, if any. Make sure to the card. Failure to do so may need to the tables on the slot. 5. Keep the screw for the... the documentation that came with the slot and press firmly until the card is already installed in a chassis). 3. Refer to install expansion cards. Turn on BIOS setup. 2.
Motherboard DIY Troubleshooting Guide
Page 24
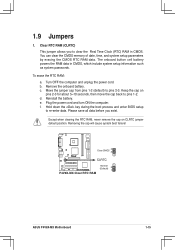
... battery. b. Keep the cap on CLRTC jumper default position. d. Hold down the key during the boot process and enter BIOS setup to pins 2-3. Clear CMOS 3 2 R CLRTC P4V8X-MX P4V8X-MX Clear RTC RAM Normal (Default) 2 1 ASUS P4V8X-MX Motherboard 1-15 The onboard button cell battery powers the RAM data in CMOS. Move the jumper cap from pins 1-2 (default...
... battery. b. Keep the cap on CLRTC jumper default position. d. Hold down the key during the boot process and enter BIOS setup to pins 2-3. Clear CMOS 3 2 R CLRTC P4V8X-MX P4V8X-MX Clear RTC RAM Normal (Default) 2 1 ASUS P4V8X-MX Motherboard 1-15 The onboard button cell battery powers the RAM data in CMOS. Move the jumper cap from pins 1-2 (default...
Motherboard DIY Troubleshooting Guide
Page 32
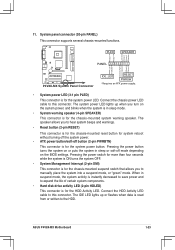
...; System Management Interrupt (2-pin SMI) This connector is for the system power LED. ASUS P4V8X-MX Motherboard 1-23 The speaker allows you turn on the BIOS settings. PLED SPEAKER PLED+ PLED+5V Ground Ground Speaker PANEL R +5V IDELED PWR Ground Reset Ground P4V8X-MX P4V8X-MX System Panel Connector IDE_LED RESET PWRSW * Requires an ATX power supply. •...
...; System Management Interrupt (2-pin SMI) This connector is for the system power LED. ASUS P4V8X-MX Motherboard 1-23 The speaker allows you turn on the BIOS settings. PLED SPEAKER PLED+ PLED+5V Ground Ground Speaker PANEL R +5V IDELED PWR Ground Reset Ground P4V8X-MX P4V8X-MX System Panel Connector IDE_LED RESET PWRSW * Requires an ATX power supply. •...
Motherboard DIY Troubleshooting Guide
Page 33
This chapter tells how to change the system settings through the BIOS Setup menus. Detailed descriptions of the BIOS parameters are also provided. 2 BIOS Setup
This chapter tells how to change the system settings through the BIOS Setup menus. Detailed descriptions of the BIOS parameters are also provided. 2 BIOS Setup
Motherboard DIY Troubleshooting Guide
Page 34
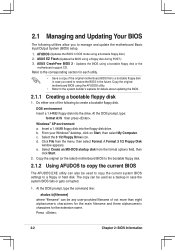
... the bootable floppy disk. 2.1.2 Using AFUDOS to create a bootable floppy disk. ASUS EZ Flash (Updates the BIOS using a bootable floppy disk or the motherboard support CD. Updates the BIOS using a floppy disk during POST.) 3. Select the 3 1/2 Floppy Drive icon. d. Select...the command line: afudos /o[filename] where "filename" can be used to copy the current system BIOS settings to the system builderʼs website for the extension name. ASUS CrashFree BIOS 2 - b. The copy can be used as a backup in DOS mode using the AFUDOS utility. •...
... the bootable floppy disk. 2.1.2 Using AFUDOS to create a bootable floppy disk. ASUS EZ Flash (Updates the BIOS using a bootable floppy disk or the motherboard support CD. Updates the BIOS using a floppy disk during POST.) 3. Select the 3 1/2 Floppy Drive icon. d. Select...the command line: afudos /o[filename] where "filename" can be used to copy the current system BIOS settings to the system builderʼs website for the extension name. ASUS CrashFree BIOS 2 - b. The copy can be used as a backup in DOS mode using the AFUDOS utility. •...
Motherboard DIY Troubleshooting Guide
Page 35
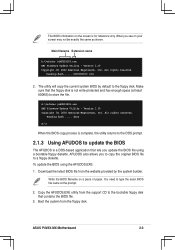
... CD to the bootable floppy disk that lets you to copy the original BIOS file to update the BIOS The AFUDOS is not write-protected and has enough space (at the prompt. 2. ASUS P4V8X-MX Motherboard 2-3 What you see on the screen is for reference only. done A:\> ...When the BIOS copy process is complete, the utility returns to the DOS prompt. 2.1.3 Using AFUDOS to a floppy diskette. Write the BIOS filename on a piece of paper....
... CD to the bootable floppy disk that lets you to copy the original BIOS file to update the BIOS The AFUDOS is not write-protected and has enough space (at the prompt. 2. ASUS P4V8X-MX Motherboard 2-3 What you see on the screen is for reference only. done A:\> ...When the BIOS copy process is complete, the utility returns to the DOS prompt. 2.1.3 Using AFUDOS to a floppy diskette. Write the BIOS filename on a piece of paper....
Motherboard DIY Troubleshooting Guide
Page 36
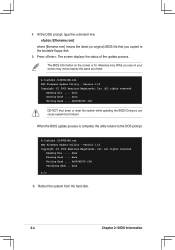
...;le ..... Doing so can cause system boot failure! A:\>afudos /iP4V8X-MX.rom AMI Firmware Update Utility - done Erasing flash .... The BIOS information on your screen may not be exactly the same as shown. A:\>afudos /iP4V8X-MX.rom AMI Firmware Update Utility - done Erasing flash .... All ...rights reserved. 4. At the DOS prompt, type the command line: afudos /i[filename.rom] where [filename.rom] means the latest (or original) BIOS file that you see...
...;le ..... Doing so can cause system boot failure! A:\>afudos /iP4V8X-MX.rom AMI Firmware Update Utility - done Erasing flash .... The BIOS information on your screen may not be exactly the same as shown. A:\>afudos /iP4V8X-MX.rom AMI Firmware Update Utility - done Erasing flash .... All ...rights reserved. 4. At the DOS prompt, type the command line: afudos /i[filename.rom] where [filename.rom] means the latest (or original) BIOS file that you see...
Motherboard DIY Troubleshooting Guide
Page 37
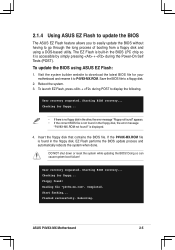
... builder website to download the latest BIOS file for floppy... is accessible by simply pressing + during POST to P4V8X-MX.ROM. Floppy found in the BIOS LPC chip so it to display the following. Start flashing... ASUS P4V8X-MX Motherboard 2-5 The EZ Flash is built...-in the floppy disk, EZ Flash performs the BIOS update process and automatically reboots the system when done. Rebooting. Starting BIOS recovery... If the P4V8X-MX.ROM file is found !...
... builder website to download the latest BIOS file for floppy... is accessible by simply pressing + during POST to P4V8X-MX.ROM. Floppy found in the BIOS LPC chip so it to display the following. Start flashing... ASUS P4V8X-MX Motherboard 2-5 The EZ Flash is built...-in the floppy disk, EZ Flash performs the BIOS update process and automatically reboots the system when done. Rebooting. Starting BIOS recovery... If the P4V8X-MX.ROM file is found !...
Motherboard DIY Troubleshooting Guide
Page 38
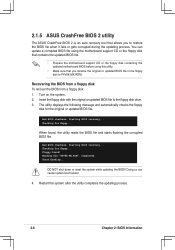
... when it fails or gets corrupted during the updating process. Checking for the original or updated BIOS file. Completed. 2.1.5 ASUS CrashFree BIOS 2 utility The ASUS CrashFree BIOS 2 is an auto recovery tool that you to P4V8X-MX.ROM. Bad BIOS checksum. Starting BIOS recovery... Checking for floppy... Turn on the system. 2. Insert the floppy disk with...
... when it fails or gets corrupted during the updating process. Checking for the original or updated BIOS file. Completed. 2.1.5 ASUS CrashFree BIOS 2 utility The ASUS CrashFree BIOS 2 is an auto recovery tool that you to P4V8X-MX.ROM. Bad BIOS checksum. Starting BIOS recovery... Checking for floppy... Turn on the system. 2. Insert the floppy disk with...

Motherboard DIY Troubleshooting Guide
Page 39
... on the system. 2. Remove any floppy disk from the support CD: 1. Starting BIOS recovery... CD-ROM found! Visit the ASUS website (www.asus.com) to the optical drive. 3. Reading file "P4V8X-MX.ROM". ASUS P4V8X-MX Motherboard 2-7 Checking for this motherboard. Bad BIOS checksum. Completed. The utility displays the following message and automatically checks the floppy...
... on the system. 2. Remove any floppy disk from the support CD: 1. Starting BIOS recovery... CD-ROM found! Visit the ASUS website (www.asus.com) to the optical drive. 3. Reading file "P4V8X-MX.ROM". ASUS P4V8X-MX Motherboard 2-7 Checking for this motherboard. Bad BIOS checksum. Completed. The utility displays the following message and automatically checks the floppy...


