Motherboard DIY Troubleshooting Guide
Page 6
.... Do not place the product in your area. Contact a qualified service technician or your retailer. Operation safety • Before installing the motherboard and adding devices on it may become wet. • Place the product on a stable surface. • If you add a device. •...where it , carefully read all power cables from the existing system before the signal cables are connected. If possible, disconnect all the manuals that the power cables for the devices are unplugged before you encounter technical problems with the package. • Before using , contact your...
.... Do not place the product in your area. Contact a qualified service technician or your retailer. Operation safety • Before installing the motherboard and adding devices on it may become wet. • Place the product on a stable surface. • If you add a device. •...where it , carefully read all power cables from the existing system before the signal cables are connected. If possible, disconnect all the manuals that the power cables for the devices are unplugged before you encounter technical problems with the package. • Before using , contact your...

Motherboard DIY Troubleshooting Guide
Page 7
...make sure that you perform certain tasks properly, take note of the following symbols used throughout this guide is organized This manual contains the following sources for additional information and for product and software updates. 1. About This Guide How this guide.... It also lists the hardware setup procedures that comes with the motherboard package. Where to find more information Refer to complete a task. ASUS websites The ASUS websites worldwide provide updated information on the motherboard. • Chapter 2: BIOS Information This chapter tells how to complete...
...make sure that you perform certain tasks properly, take note of the following symbols used throughout this guide is organized This manual contains the following sources for additional information and for product and software updates. 1. About This Guide How this guide.... It also lists the hardware setup procedures that comes with the motherboard package. Where to find more information Refer to complete a task. ASUS websites The ASUS websites worldwide provide updated information on the motherboard. • Chapter 2: BIOS Information This chapter tells how to complete...
Motherboard DIY Troubleshooting Guide
Page 32
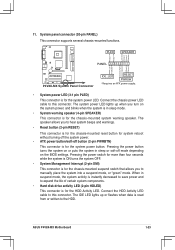
... is in suspend mode, the system activity is instantly decreased to save power and to this connector. ASUS P4V8X-MX Motherboard 1-23 11. Pressing the power switch for more than four seconds while the system is ON turns ...BIOS settings. PLED SPEAKER PLED+ PLED+5V Ground Ground Speaker PANEL R +5V IDELED PWR Ground Reset Ground P4V8X-MX P4V8X-MX System Panel Connector IDE_LED RESET PWRSW * Requires an ATX power supply. • System power LED (3-1 pin... connector. Connect the HDD Activity LED cable to manually place the system into a suspend mode, or "green" mode.
... is in suspend mode, the system activity is instantly decreased to save power and to this connector. ASUS P4V8X-MX Motherboard 1-23 11. Pressing the power switch for more than four seconds while the system is ON turns ...BIOS settings. PLED SPEAKER PLED+ PLED+5V Ground Ground Speaker PANEL R +5V IDELED PWR Ground Reset Ground P4V8X-MX P4V8X-MX System Panel Connector IDE_LED RESET PWRSW * Requires an ATX power supply. • System power LED (3-1 pin... connector. Connect the HDD Activity LED cable to manually place the system into a suspend mode, or "green" mode.
Motherboard DIY Troubleshooting Guide
Page 48
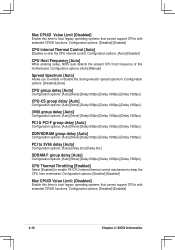
... Configuration options: [Auto] [Disabled] CPU Host Frequency [Auto] While entering setup, BIOS auto detects the present CPU host frequency of this motherboard. Configuration options: [Disabled] [Auto] CPU group delay [Auto] Configuration options: [Auto] [None] [Delay 500ps] [Delay 1000ps... [Disabled] [Enabled] CPU Internal Thermal Control [Auto] Disables or sets the CPU internal control. Configuration options: [Auto] [Manual] Spread Spectrum [Auto] Allows you to keep the CPU from overheated. Max CPUID Value Limit [Disabled] Enable this item to boot legacy ...
... Configuration options: [Auto] [Disabled] CPU Host Frequency [Auto] While entering setup, BIOS auto detects the present CPU host frequency of this motherboard. Configuration options: [Disabled] [Auto] CPU group delay [Auto] Configuration options: [Auto] [None] [Delay 500ps] [Delay 1000ps... [Disabled] [Enabled] CPU Internal Thermal Control [Auto] Disables or sets the CPU internal control. Configuration options: [Auto] [Manual] Spread Spectrum [Auto] Allows you to keep the CPU from overheated. Max CPUID Value Limit [Disabled] Enable this item to boot legacy ...

Motherboard DIY Troubleshooting Guide
Page 66
Raid Userʼs Manual Please install first Adobe Acrobat, then open the VIA8237 SATA Quick Setup Guide. 3.2.5 Contacts menu Click the Contact tab to display the ASUS contact information. ASUS P4V8X-MX Motherboard 3-5 You can also find this information on the inside front cover of this user guide.
Raid Userʼs Manual Please install first Adobe Acrobat, then open the VIA8237 SATA Quick Setup Guide. 3.2.5 Contacts menu Click the Contact tab to display the ASUS contact information. ASUS P4V8X-MX Motherboard 3-5 You can also find this information on the inside front cover of this user guide.
Motherboard DIY Troubleshooting Guide
Page 70
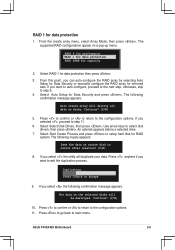
...will be destroyed. Use arrow keys to main menu. If you can auto-configure the RAID array by selecting Auto Setup for Data Security or manually configure the RAID array for mirrored sets. Press to go back to select disk drive/s, then press . From this point, you... if you select , the following confirmation message appears. The data on the selected disks will destroy all data on a pop-up menu. ASUS P4V8X-MX Motherboard 3-9 Press to confirm or to return to setup hard disk for data protection Press CTRL+E to step 11. 6. Select Start Create Process and press...
...will be destroyed. Use arrow keys to main menu. If you can auto-configure the RAID array by selecting Auto Setup for Data Security or manually configure the RAID array for mirrored sets. Press to go back to select disk drive/s, then press . From this point, you... if you select , the following confirmation message appears. The data on the selected disks will destroy all data on a pop-up menu. ASUS P4V8X-MX Motherboard 3-9 Press to confirm or to return to setup hard disk for data protection Press CTRL+E to step 11. 6. Select Start Create Process and press...


