Motherboard DIY Troubleshooting Guide
Page 2
... be reproduced, transmitted, transcribed, stored in a retrieval system, or translated into any means, except documentation kept by ASUS; or (2) the serial number of this manual may or may be registered trademarks or copyrights of their respective companies, and are used only for backup purposes, without... intent to the ownersʼ benefit, without the express written permission of alteration is defaced or missing. ASUS PROVIDES THIS MANUAL "AS IS" WITHOUT WARRANTY OF ANY KIND, EITHER EXPRESS OR IMPLIED, INCLUDING BUT NOT LIMITED TO THE IMPLIED WARRANTIES OR ...
... be reproduced, transmitted, transcribed, stored in a retrieval system, or translated into any means, except documentation kept by ASUS; or (2) the serial number of this manual may or may be registered trademarks or copyrights of their respective companies, and are used only for backup purposes, without... intent to the ownersʼ benefit, without the express written permission of alteration is defaced or missing. ASUS PROVIDES THIS MANUAL "AS IS" WITHOUT WARRANTY OF ANY KIND, EITHER EXPRESS OR IMPLIED, INCLUDING BUT NOT LIMITED TO THE IMPLIED WARRANTIES OR ...
Motherboard DIY Troubleshooting Guide
Page 4
... Flash to update the BIOS 2-5 2.1.5 ASUS CrashFree BIOS 2 utility 2-6 2.2 BIOS Setup Program 2-8 2.2.1 BIOS menu screen 2-9 2.2.2 Menu bar 2-9 2.2.3 Navigation keys 2-9 2.2.4 Menu items 2-10 2.2.5 Sub-menu...29 Chapter 3: Software Support 3.1 Installing An Operating System 3-2 3.2 Support CD Information 3-2 3.2.1 Running the support CD 3-2 3.2.2 Drivers menu 3-3 3.2.3 Utilities menu 3-3 3.2.4 Manual menu 3-4 3.2.5 Contacts menu 3-5 3.3 VIA RAID configurations 3-6 3.3.1 Installing hard disks 3-6 3.3.2 VIA RAID Configuration 3-7 3.4 Creating a RAID driver disk 3-10 iv
... Flash to update the BIOS 2-5 2.1.5 ASUS CrashFree BIOS 2 utility 2-6 2.2 BIOS Setup Program 2-8 2.2.1 BIOS menu screen 2-9 2.2.2 Menu bar 2-9 2.2.3 Navigation keys 2-9 2.2.4 Menu items 2-10 2.2.5 Sub-menu...29 Chapter 3: Software Support 3.1 Installing An Operating System 3-2 3.2 Support CD Information 3-2 3.2.1 Running the support CD 3-2 3.2.2 Drivers menu 3-3 3.2.3 Utilities menu 3-3 3.2.4 Manual menu 3-4 3.2.5 Contacts menu 3-5 3.3 VIA RAID configurations 3-6 3.3.1 Installing hard disks 3-6 3.3.2 VIA RAID Configuration 3-7 3.4 Creating a RAID driver disk 3-10 iv
Motherboard DIY Troubleshooting Guide
Page 6
... the electrical outlet you are using, contact your local power company. • If the power supply is set to fix it , carefully read all the manuals that all power cables are unplugged. • Seek professional assistance before using the product, make sure all power cables from the existing system before you...
... the electrical outlet you are using, contact your local power company. • If the power supply is set to fix it , carefully read all the manuals that all power cables are unplugged. • Seek professional assistance before using the product, make sure all power cables from the existing system before you...

Motherboard DIY Troubleshooting Guide
Page 7
...supports. Conventions used throughout this guide. CAUTION: Information to prevent damage to the components when trying to complete a task. ASUS websites The ASUS websites worldwide provide updated information on the motherboard. • Chapter 2: BIOS Information This chapter tells how to perform when ... settings through the BIOS Setup menus. Where to find more information Refer to aid in this guide is organized This manual contains the following sources for additional information and for product and software updates. 1. NOTE: Tips and additional information to the following...
...supports. Conventions used throughout this guide. CAUTION: Information to prevent damage to the components when trying to complete a task. ASUS websites The ASUS websites worldwide provide updated information on the motherboard. • Chapter 2: BIOS Information This chapter tells how to perform when ... settings through the BIOS Setup menus. Where to find more information Refer to aid in this guide is organized This manual contains the following sources for additional information and for product and software updates. 1. NOTE: Tips and additional information to the following...

Motherboard DIY Troubleshooting Guide
Page 9
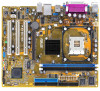
...P4V8X-MX Specifications Summary BIOS features Industry standard Manageability Support CD Accessary Form factor 4 Mb Flash ROM, AMI BIOS, PnP, DMI2.0, WfM2.0, SM BIOS 2.3, ACPI 2.0a, C.P.R. (CPU Parameter Recall), ASUS CrashFree BIOS2, ASUS EZ Flash, MyLogo2, PXE, RPL PCI 2.2, USB 2.0/1.1 WfM 2.0, DMI 2.0, WOL by PME, WOR by PME Drivers ASUS... PC Probe Anti-Virus Software (OEM version) ASUS LiveUpdate Utility 1 x UltraDMA 133/100/66 cable 1 x Serial ATA / Power cable 1 x FDD cable Userʼs Manual I/O shield Micro ATX Form Factor, 9.6" x 8" (...
...P4V8X-MX Specifications Summary BIOS features Industry standard Manageability Support CD Accessary Form factor 4 Mb Flash ROM, AMI BIOS, PnP, DMI2.0, WfM2.0, SM BIOS 2.3, ACPI 2.0a, C.P.R. (CPU Parameter Recall), ASUS CrashFree BIOS2, ASUS EZ Flash, MyLogo2, PXE, RPL PCI 2.2, USB 2.0/1.1 WfM 2.0, DMI 2.0, WOL by PME, WOR by PME Drivers ASUS... PC Probe Anti-Virus Software (OEM version) ASUS LiveUpdate Utility 1 x UltraDMA 133/100/66 cable 1 x Serial ATA / Power cable 1 x FDD cable Userʼs Manual I/O shield Micro ATX Form Factor, 9.6" x 8" (...
Motherboard DIY Troubleshooting Guide
Page 32
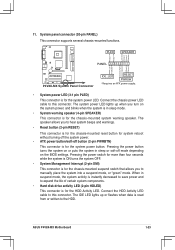
... and to manually place the system into a suspend mode, or "green" mode. Connect the chassis power LED cable to this connector. System panel connector (20-pin PANEL) This connector supports several chassis-mounted functions. PLED SPEAKER PLED+ PLED+5V Ground Ground Speaker PANEL R +5V IDELED PWR Ground Reset Ground P4V8X-MX P4V8X-MX System Panel... the system power button. Connect the HDD Activity LED cable to this connector. The IDE LED lights up when you turn on the BIOS settings. ASUS P4V8X-MX Motherboard 1-23 11.
... and to manually place the system into a suspend mode, or "green" mode. Connect the chassis power LED cable to this connector. System panel connector (20-pin PANEL) This connector supports several chassis-mounted functions. PLED SPEAKER PLED+ PLED+5V Ground Ground Speaker PANEL R +5V IDELED PWR Ground Reset Ground P4V8X-MX P4V8X-MX System Panel... the system power button. Connect the HDD Activity LED cable to this connector. The IDE LED lights up when you turn on the BIOS settings. ASUS P4V8X-MX Motherboard 1-23 11.
Motherboard DIY Troubleshooting Guide
Page 48
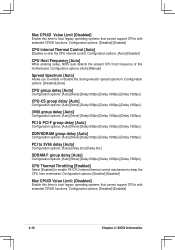
... mechanism to enable or disable the clock generator spread spectrum. Configuration options: [Disabled] [Enabled] 2-16 Chapter 2: BIOS Information Configuration options: [Auto] [Manual] Spread Spectrum [Auto] Allows you to keep the CPU from overheated. Configuration options: [Auto] [Disabled] CPU Host Frequency [Auto] While entering setup, BIOS...
... mechanism to enable or disable the clock generator spread spectrum. Configuration options: [Disabled] [Enabled] 2-16 Chapter 2: BIOS Information Configuration options: [Auto] [Manual] Spread Spectrum [Auto] Allows you to keep the CPU from overheated. Configuration options: [Auto] [Disabled] CPU Host Frequency [Auto] While entering setup, BIOS...
Motherboard DIY Troubleshooting Guide
Page 65
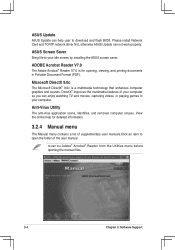
.... Microsoft DirectX 9.0c The Microsoft DirectX® 9.0c is for detailed information. 3.2.4 Manual menu The Manual menu contains a list of supplementary user manuals.Click an item to your computer. ASUS Screen Saver Bring life to open the folder of the user manual Install the Adobe® Acrobat® Reader from the Utilities menu before opening...
.... Microsoft DirectX 9.0c The Microsoft DirectX® 9.0c is for detailed information. 3.2.4 Manual menu The Manual menu contains a list of supplementary user manuals.Click an item to your computer. ASUS Screen Saver Bring life to open the folder of the user manual Install the Adobe® Acrobat® Reader from the Utilities menu before opening...

Motherboard DIY Troubleshooting Guide
Page 66
Raid Userʼs Manual Please install first Adobe Acrobat, then open the VIA8237 SATA Quick Setup Guide. 3.2.5 Contacts menu Click the Contact tab to display the ASUS contact information. You can also find this information on the inside front cover of this user guide. ASUS P4V8X-MX Motherboard 3-5
Raid Userʼs Manual Please install first Adobe Acrobat, then open the VIA8237 SATA Quick Setup Guide. 3.2.5 Contacts menu Click the Contact tab to display the ASUS contact information. You can also find this information on the inside front cover of this user guide. ASUS P4V8X-MX Motherboard 3-5
Motherboard DIY Troubleshooting Guide
Page 69
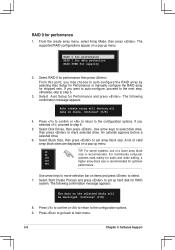
...;rmation message appears: The data on a pop-up menu. Use arrow keys to auto-configure the RAID array by selecting Auto Setup for Performance or manually configure the RAID array for performance 1. The following confirmation message appears. Continue? (Y/N) 8. Press to confirm or to return to...
...;rmation message appears: The data on a pop-up menu. Use arrow keys to auto-configure the RAID array by selecting Auto Setup for Performance or manually configure the RAID array for performance 1. The following confirmation message appears. Continue? (Y/N) 8. Press to confirm or to return to...
Motherboard DIY Troubleshooting Guide
Page 70
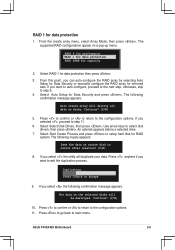
...menu. The following inquiry appears: Save the data on the selected disks will destroy all data on a pop-up menu. Continue? (Y/N) 10. ASUS P4V8X-MX Motherboard 3-9 The following confirmation message appears. Duplicating... The supported RAID configurations appear on disks, Continue? (Y/N) 5. Select Auto...Select Select Disk Drives, then press . If you can auto-configure the RAID array by selecting Auto Setup for Data Security or manually configure the RAID array for data protection Press CTRL+E to the configuration options. 11. If you select ,...
...menu. The following inquiry appears: Save the data on the selected disks will destroy all data on a pop-up menu. Continue? (Y/N) 10. ASUS P4V8X-MX Motherboard 3-9 The following confirmation message appears. Duplicating... The supported RAID configurations appear on disks, Continue? (Y/N) 5. Select Auto...Select Select Disk Drives, then press . If you can auto-configure the RAID array by selecting Auto Setup for Data Security or manually configure the RAID array for data protection Press CTRL+E to the configuration options. 11. If you select ,...


