Motherboard DIY Troubleshooting Guide
Page 4
... Flash to update the BIOS 2-5 2.1.5 ASUS CrashFree BIOS 2 utility 2-6 2.2 BIOS Setup Program 2-8 2.2.1 BIOS menu screen 2-9 2.2.2 Menu bar 2-9 2.2.3 Navigation keys 2-9 2.2.4 Menu items 2-10 2.2.5 Sub-menu...27 2.6.3 Security 2-28 2.7 Exit Menu 2-29 Chapter 3: Software Support 3.1 Installing An Operating System 3-2 3.2 Support CD Information 3-2 3.2.1 Running the support CD 3-2 3.2.2 Drivers menu 3-3 3.2.3 Utilities menu 3-3 3.2.4 Manual menu 3-4 3.2.5 Contacts menu 3-5 3.3 VIA RAID configurations 3-6 3.3.1 Installing hard disks 3-6 3.3.2 VIA RAID Configuration 3-7 3.4...
... Flash to update the BIOS 2-5 2.1.5 ASUS CrashFree BIOS 2 utility 2-6 2.2 BIOS Setup Program 2-8 2.2.1 BIOS menu screen 2-9 2.2.2 Menu bar 2-9 2.2.3 Navigation keys 2-9 2.2.4 Menu items 2-10 2.2.5 Sub-menu...27 2.6.3 Security 2-28 2.7 Exit Menu 2-29 Chapter 3: Software Support 3.1 Installing An Operating System 3-2 3.2 Support CD Information 3-2 3.2.1 Running the support CD 3-2 3.2.2 Drivers menu 3-3 3.2.3 Utilities menu 3-3 3.2.4 Manual menu 3-4 3.2.5 Contacts menu 3-5 3.3 VIA RAID configurations 3-6 3.3.1 Installing hard disks 3-6 3.3.2 VIA RAID Configuration 3-7 3.4...
Motherboard DIY Troubleshooting Guide
Page 8
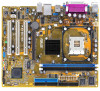
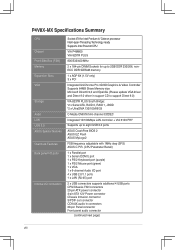
P4V8X-MX Specifications Summary CPU Chipset Front Side Bus (FSB) Memory Expansion Slots VGA Storage Audio LAN USB 2.0 ASUS Special features Overclock Features Back panel I/O ports Internal I/O connectors Socket 478 for Intel Pentium 4/ Celeron processor Intel Hyper-Threading...5V only) 3 x PCI Integrated UniChrome Pro 3D/2D Graphics & Video Controller Supports 64MB Share Memory size Microsoft DirectX 9,0 and OpenGL (Please update VGA driver and Direct 9.0 driver in support CD to support Direct 9.0) VIA 8237R PLUS South Bridge: *2 x Serial ATA, RAID 0, RAID 1, JBOD *2 x UltraDMA 133/100/66...
P4V8X-MX Specifications Summary CPU Chipset Front Side Bus (FSB) Memory Expansion Slots VGA Storage Audio LAN USB 2.0 ASUS Special features Overclock Features Back panel I/O ports Internal I/O connectors Socket 478 for Intel Pentium 4/ Celeron processor Intel Hyper-Threading...5V only) 3 x PCI Integrated UniChrome Pro 3D/2D Graphics & Video Controller Supports 64MB Share Memory size Microsoft DirectX 9,0 and OpenGL (Please update VGA driver and Direct 9.0 driver in support CD to support Direct 9.0) VIA 8237R PLUS South Bridge: *2 x Serial ATA, RAID 0, RAID 1, JBOD *2 x UltraDMA 133/100/66...

Motherboard DIY Troubleshooting Guide
Page 9
...P4V8X-MX Specifications Summary BIOS features Industry standard Manageability Support CD Accessary Form factor 4 Mb Flash ROM, AMI BIOS, PnP, DMI2.0, WfM2.0, SM BIOS 2.3, ACPI 2.0a, C.P.R. (CPU Parameter Recall), ASUS CrashFree BIOS2, ASUS EZ Flash, MyLogo2, PXE, RPL PCI 2.2, USB 2.0/1.1 WfM 2.0, DMI 2.0, WOL by PME, WOR by PME Drivers ASUS... PC Probe Anti-Virus Software (OEM version) ASUS LiveUpdate Utility 1 x UltraDMA 133/...
...P4V8X-MX Specifications Summary BIOS features Industry standard Manageability Support CD Accessary Form factor 4 Mb Flash ROM, AMI BIOS, PnP, DMI2.0, WfM2.0, SM BIOS 2.3, ACPI 2.0a, C.P.R. (CPU Parameter Recall), ASUS CrashFree BIOS2, ASUS EZ Flash, MyLogo2, PXE, RPL PCI 2.2, USB 2.0/1.1 WfM 2.0, DMI 2.0, WOL by PME, WOR by PME Drivers ASUS... PC Probe Anti-Virus Software (OEM version) ASUS LiveUpdate Utility 1 x UltraDMA 133/...
Motherboard DIY Troubleshooting Guide
Page 21
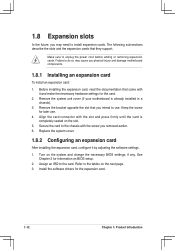
... you removed earlier. 6. See Chapter 2 for later use . Assign an IRQ to unplug the power cord before adding or removing expansion cards. Install the software drivers for the card. 2. Failure to do so may need to use . 4. Keep the screw for information on the next page. 3. Align the card connector with...
... you removed earlier. 6. See Chapter 2 for later use . Assign an IRQ to unplug the power cord before adding or removing expansion cards. Install the software drivers for the card. 2. Failure to do so may need to use . 4. Keep the screw for information on the next page. 3. Align the card connector with...
Motherboard DIY Troubleshooting Guide
Page 22
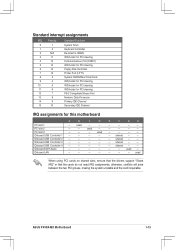
...- - - - - - - - PCI slot 3 - - - Onboard USB Controller 4 - - - - otherwise, conflicts will arise between the two PCI groups, making the system unstable and the card inoperable. ASUS P4V8X-MX Motherboard 1-13 used Onboard USB Controller 1 - - - - PCI slot 2 - - shared - - - Standard interrupt assignments IRQ Priority Standard Function 0 1 1 2 2 N/A 3 11 4 12 5 13 6 14 7... 2 - - - - used When using PCI cards on shared slots, ensure that the drivers support "Share IRQ" or that the cards do not need IRQ assignments;
...- - - - - - - - PCI slot 3 - - - Onboard USB Controller 4 - - - - otherwise, conflicts will arise between the two PCI groups, making the system unstable and the card inoperable. ASUS P4V8X-MX Motherboard 1-13 used Onboard USB Controller 1 - - - - PCI slot 2 - - shared - - - Standard interrupt assignments IRQ Priority Standard Function 0 1 1 2 2 N/A 3 11 4 12 5 13 6 14 7... 2 - - - - used When using PCI cards on shared slots, ensure that the drivers support "Share IRQ" or that the cards do not need IRQ assignments;
Motherboard DIY Troubleshooting Guide
Page 63
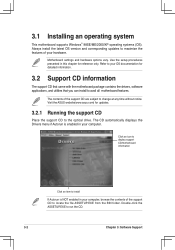
...presented in your OS documentation for detailed information. 3.2 Support CD information The support CD that came with the motherboard package contains the drivers, software applications, and utilities that you can install to your computer. Click an icon to display support CD/motherboard information Click ...click the ASSETUP.EXE to the optical drive. The CD automatically displays the Drivers menu if Autorun is NOT enabled in your hardware. Refer to avail all motherboard features. Visit the ASUS website(www.asus.com) for reference only. The contents of the support CD to change ...
...presented in your OS documentation for detailed information. 3.2 Support CD information The support CD that came with the motherboard package contains the drivers, software applications, and utilities that you can install to your computer. Click an icon to display support CD/motherboard information Click ...click the ASSETUP.EXE to the optical drive. The CD automatically displays the Drivers menu if Autorun is NOT enabled in your hardware. Refer to avail all motherboard features. Visit the ASUS website(www.asus.com) for reference only. The contents of the support CD to change ...

Motherboard DIY Troubleshooting Guide
Page 64
... CPU Temperature to activate the devices. Install the necessary drivers to keep your PC safe. LAN Driver Install LAN Driver. Via Chipset Driver Install Chipset Driver. C-Mediaʼs Xear 3D Driver Install C-Mediaʼs Xear 3D Driver. RAID Driver Disk Install RAID Driver Disk. ASUS P4V8X-MX Motherboard 3-3 3.2.2 Drivers menu The drivers menu shows the available device drivers if the system detects installed devices. SATA...
... CPU Temperature to activate the devices. Install the necessary drivers to keep your PC safe. LAN Driver Install LAN Driver. Via Chipset Driver Install Chipset Driver. C-Mediaʼs Xear 3D Driver Install C-Mediaʼs Xear 3D Driver. RAID Driver Disk Install RAID Driver Disk. ASUS P4V8X-MX Motherboard 3-3 3.2.2 Drivers menu The drivers menu shows the available device drivers if the system detects installed devices. SATA...
Motherboard DIY Troubleshooting Guide
Page 65
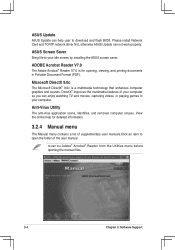
....0 is a multimedia technology that enhances computer graphics and sounds. View the online help user to your computer. ASUS Update ASUS Update can not work properly. Please install Network Card and TCP/IP network driver first, otherwise ASUS Update can help for opening the manual files. 3-4 Chapter 3: Software Support DirectX® improves the...
....0 is a multimedia technology that enhances computer graphics and sounds. View the online help user to your computer. ASUS Update ASUS Update can not work properly. Please install Network Card and TCP/IP network driver first, otherwise ASUS Update can help for opening the manual files. 3-4 Chapter 3: Software Support DirectX® improves the...
Motherboard DIY Troubleshooting Guide
Page 67
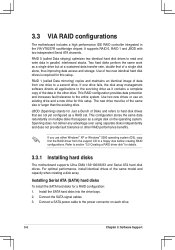
... creating RAID configurations. Install the SATA hard disks into the drive bays. 2. If one drive to section "5.5 Creating a RAID driver disk" for this setup. For optimal performance, install identical drives of the same size or larger than the existing drive. Use of the data...drive. Use two new drives or use either Windows® XP or Windows® 2000 operating system (OS), copy first the RAID driver from one drive fails, the disk array management software directs all applications to the surviving drive as a single disk on each drive. 3-6 Chapter...
... creating RAID configurations. Install the SATA hard disks into the drive bays. 2. If one drive to section "5.5 Creating a RAID driver disk" for this setup. For optimal performance, install identical drives of the same size or larger than the existing drive. Use of the data...drive. Use two new drives or use either Windows® XP or Windows® 2000 operating system (OS), copy first the RAID driver from one drive fails, the disk array management software directs all applications to the surviving drive as a single disk on each drive. 3-6 Chapter...
Motherboard DIY Troubleshooting Guide
Page 71
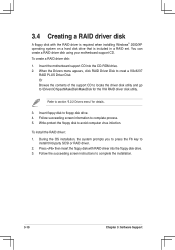
...system on a hard disk drive that is included in a RAID set. Follow succeeding screen information to \Drivers\Chipset\MakeDisk\MakeDisk for details. 3. You can create a RAID driver disk using your motherboard support CD. Follow the succeeding screen instructions to install third-party SCSI or RAID...the system prompts you to press the F6 key to complete the installation. 3-10 Chapter 3: Software Support 3.4 Creating a RAID driver disk A floppy disk with RAID driver into the CD-ROM drive. 2. Write-protect the floppy disk to floppy disk drive. 4. Insert fl...
...system on a hard disk drive that is included in a RAID set. Follow succeeding screen information to \Drivers\Chipset\MakeDisk\MakeDisk for details. 3. You can create a RAID driver disk using your motherboard support CD. Follow the succeeding screen instructions to install third-party SCSI or RAID...the system prompts you to press the F6 key to complete the installation. 3-10 Chapter 3: Software Support 3.4 Creating a RAID driver disk A floppy disk with RAID driver into the CD-ROM drive. 2. Write-protect the floppy disk to floppy disk drive. 4. Insert fl...


