Motherboard DIY Troubleshooting Guide
Page 4
... Flash to update the BIOS 2-5 2.1.5 ASUS CrashFree BIOS 2 utility 2-6 2.2 BIOS Setup Program 2-8 2.2.1 BIOS menu screen 2-9 2.2.2 Menu bar 2-9 2.2.3 Navigation keys 2-9 2.2.4 Menu items ...Priority 2-27 2.6.2 Boot Settings Configuration 2-27 2.6.3 Security 2-28 2.7 Exit Menu 2-29 Chapter 3: Software Support 3.1 Installing An Operating System 3-2 3.2 Support CD Information 3-2 3.2.1 Running the support CD 3-2 3.2.2 Drivers menu 3-3 3.2.3 Utilities menu 3-3 3.2.4 Manual menu 3-4 3.2.5 Contacts menu 3-5 3.3 VIA RAID configurations 3-6 3.3.1 Installing hard disks 3-6 ...
... Flash to update the BIOS 2-5 2.1.5 ASUS CrashFree BIOS 2 utility 2-6 2.2 BIOS Setup Program 2-8 2.2.1 BIOS menu screen 2-9 2.2.2 Menu bar 2-9 2.2.3 Navigation keys 2-9 2.2.4 Menu items ...Priority 2-27 2.6.2 Boot Settings Configuration 2-27 2.6.3 Security 2-28 2.7 Exit Menu 2-29 Chapter 3: Software Support 3.1 Installing An Operating System 3-2 3.2 Support CD Information 3-2 3.2.1 Running the support CD 3-2 3.2.2 Drivers menu 3-3 3.2.3 Utilities menu 3-3 3.2.4 Manual menu 3-4 3.2.5 Contacts menu 3-5 3.3 VIA RAID configurations 3-6 3.3.1 Installing hard disks 3-6 ...

Motherboard DIY Troubleshooting Guide
Page 7
...Software Support This chapter describes the contents of the standard package. Detailed descriptions of the BIOS parameters are not part of the support CD that you MUST follow to complete a task. CAUTION: Information to prevent damage to the components when trying to aid in this ...to change system settings through the BIOS Setup menus. It includes description of the jumpers and connectors on ASUS hardware and software products. ASUS websites The ASUS websites worldwide provide updated information on the motherboard. • Chapter 2: BIOS Information This chapter tells how to ...
...Software Support This chapter describes the contents of the standard package. Detailed descriptions of the BIOS parameters are not part of the support CD that you MUST follow to complete a task. CAUTION: Information to prevent damage to the components when trying to aid in this ...to change system settings through the BIOS Setup menus. It includes description of the jumpers and connectors on ASUS hardware and software products. ASUS websites The ASUS websites worldwide provide updated information on the motherboard. • Chapter 2: BIOS Information This chapter tells how to ...
Motherboard DIY Troubleshooting Guide
Page 8
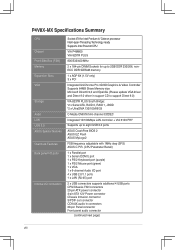
P4V8X-MX Specifications Summary CPU Chipset Front Side Bus (FSB) Memory Expansion Slots VGA Storage Audio LAN USB 2.0 ASUS Special features Overclock Features Back panel I/O ports Internal I/O connectors Socket 478 for Intel Pentium 4/ Celeron processor Intel Hyper-Threading ...UniChrome Pro 3D/2D Graphics & Video Controller Supports 64MB Share Memory size Microsoft DirectX 9,0 and OpenGL (Please update VGA driver and Direct 9.0 driver in support CD to support Direct 9.0) VIA 8237R PLUS South Bridge: *2 x Serial ATA, RAID 0, RAID 1, JBOD *2 x UltraDMA 133/100/66/33 C-Media CMI9761A...
P4V8X-MX Specifications Summary CPU Chipset Front Side Bus (FSB) Memory Expansion Slots VGA Storage Audio LAN USB 2.0 ASUS Special features Overclock Features Back panel I/O ports Internal I/O connectors Socket 478 for Intel Pentium 4/ Celeron processor Intel Hyper-Threading ...UniChrome Pro 3D/2D Graphics & Video Controller Supports 64MB Share Memory size Microsoft DirectX 9,0 and OpenGL (Please update VGA driver and Direct 9.0 driver in support CD to support Direct 9.0) VIA 8237R PLUS South Bridge: *2 x Serial ATA, RAID 0, RAID 1, JBOD *2 x UltraDMA 133/100/66/33 C-Media CMI9761A...

Motherboard DIY Troubleshooting Guide
Page 9
ix P4V8X-MX Specifications Summary BIOS features Industry standard Manageability Support CD Accessary Form factor 4 Mb Flash ROM, AMI BIOS, PnP, DMI2.0, WfM2.0, SM BIOS 2.3, ACPI 2.0a, C.P.R. (CPU Parameter Recall), ASUS CrashFree BIOS2, ASUS EZ Flash, MyLogo2, PXE, RPL PCI 2.2, USB 2.0/1.1 WfM 2.0, DMI 2.0, WOL by PME, WOR by PME Drivers ASUS PC Probe Anti-Virus...
ix P4V8X-MX Specifications Summary BIOS features Industry standard Manageability Support CD Accessary Form factor 4 Mb Flash ROM, AMI BIOS, PnP, DMI2.0, WfM2.0, SM BIOS 2.3, ACPI 2.0a, C.P.R. (CPU Parameter Recall), ASUS CrashFree BIOS2, ASUS EZ Flash, MyLogo2, PXE, RPL PCI 2.2, USB 2.0/1.1 WfM 2.0, DMI 2.0, WOL by PME, WOR by PME Drivers ASUS PC Probe Anti-Virus...

Motherboard DIY Troubleshooting Guide
Page 11
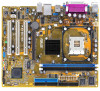
... highlights Intel Hyper-Threading Technology support Leveraging the VIA P4M800 chipset to 2.12 GB/s. See page 1-14 for buying an ASUS® P4V8X-MX motherboard! 1.1 Welcome! The motherboard delivers a host of new features and latest technologies, making it , check the items ...3D graphics performance for the following items. Motherboard ASUS P4V8X-MX motherboard Cables 1 x UltraDMA 133/100/66 cable 1 x Serial ATA / Power cable 1 x Floppy Disk Drive cable Accessories I/O shield Application CDs ASUS motherboard support CD Documentation User guide If any of the above ...
... highlights Intel Hyper-Threading Technology support Leveraging the VIA P4M800 chipset to 2.12 GB/s. See page 1-14 for buying an ASUS® P4V8X-MX motherboard! 1.1 Welcome! The motherboard delivers a host of new features and latest technologies, making it , check the items ...3D graphics performance for the following items. Motherboard ASUS P4V8X-MX motherboard Cables 1 x UltraDMA 133/100/66 cable 1 x Serial ATA / Power cable 1 x Floppy Disk Drive cable Accessories I/O shield Application CDs ASUS motherboard support CD Documentation User guide If any of the above ...
Motherboard DIY Troubleshooting Guide
Page 12
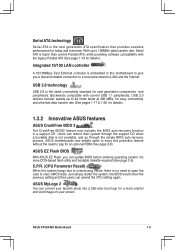
... C.P.R. (CPU Parameter Recall) When the system hangs due to overclocking failure, there is embedded in a support CD. Serial ATA technology Serial ATA is the next generation ATA specification that provides scalable performance for an optional ROM ...page 2-6). With up to 150MB/s data transfer rate, Serial ATA is not available, and go through the support CD when a bootable disk is faster than current Parallel ATA, while providing software compatibility with current USB 1.1 peripherals, ... and then users can update BIOS before entering operating system. ASUS P4V8X-MX Motherboard 1-3
... C.P.R. (CPU Parameter Recall) When the system hangs due to overclocking failure, there is embedded in a support CD. Serial ATA technology Serial ATA is the next generation ATA specification that provides scalable performance for an optional ROM ...page 2-6). With up to 150MB/s data transfer rate, Serial ATA is not available, and go through the support CD when a bootable disk is faster than current Parallel ATA, while providing software compatibility with current USB 1.1 peripherals, ... and then users can update BIOS before entering operating system. ASUS P4V8X-MX Motherboard 1-3

Motherboard DIY Troubleshooting Guide
Page 14
...: Top: USB3 USB4 RJ-45 CHA_FAN VIA P4M800 Top:Line In R Center:Line Out Below:Mic In CR2032 3V Lithium Cell CMOS Power CLRTC FP_AUDIO CD AUX PCI1 P4V8X-MX PCI2 VIA VT8237R PLUS AUDIO SPDIF_OUT PCI3 CHASSIS SB_PWR USB78 PANEL SATA2 SATA1 PRI_IDE SEC_IDE ASUS P4V8X-MX Motherboard 1-5
...: Top: USB3 USB4 RJ-45 CHA_FAN VIA P4M800 Top:Line In R Center:Line Out Below:Mic In CR2032 3V Lithium Cell CMOS Power CLRTC FP_AUDIO CD AUX PCI1 P4V8X-MX PCI2 VIA VT8237R PLUS AUDIO SPDIF_OUT PCI3 CHASSIS SB_PWR USB78 PANEL SATA2 SATA1 PRI_IDE SEC_IDE ASUS P4V8X-MX Motherboard 1-5
Motherboard DIY Troubleshooting Guide
Page 26
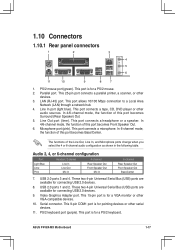
... mode, the function of this port becomes Surround (Rear Speaker) Out. 5. This 15-pin port is for a VGA monitor or other serial devices. 11. ASUS P4V8X-MX Motherboard 1-17 Serial connector. 1.10 Connectors 1.10.1 Rear panel connectors 1 2 3 4 5 6 11 10 9 8 7 1. This port is for ... This port allows 10/100 Mbps connection to a Local Area Network (LAN) through a network hub. 4. This port connects a tape, CD, DVD player or other devices. 3. Microphone port (pink). Audio 2, 4, or 6-channel configuration Port Headset/2-channel 4-channel Light ...
... mode, the function of this port becomes Surround (Rear Speaker) Out. 5. This 15-pin port is for a VGA monitor or other serial devices. 11. ASUS P4V8X-MX Motherboard 1-17 Serial connector. 1.10 Connectors 1.10.1 Rear panel connectors 1 2 3 4 5 6 11 10 9 8 7 1. This port is for ... This port allows 10/100 Mbps connection to a Local Area Network (LAN) through a network hub. 4. This port connects a tape, CD, DVD player or other devices. 3. Microphone port (pink). Audio 2, 4, or 6-channel configuration Port Headset/2-channel 4-channel Light ...
Motherboard DIY Troubleshooting Guide
Page 29
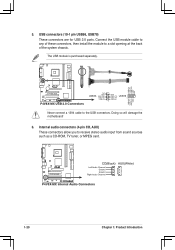
... USB module is purchased separately. Doing so will damage the motherboard! 6. R P4V8X-MX CD(Black) Left Audio Channel Ground Ground Right Audio Channel AUX(White) P4V8X-MX Internal Audio Connectors 1-20 Chapter 1: Product Introduction R USB+5V USB_P8USB_P8+ GND NC USB+5V USB_P7USB_P7+ GND P4V8X-MX P4V8X-MX USB 2.0 Connectors USB56 NC GND USB_P8+ USB_P8USB+5V GND USB_P7+ USB78 USB_P7USB...
... USB module is purchased separately. Doing so will damage the motherboard! 6. R P4V8X-MX CD(Black) Left Audio Channel Ground Ground Right Audio Channel AUX(White) P4V8X-MX Internal Audio Connectors 1-20 Chapter 1: Product Introduction R USB+5V USB_P8USB_P8+ GND NC USB+5V USB_P7USB_P7+ GND P4V8X-MX P4V8X-MX USB 2.0 Connectors USB56 NC GND USB_P8+ USB_P8USB+5V GND USB_P7+ USB78 USB_P7USB...
Motherboard DIY Troubleshooting Guide
Page 34
ASUS CrashFree BIOS 2 - Do either one of the following utilities allow you need to restore the BIOS in DOS mode using the AFUDOS utility. • Refer ... corrupted. 1. DOS environment Insert a 1.44MB floppy disk into the floppy disk drive. Click File from the format options field, then click Start. 2. ASUS EZ Flash (Updates the BIOS using a bootable floppy disk or the motherboard support...
ASUS CrashFree BIOS 2 - Do either one of the following utilities allow you need to restore the BIOS in DOS mode using the AFUDOS utility. • Refer ... corrupted. 1. DOS environment Insert a 1.44MB floppy disk into the floppy disk drive. Click File from the format options field, then click Start. 2. ASUS EZ Flash (Updates the BIOS using a bootable floppy disk or the motherboard support...
Motherboard DIY Troubleshooting Guide
Page 35
... Using AFUDOS to type the exact BIOS file name at least 600KB) to a floppy diskette. Boot the system from the support CD to the floppy disk. A:\>afudos /oMYBIOS03.rom AMI Firmware Update Utility - Download the latest BIOS file from the website provided by...copy the original BIOS file to store the file. All rights reserved. Write the BIOS filename on a piece of paper. ASUS P4V8X-MX Motherboard 2-3 To update the BIOS using a bootable floppy diskette. The utility will copy the current system BIOS by the system builder. Reading...
... Using AFUDOS to type the exact BIOS file name at least 600KB) to a floppy diskette. Boot the system from the support CD to the floppy disk. A:\>afudos /oMYBIOS03.rom AMI Firmware Update Utility - Download the latest BIOS file from the website provided by...copy the original BIOS file to store the file. All rights reserved. Write the BIOS filename on a piece of paper. ASUS P4V8X-MX Motherboard 2-3 To update the BIOS using a bootable floppy diskette. The utility will copy the current system BIOS by the system builder. Reading...
Motherboard DIY Troubleshooting Guide
Page 38
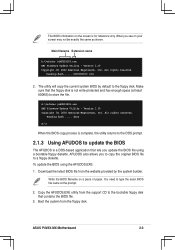
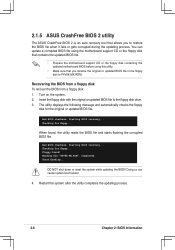
.... • Prepare the motherboard support CD or the floppy disk containing the updated motherboard BIOS before using this utility. • Make sure that allows you rename the original or updated BIOS file in the floppy disk to P4V8X-MX.ROM. The utility displays the following ... from a floppy disk: 1. Reading file "P4V8X-MX.ROM". Start flashing... Insert the floppy disk with the original or updated BIOS file to the floppy disk drive. 3. 2.1.5 ASUS CrashFree BIOS 2 utility The ASUS CrashFree BIOS 2 is an auto recovery tool that you to ...
.... • Prepare the motherboard support CD or the floppy disk containing the updated motherboard BIOS before using this utility. • Make sure that allows you rename the original or updated BIOS file in the floppy disk to P4V8X-MX.ROM. The utility displays the following ... from a floppy disk: 1. Reading file "P4V8X-MX.ROM". Start flashing... Insert the floppy disk with the original or updated BIOS file to the floppy disk drive. 3. 2.1.5 ASUS CrashFree BIOS 2 utility The ASUS CrashFree BIOS 2 is an auto recovery tool that you to ...

Motherboard DIY Troubleshooting Guide
Page 39
... automatically checks the optical drive for this motherboard. Reading file "P4V8X-MX.ROM". ASUS P4V8X-MX Motherboard 2-7 Checking for floppy... Starting BIOS recovery... Start flashing... Visit the ASUS website (www.asus.com) to the optical drive. 3. Recovering the BIOS from the support CD To recover the BIOS from the floppy disk drive, then turn...
... automatically checks the optical drive for this motherboard. Reading file "P4V8X-MX.ROM". ASUS P4V8X-MX Motherboard 2-7 Checking for floppy... Starting BIOS recovery... Start flashing... Visit the ASUS website (www.asus.com) to the optical drive. 3. Recovering the BIOS from the support CD To recover the BIOS from the floppy disk drive, then turn...
Motherboard DIY Troubleshooting Guide
Page 41
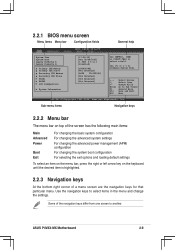
... Master Secondary IDE Slave SATA1 SATA2 IDE Configuration System Information [17:08:35] [Mon 08/08/2005] [1.44M, 3.5 in.] [Disabled] [ST340014A] [Not Detected] [ASUS CD-S500/A] [Not Detected] [Not Detected] [Not Detected] Use [ENTER], [TAB] or [SHIFT-TAB] to select items in the menu and change the settings. Use the... to configure System Time. Use [+] or [-] to Sub Screen General Help Save and Exit Exit v02.58 (C)Copyright 1985-2004, American Megatrends, Inc. ASUS P4V8X-MX Motherboard 2-9 Some of a menu screen are the navigation keys for that particular menu.
... Master Secondary IDE Slave SATA1 SATA2 IDE Configuration System Information [17:08:35] [Mon 08/08/2005] [1.44M, 3.5 in.] [Disabled] [ST340014A] [Not Detected] [ASUS CD-S500/A] [Not Detected] [Not Detected] [Not Detected] Use [ENTER], [TAB] or [SHIFT-TAB] to select items in the menu and change the settings. Use the... to configure System Time. Use [+] or [-] to Sub Screen General Help Save and Exit Exit v02.58 (C)Copyright 1985-2004, American Megatrends, Inc. ASUS P4V8X-MX Motherboard 2-9 Some of a menu screen are the navigation keys for that particular menu.

Motherboard DIY Troubleshooting Guide
Page 43
... 2.3.1 System Time [xx:xx:xxxx] Allows you to set the system date. 2.3.3 Legacy Diskette A [1.44M, 3.5 in .] [Disabled] [ST340014A] [Not Detected] [ASUS CD-S500/A] [Not Detected] [Not Detected] [Not Detected] Use [ENTER], [TAB] or [SHIFT-TAB] to configure System Time. Use [+] or [-] to...figuration options: [Disabled] [360K, 5.25 in.] [1.2M , 5.25 in.] [720K , 3.5 in.] [1.44M, 3.5 in.] [2.88M, 3.5 in .] ASUS P4V8X-MX Motherboard 2-11 2.3 Main Menu When you enter the BIOS Setup program, the Main menu screen appears, giving you to set the system time. 2.3.2 System Date...
... 2.3.1 System Time [xx:xx:xxxx] Allows you to set the system date. 2.3.3 Legacy Diskette A [1.44M, 3.5 in .] [Disabled] [ST340014A] [Not Detected] [ASUS CD-S500/A] [Not Detected] [Not Detected] [Not Detected] Use [ENTER], [TAB] or [SHIFT-TAB] to configure System Time. Use [+] or [-] to...figuration options: [Disabled] [360K, 5.25 in.] [1.2M , 5.25 in.] [720K , 3.5 in.] [1.44M, 3.5 in.] [2.88M, 3.5 in .] ASUS P4V8X-MX Motherboard 2-11 2.3 Main Menu When you enter the BIOS Setup program, the Main menu screen appears, giving you to set the system time. 2.3.2 System Date...
Motherboard DIY Troubleshooting Guide
Page 58
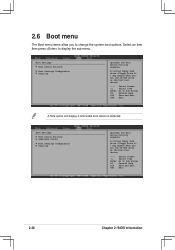
... Drives Boot Settings Configuration Security Specifies the Boot Device Priority sequence. 2.6 Boot menu The Boot menu items allow you set the CD-ROM drive as the first boot device. Select an item then press to change the system boot options. A virtual floppy disk drive (Floppy... Drive B: ) may appear when you to display the sub-menu. A virtual floppy disk drive (Floppy Drive B: ) may appear when you set the CD-ROM drive as the first boot device.
... Drives Boot Settings Configuration Security Specifies the Boot Device Priority sequence. 2.6 Boot menu The Boot menu items allow you set the CD-ROM drive as the first boot device. Select an item then press to change the system boot options. A virtual floppy disk drive (Floppy... Drive B: ) may appear when you to display the sub-menu. A virtual floppy disk drive (Floppy Drive B: ) may appear when you set the CD-ROM drive as the first boot device.
Motherboard DIY Troubleshooting Guide
Page 59
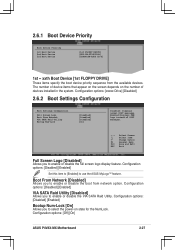
... Bootup Num-Lock [On] Allows you to enable or disable the full screen logo display feature. Configuration options: [Off] [On] ASUS P4V8X-MX Motherboard 2-27 2.6.1 Boot Device Priority Boot Device Priority 1st Boot Device 2nd Boot Device 3rd Boot Device [1st FLOPPY DRIVE] [HDD:PM-ST340014A]... [CDROM:SM-ASUS CD-S] Specifies the boot sequence from network option. Configuration options: [Disabled] [Enabled] VIA SATA Raid Utility [Disabled] Allows you ...
... Bootup Num-Lock [On] Allows you to enable or disable the full screen logo display feature. Configuration options: [Off] [On] ASUS P4V8X-MX Motherboard 2-27 2.6.1 Boot Device Priority Boot Device Priority 1st Boot Device 2nd Boot Device 3rd Boot Device [1st FLOPPY DRIVE] [HDD:PM-ST340014A]... [CDROM:SM-ASUS CD-S] Specifies the boot sequence from network option. Configuration options: [Disabled] [Enabled] VIA SATA Raid Utility [Disabled] Allows you ...
Motherboard DIY Troubleshooting Guide
Page 62
This chapter describes the contents Software Sup3port of the support CD that comes with the motherboard package.
This chapter describes the contents Software Sup3port of the support CD that comes with the motherboard package.
Motherboard DIY Troubleshooting Guide
Page 63
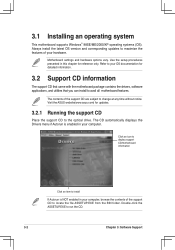
...OS version and corresponding updates to avail all motherboard features. Refer to your OS documentation for detailed information. 3.2 Support CD information The support CD that came with the motherboard package contains the drivers, software applications, and utilities that you can install to maximize the .... Double-click the ASSETUP.EXE to the optical drive. Motherboard settings and hardware options vary. Visit the ASUS website(www.asus.com) for reference only. The CD automatically displays the Drivers menu if Autorun is NOT enabled in this chapter for updates. 3.2.1 Running the ...
...OS version and corresponding updates to avail all motherboard features. Refer to your OS documentation for detailed information. 3.2 Support CD information The support CD that came with the motherboard package contains the drivers, software applications, and utilities that you can install to maximize the .... Double-click the ASSETUP.EXE to the optical drive. Motherboard settings and hardware options vary. Visit the ASUS website(www.asus.com) for reference only. The CD automatically displays the Drivers menu if Autorun is NOT enabled in this chapter for updates. 3.2.1 Running the ...
Motherboard DIY Troubleshooting Guide
Page 67
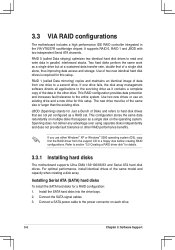
...;gured as a single disk on each drive. 3-6 Chapter 3: Software Support RAID 0 (called Data mirroring) copies and maintains an identical image of data from the support CD to read and write data in parallel, interleaved stacks.
...;gured as a single disk on each drive. 3-6 Chapter 3: Software Support RAID 0 (called Data mirroring) copies and maintains an identical image of data from the support CD to read and write data in parallel, interleaved stacks.


