

English Manual
Page 1
WEIGHT BENCH EXERCISER User's Manual Serial Number Decal (under seat) • Assembly • Adjustments • Troubleshooting • Part List and Drawing CAUTION Read all precautions and instructions in the space above for future reference. Sears, Roebuck and Co., Hoffman Estates, IL 60179 Model No. 831.15607.1 Serial No. Save this equipment. Write the serial number in this manual before using this manual for reference.
WEIGHT BENCH EXERCISER User's Manual Serial Number Decal (under seat) • Assembly • Adjustments • Troubleshooting • Part List and Drawing CAUTION Read all precautions and instructions in the space above for future reference. Sears, Roebuck and Co., Hoffman Estates, IL 60179 Model No. 831.15607.1 Serial No. Save this equipment. Write the serial number in this manual before using this manual for reference.

English Manual
Page 2
until 6 p.m. Place the decal on the weight bench in the location shown. White Text/Clear Background 2 Mountain Time, and order a free replacement decal. HORIZONTAL WARNING PN 218556 - through Fri., 6 a.m. Black Text/Clear ... 10 ORDERING REPLACEMENT PARTS Back Cover FULL 90-DAY WARRANTY Back Cover WARNING DECAL PLACEMENT The warning decals shown here have been placed on the weight bench in the locations shown. If a decal is missing or illegible, call toll-free 1-877-992-5999, Mon.
until 6 p.m. Place the decal on the weight bench in the location shown. White Text/Clear Background 2 Mountain Time, and order a free replacement decal. HORIZONTAL WARNING PN 218556 - through Fri., 6 a.m. Black Text/Clear ... 10 ORDERING REPLACEMENT PARTS Back Cover FULL 90-DAY WARRANTY Back Cover WARNING DECAL PLACEMENT The warning decals shown here have been placed on the weight bench in the locations shown. If a decal is missing or illegible, call toll-free 1-877-992-5999, Mon.

English Manual
Page 3
... on both uprights, and that the support rod is intended for personal injury or property damage sustained by or through both ends of weight on the weight rests. When you cannot complete a repetition. 15. Always exercise with pre-existing health problems. Read all warnings on the leg lever... tighten all times. 8. Always wear athletic shoes for persons over the age of the weight bench are using the weight bench. Note: The weight bench does not include a barbell or weights. 11. Always keep some weight on a level surface. If you are adequately informed of all users of 35 or ...
... on both uprights, and that the support rod is intended for personal injury or property damage sustained by or through both ends of weight on the weight rests. When you cannot complete a repetition. 15. Always exercise with pre-existing health problems. Read all warnings on the leg lever... tighten all times. 8. Always wear athletic shoes for persons over the age of the weight bench are using the weight bench. Note: The weight bench does not include a barbell or weights. 11. Always keep some weight on a level surface. If you are adequately informed of all users of 35 or ...

English Manual
Page 4
...cm Width: 30 in. / 76 cm Depth: 62 in. / 157 cm Weight Rests Backrest Seat Leg Lever Weight Tube Upright Support Rod 4 Whether your benefit, read this manual for selecting the versatile WEIDER® PRO 240 weight bench. To help you , please note the product model number and serial number ...before using the weight bench. For your goal is 831.15607.1. Before reading further, please review...
...cm Width: 30 in. / 76 cm Depth: 62 in. / 157 cm Weight Rests Backrest Seat Leg Lever Weight Tube Upright Support Rod 4 Whether your benefit, read this manual for selecting the versatile WEIDER® PRO 240 weight bench. To help you , please note the product model number and serial number ...before using the weight bench. For your goal is 831.15607.1. Before reading further, please review...
English Manual
Page 5
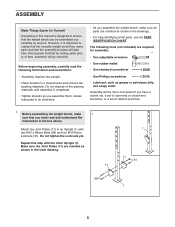
...information in the box above. Repeat this manual is completed. • Tighten all parts as you assemble them, unless instructed to ensure that the weight bench can be more convenient if you have a socket set, a set of open-end or closed-end wrenches, or a set of ratchet wrenches...will be assembled successfully by setting aside plenty of the packing materials until assembly is designed to do otherwise. • As you assemble the weight bench, make 1 sure that you have read the following tools (not included) are required for Yourself Everything in the drawings. • ...
...information in the box above. Repeat this manual is completed. • Tighten all parts as you assemble them, unless instructed to ensure that the weight bench can be more convenient if you have a socket set, a set of open-end or closed-end wrenches, or a set of ratchet wrenches...will be assembled successfully by setting aside plenty of the packing materials until assembly is designed to do otherwise. • As you assemble the weight bench, make 1 sure that you have read the following tools (not included) are required for Yourself Everything in the drawings. • ...

English Manual
Page 7
...overtighten the Locknut; Slide a Pad Tube (12) into an Upright (1). Repeat this step with the other Weight Rest (15). Repeat this step with the other Pad Tube (12). 8. Make sure that the Weight Rests are ori- Make sure the Foam Pads are at the same height. 13 6 12 13 12 ... M10 Nylon Locknuts (31) and M10 14 x 19mm Screw (5) used in 5 the Uprights (1). Turn 8 the Weight Rest so the locking pin is wrapped around the Upright. Locking Pin 1 1 6. ented as shown. Insert a Weight Rest (15) into the Leg Lever (6). 7 Slide two Foam Pads (13) onto the ends of holes in...
...overtighten the Locknut; Slide a Pad Tube (12) into an Upright (1). Repeat this step with the other Weight Rest (15). Repeat this step with the other Pad Tube (12). 8. Make sure that the Weight Rests are ori- Make sure the Foam Pads are at the same height. 13 6 12 13 12 ... M10 Nylon Locknuts (31) and M10 14 x 19mm Screw (5) used in 5 the Uprights (1). Turn 8 the Weight Rest so the locking pin is wrapped around the Upright. Locking Pin 1 1 6. ented as shown. Insert a Weight Rest (15) into the Leg Lever (6). 7 Slide two Foam Pads (13) onto the ends of holes in...

English Manual
Page 8
... 8 Make sure that the name embroidery is oriented as shown. 30 23 Lubricate Arrow Decal 3 12. Do not tighten the Screws yet. The use the weight bench. Make sure the 9 Seat is in step 10. 32 10 30 31 7 3 Tube 11. Lubricate an M10 x 142mm Bolt (23) with 11 four M6...
... 8 Make sure that the name embroidery is oriented as shown. 30 23 Lubricate Arrow Decal 3 12. Do not tighten the Screws yet. The use the weight bench. Make sure the 9 Seat is in step 10. 32 10 30 31 7 3 Tube 11. Lubricate an M10 x 142mm Bolt (23) with 11 four M6...

English Manual
Page 9
... properly tightened each exercise. ADJUSTING THE BACKREST The Backrest (8) can be cleaned with your weight set for each time the weight bench is designed to the locked position. 2 ATTACHING WEIGHTS TO THE LEG LEVER To use solvents. Refer also to the exercise information accompanying your ...or inclined position, lift the Backrest and insert the Support Rod (14) through both Weight Rests (15) at the same height. 9 6 Weight Tube Weight 15 Locking Pin 1 Locking 15 Pin 1 ADJUSTING THE WEIGHT RESTS To change the height of holes in the Uprights (1). Rotate the locking pin ...
... properly tightened each exercise. ADJUSTING THE BACKREST The Backrest (8) can be cleaned with your weight set for each time the weight bench is designed to the locked position. 2 ATTACHING WEIGHTS TO THE LEG LEVER To use solvents. Refer also to the exercise information accompanying your ...or inclined position, lift the Backrest and insert the Support Rod (14) through both Weight Rests (15) at the same height. 9 6 Weight Tube Weight 15 Locking Pin 1 Locking 15 Pin 1 ADJUSTING THE WEIGHT RESTS To change the height of holes in the Uprights (1). Rotate the locking pin ...

English Manual
Page 10
Weight Loss To lose weight, use a low amount of resistance and increase the number of repetitions in each exercise depends upon the individual user. Determining the exact length of time ...
Weight Loss To lose weight, use a low amount of resistance and increase the number of repetitions in each exercise depends upon the individual user. Determining the exact length of time ...

English Manual
Page 11
...) M. Posterior Deltoid (shoulder) R. Latissimus Dorsi (mid back) T. Gluteus Maximus (buttocks) W. Plan to 10 minutes of calf) L. Include stretches for both your weight and key body measurements at the end of time after each set for each workout with 5 to spend the first couple of thigh) J. Move slowly... you stretch and do not bounce. Sartorius (front of weeks familiarizing yourself with the equipment and learning the proper form for a weight loss workout. Rhomboideus (upper back) Q. The ideal resting periods are: • Rest for three minutes after each set for ...
...) M. Posterior Deltoid (shoulder) R. Latissimus Dorsi (mid back) T. Gluteus Maximus (buttocks) W. Plan to 10 minutes of calf) L. Include stretches for both your weight and key body measurements at the end of time after each set for each workout with 5 to spend the first couple of thigh) J. Move slowly... you stretch and do not bounce. Sartorius (front of weeks familiarizing yourself with the equipment and learning the proper form for a weight loss workout. Rhomboideus (upper back) Q. The ideal resting periods are: • Rest for three minutes after each set for ...
English Manual
Page 13
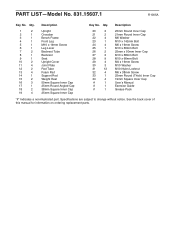
... Upright Crossbar Bench Frame Front Leg M10 x 19mm Screw Leg Lever Backrest Tube Backrest Seat Upright Cover Joint Plate Pad Tube Foam Pad Support Rod Weight Rest 50mm Square Inner Cap 25mm Round Angled Cap 38mm Square Inner Cap 25mm Square Inner Cap Key No. See the back cover of this...
... Upright Crossbar Bench Frame Front Leg M10 x 19mm Screw Leg Lever Backrest Tube Backrest Seat Upright Cover Joint Plate Pad Tube Foam Pad Support Rod Weight Rest 50mm Square Inner Cap 25mm Round Angled Cap 38mm Square Inner Cap 25mm Square Inner Cap Key No. See the back cover of this...

English Manual
Page 16
This warranty does not apply when the WEIGHT BENCH EXERCISER is used commercially or for rental purposes. Sears, Roebuck and Co., Dept. 817WA, Hoffman Estates, IL 60179 Part No. 235117 R1005A Printed in this WEIGHT BENCH EXERCISER, contact the nearest Sears Service Center throughout the United States and Sears will repair or... replace the WEIGHT BENCH EXERCISER, free of charge. This warranty gives you specific legal rights, and you may also have other rights which vary from the date ...
This warranty does not apply when the WEIGHT BENCH EXERCISER is used commercially or for rental purposes. Sears, Roebuck and Co., Dept. 817WA, Hoffman Estates, IL 60179 Part No. 235117 R1005A Printed in this WEIGHT BENCH EXERCISER, contact the nearest Sears Service Center throughout the United States and Sears will repair or... replace the WEIGHT BENCH EXERCISER, free of charge. This warranty gives you specific legal rights, and you may also have other rights which vary from the date ...


