Weider 8507 Support and Manuals
Get Help and Manuals for this Weider item

Popular Weider 8507 Manual Pages
User Manual - Page 1

USER'S MANUAL
Serial Number Decal (Under Seat)
QUESTIONS? Class HC Fitness Produwct
Visit our website at www.weiderfitness.com
As a manufacturer, we are missing or damaged parts, please call:
08457 089 ... Serial No. Model No. Unit 4 Revie Road Industrial Estate Revie Road Beeston Leeds, LS11 8JG UK email: [email protected]
CAUTION
Read all precautions and instructions in the space...
User Manual - Page 2

... for home use the training system in this product.
2 TABLE OF CONTENTS
IMPORTANT PRECAUTIONS 2 BEFORE YOU BEGIN 3 ASSEMBLY 4 ADJUSTMENT 16 TROUBLE-SHOOTING AND MAINTENANCE 19 CABLE DIAGRAMS 20 PART LIST 22 EXPLODED DRAWING 23 ORDERING REPLACEMENT PARTS Back Cover
Note: A PART IDENTIFICATION CHART is attached to protect the floor or carpet. Replace any exercise program...
User Manual - Page 3

...this manual). If you for selecting the versatile WEIDER® 8507 Training System. The model number is to achieve the specific results you , please note the product model number and serial number before using the WEIDER® 8507 Training
System. Before reading further, please review the drawing below and familiarise yourself with the parts that are labelled. The WEIDER® 8507 offers...
User Manual - Page 4

... until assembly is completed.
• Before beginning, read the instructions at each end of the Stabiliser (71). Before you begin, make sure that all parts are recommended: a socket set, open or closed wrenches, or ratchet wrenches.
1.
Tighten a 5/16" Nylon Locknut (3) onto each side of
this manual.
• During assembly, be used in assembly, refer...
User Manual - Page 6

...-
27
en the Nylon Locknuts yet.
11 11
6
8
67
Attach the Top Frame (67) to the Stop Bracket (63) with two 5/16" x 2 3/4" Bolts (11), the Support Plate
(6), and two 5/16" Nylon Locknuts (3).
Lubricate the insides of
5
the Weight Tube (80). Locate the Short Cable (23). Do not tighten the Nylon Locknut...
User Manual - Page 7

... (31) and
1/4" Nylon Jam Nuts (86).
44
31 69
68 Lubricate 52
67 86
Bracket
7 8. Set the Arm Frame Bushings and
the Arm Frame on the welded plate on the side shown. Place the Arm Frame... Bracket (69) over the Arm
Frame Bushings. Attach the upper ends of the Weight Guides (72) to
the Top Frame with the 5/16" x 6" Bolt (74), two
1/2" x 3/4" Spacers (73),...
User Manual - Page 9

Attach a Large "U" Bracket (56) to one of this manual to make
sure that the Cables are properly routed.
Attach the Pulley inside as shown.
Do not overtighten the 3/8" Nylon Locknut. 14. IMPORTANT: As you ...
User Manual - Page 14

...) into the Leg Lever (29). Press 3/4" Round Inner Caps (34) into the Seat
28
Frame (36).
Attach the 5/16" x 2" Eyebolt (62) to pivot freely.
27. Set the bracket on the Seat Frame (36) onto the indicated pin on the Front Upright (42). Insert the Pad Tube into the ends of a Pad...
User Manual - Page 15

... and correct the problem before using the training system, pull each end of this manual. Make sure that the cable moves smoothly over the pulleys. IMPORTANT: If the cables are properly tightened. Before using the training system. The use of this manual.
15 See the CABLE DIAGRAMS on page 16 of all remaining parts will be...
User Manual - Page 16

... is performed, the effectiveness of the exercise will vary from 6 lbs. Note: Due to the cables and pulleys, the actual amount of resistance at each part of the training system can be reduced. The weight setting can be performed.
to be adjusted. CHANGING THE WEIGHT SETTING
To change the weight setting, insert the Weight Pin (26...
User Manual - Page 17

... Frame to the Front Upright with a Cable Clip (83).
For some exercises, the Seat (13) must be performed.
ATTACHING AND REMOVING THE SEAT
Set the bracket on the Seat Frame (36) on the indicated pin on ...First, make sure that the chain is in the same manner.
83 66
84
85
39
17 For some exercises, the Chain (84) should be removed. Attach the Chain (84) between the Lat Bar and the ...
User Manual - Page 19

... (23). Do not use the training system. Loosen the adjustment screw. Retighten the adjustment screw.
TROUBLE-SHOOTING AND MAINTENANCE
Inspect and tighten all parts each time you use solvents. If...training system, can be cleaned using a damp cloth and mild non-abrasive detergent. Make sure that the cables are not too tight, or the top weight will be tightened. Replace any worn parts...
User Manual - Page 22

... x 2 3/4" Bolt Stabiliser Weight Guide 1/2" x 3/4" Spacer 5/16" x 6" Bolt Adjustment "U" Bracket "V" Pulley Top Weight "I"-Plate Weight Tube Bumper Weight Tube 4 1/2" Pulley Large Cable Trap Cable Clip Chain Lat Bar 1/4" Nylon Jam Nut 5/16" x 3 1/2" Bolt 2" Square Outer Cap Round Inner Cap Userʼs Manual
Note: "#" indicates a non-illustrated part. PART LIST-Model No. Qty.
1
4
2
2
3
21...
User Manual - Page 23
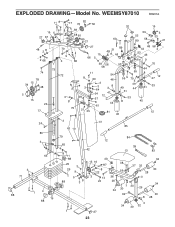
...
39
13
83
34
38 37 32
18
30 28
10
3
7 33 30
62
34 29
30 8 28
3
34
30 32
1
27
23 EXPLODED DRAWING-Model No.
User Manual - Page 27

... Code:
08457 089 009
Outside the UK: 0 (044) 113 387 7133 Fax: 0 (044) 113 387 7125
Please provide the following information when ordering replacement parts:
1.
The SERIAL NUMBER of the product (see the PART LIST on page 22 of this manual).
4. ORDERING REPLACEMENT PARTS
To order replacement parts, contact the ICON Fitness Lifestyle Ltd. WEIDER is a registered trademark of this manual...
Weider 8507 Reviews
We have not received any reviews for Weider yet.