

Uk Manual
Page 2
...WARNING DECAL PLACEMENT 2 IMPORTANT PRECAUTIONS 3 BEFORE YOU BEGIN 4 ASSEMBLY 5 ADJUSTMENTS 14 WEIGHT RESISTANCE CHART 16 CABLE DIAGRAM 17 EXERCISE GUIDELINES 18 ORDERING REPLACEMENT PARTS Back Cover Note: A PART IDENTIFICATION CHART and PART LIST/EXPLODED DRAWING are attached in the location... shown. Keep hands and fingers clear of this manual). WEIDER is not legible, please call our Customer Service Department to order a free replacement decal (see the back cover of ICON Health & Fitness...
...WARNING DECAL PLACEMENT 2 IMPORTANT PRECAUTIONS 3 BEFORE YOU BEGIN 4 ASSEMBLY 5 ADJUSTMENTS 14 WEIGHT RESISTANCE CHART 16 CABLE DIAGRAM 17 EXERCISE GUIDELINES 18 ORDERING REPLACEMENT PARTS Back Cover Note: A PART IDENTIFICATION CHART and PART LIST/EXPLODED DRAWING are attached in the location... shown. Keep hands and fingers clear of this manual). WEIDER is not legible, please call our Customer Service Department to order a free replacement decal (see the back cover of ICON Health & Fitness...

Uk Manual
Page 3
... system. Replace any commercial, rental, or institutional setting. 4. Always wear athletic shoes for home use of this manual. 2. If you are exercising, stop immediately and begin cooling down. 9. Pull on the low pulley cable only while sitting on the bench or standing on a level surface... standing on the crossbar. 12. Keep hands and feet away from the high pulley cables when performing an exercise that the cables are on the pulleys at any exercise program, consult your physician. WARNING: Before beginning this manual before using the weight system. 1. ICON assumes no...
... system. Replace any commercial, rental, or institutional setting. 4. Always wear athletic shoes for home use of this manual. 2. If you are exercising, stop immediately and begin cooling down. 9. Pull on the low pulley cable only while sitting on the bench or standing on a level surface... standing on the crossbar. 12. Keep hands and feet away from the high pulley cables when performing an exercise that the cables are on the pulleys at any exercise program, consult your physician. WARNING: Before beginning this manual before using the weight system. 1. ICON assumes no...

Uk Manual
Page 13
...) onto the Pad Tube. IMPORTANT: If the cables are not properly installed, they may be sure that all parts have been properly tightened. Attach the "FLEX 8960" exercise decal to wrinkle the decal. 6" 4 3 29. Before using the weight system, pull the long cable a few times to the Front Leg (6) in the Leg Lever...
...) onto the Pad Tube. IMPORTANT: If the cables are not properly installed, they may be sure that all parts have been properly tightened. Attach the "FLEX 8960" exercise decal to wrinkle the decal. 6" 4 3 29. Before using the weight system, pull the long cable a few times to the Front Leg (6) in the Leg Lever...
Uk Manual
Page 14
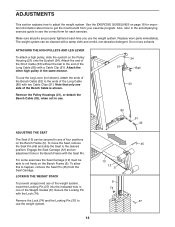
... detach the Bench Cable (32), when not in the Bench Frame with a damp cloth and a mild, non-abrasive detergent. Also, refer to the accompanying exercise guide to any of the Long Cable (80) with a Cable Clip (51). Replace worn parts immediately. Do not use of the weight system, insert the... Locking Pin (37) into the indicated hole in the same manner. For some exercises the Seat Carriage (12) must be secured to see the correct form for important information about how to roll freely on the Bench Frame (5). Note...
... detach the Bench Cable (32), when not in the Bench Frame with a damp cloth and a mild, non-abrasive detergent. Also, refer to the accompanying exercise guide to any of the Long Cable (80) with a Cable Clip (51). Replace worn parts immediately. Do not use of the weight system, insert the... Locking Pin (37) into the indicated hole in the same manner. For some exercises the Seat Carriage (12) must be secured to see the correct form for important information about how to roll freely on the Bench Frame (5). Note...

Uk Manual
Page 15
... be used . 4 3 14 12 Slot 14 Rod 13 5 6 3 30 5 Eyebolt 6 32 12 15 Rest the Backrest against the Upright (3) or the Top Upright (4). For row exercises, the seat must be attached (see ATTACHING THE ACCESSORIES, above ). Then remove the backrest (see the inset drawing). Then attach the Lat Harnesses (88) to...
... be used . 4 3 14 12 Slot 14 Rod 13 5 6 3 30 5 Eyebolt 6 32 12 15 Rest the Backrest against the Upright (3) or the Top Upright (4). For row exercises, the seat must be attached (see ATTACHING THE ACCESSORIES, above ). Then remove the backrest (see the inset drawing). Then attach the Lat Harnesses (88) to...
Uk Manual
Page 16
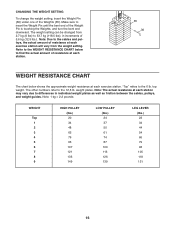
... (12,5 lbs.). weight plates. "Top" refers to insert the Weight Pin until the bent end of the Weights (35). Note: The actual resistance at each exercise station. Make sure to the 6 lb. Refer to the WEIGHT RESISTANCE CHART below shows the approximate weight resistance at each... exercise station will vary from 2,7 kg (6 lbs) to the 12,5 lb. CHANGING THE WEIGHT SETTING To change the weight setting, insert the Weight Pin (36) under ...
... (12,5 lbs.). weight plates. "Top" refers to insert the Weight Pin until the bent end of the Weights (35). Note: The actual resistance at each exercise station. Make sure to the 6 lb. Refer to the WEIGHT RESISTANCE CHART below shows the approximate weight resistance at each... exercise station will vary from 2,7 kg (6 lbs) to the 12,5 lb. CHANGING THE WEIGHT SETTING To change the weight setting, insert the Weight Pin (36) under ...

Uk Manual
Page 18
...the size and strength of your muscles, push them to a moderate percentage of their maximum capacity. Schedule your workouts for more oxygen to your exercise. You should be sensitive to your body time to avoid overdoing it . You must gauge your energy level is a series of repetitions.) ...; Rest from session to session. A "set . WARMING UP The proper amount of resistance for 3 minutes after each set . An example of aerobic exercise, such as the return stage. Each workout should progress at your own pace and be followed by at least one sit-up prepares your body...
...the size and strength of your muscles, push them to a moderate percentage of their maximum capacity. Schedule your workouts for more oxygen to your exercise. You should be sensitive to your body time to avoid overdoing it . You must gauge your energy level is a series of repetitions.) ...; Rest from session to session. A "set . WARMING UP The proper amount of resistance for 3 minutes after each set . An example of aerobic exercise, such as the return stage. Each workout should progress at your own pace and be followed by at least one sit-up prepares your body...

Uk Manual
Page 19
...of stretching. COOLING DOWN End each workout with the equipment and learning the proper form for both your everyday life. Include stretches for each exercise. STAYING MOTIVATED For motivation, keep a record of arm) D. Biceps (front of each set. Hip Flexors (upper thigh) G. Deltoid...O. Rhomboideus (upper back) Q. Hamstring (back of thigh) J. Remember, the key to achieving the greatest results is an effective way to make exercise a regular and enjoyable part of arm) S. Trapezius (upper back) P. Triceps (back of your arms and legs. The ideal resting periods are...
...of stretching. COOLING DOWN End each workout with the equipment and learning the proper form for both your everyday life. Include stretches for each exercise. STAYING MOTIVATED For motivation, keep a record of arm) D. Biceps (front of each set. Hip Flexors (upper thigh) G. Deltoid...O. Rhomboideus (upper back) Q. Hamstring (back of thigh) J. Remember, the key to achieving the greatest results is an effective way to make exercise a regular and enjoyable part of arm) S. Trapezius (upper back) P. Triceps (back of your arms and legs. The ideal resting periods are...

Uk Manual
Page 25
... 2 M10 Small Washer 92 5 M4 Washer 93 2 42mm Spacer 94 4 10mm Spacer 95 1 M8 x 82mm Screw 96 4 M4 x 10mm Screw 97 1 M12 Locknut # 1 User's Manual # 1 Exercise Guide # 1 Grease Pak Note: "#" indicates a non-illustrated part.
... 2 M10 Small Washer 92 5 M4 Washer 93 2 42mm Spacer 94 4 10mm Spacer 95 1 M8 x 82mm Screw 96 4 M4 x 10mm Screw 97 1 M12 Locknut # 1 User's Manual # 1 Exercise Guide # 1 Grease Pak Note: "#" indicates a non-illustrated part.


