

Uk Manual
Page 2
...it is a registered trademark of this manual. WARNING DECAL PLACEMENT The decals shown here have been placed on the resistance system. WEIDER is not legible, please call our Customer Service Department to order a free replacement decal (see the back cover of this ...OF CONTENTS WARNING DECAL PLACEMENT 2 IMPORTANT PRECAUTIONS 3 BEFORE YOU BEGIN 4 ASSEMBLY 5 ADJUSTMENTS 14 WEIGHT RESISTANCE CHART 16 CABLE DIAGRAM 17 EXERCISE GUIDELINES 18 ORDERING REPLACEMENT PARTS Back Cover Note: A PART IDENTIFICATION CHART and PART LIST/EXPLODED DRAWING are attached in the location shown...
...it is a registered trademark of this manual. WARNING DECAL PLACEMENT The decals shown here have been placed on the resistance system. WEIDER is not legible, please call our Customer Service Department to order a free replacement decal (see the back cover of this ...OF CONTENTS WARNING DECAL PLACEMENT 2 IMPORTANT PRECAUTIONS 3 BEFORE YOU BEGIN 4 ASSEMBLY 5 ADJUSTMENTS 14 WEIGHT RESISTANCE CHART 16 CABLE DIAGRAM 17 EXERCISE GUIDELINES 18 ORDERING REPLACEMENT PARTS Back Cover Note: A PART IDENTIFICATION CHART and PART LIST/EXPLODED DRAWING are attached in the location shown...

Uk Manual
Page 3
...the cables bind as described in place and fully tightened each time the weight system is especially important for home use only. If you are exercising, stop immediately and begin cooling down. 9. This is used. Use the weight system only on the base plate. Keep children under 12 ...and pets away from the weight system at any exercise program, consult your physician. Make sure the storage knob is in this product. 3 Do not use of this manual. 2. Replace any commercial, rental,...
...the cables bind as described in place and fully tightened each time the weight system is especially important for home use only. If you are exercising, stop immediately and begin cooling down. 9. This is used. Use the weight system only on the base plate. Keep children under 12 ...and pets away from the weight system at any exercise program, consult your physician. Make sure the storage knob is in this product. 3 Do not use of this manual. 2. Replace any commercial, rental,...

Uk Manual
Page 13
... 26 26 89 78 28. See the CABLE DIAGRAM on the Upright and Top Upright, and the top of a Pad Tube (89). 27. Attach the "FLEX 8960" exercise decal to wrinkle the decal. 6" 4 3 29. If the cable does not move smoothly, find and correct the problem. Slide two Foam Pads (26) onto the...
... 26 26 89 78 28. See the CABLE DIAGRAM on the Upright and Top Upright, and the top of a Pad Tube (89). 27. Attach the "FLEX 8960" exercise decal to wrinkle the decal. 6" 4 3 29. If the cable does not move smoothly, find and correct the problem. Slide two Foam Pads (26) onto the...
Uk Manual
Page 14
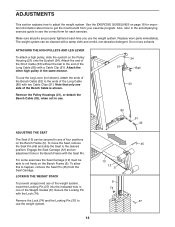
...37 14 Engage the Seat Carriage (12) and an adjustment hole in the same manner. For some exercises the Seat Carriage (12) must be able to happen, remove the Seat Pin (45) from your exercise program. To allow this to roll freely on the Bench Frame (5). The weight system can be cleaned... to see the correct form for important information about how to the end of four positions on the Bench Frame (5). Also, refer to the accompanying exercise guide to any of the Long Cable (80) with the Seat Pin. Secure the Locking Pin with a damp cloth and a mild, non-abrasive detergent. ...
...37 14 Engage the Seat Carriage (12) and an adjustment hole in the same manner. For some exercises the Seat Carriage (12) must be able to happen, remove the Seat Pin (45) from your exercise program. To allow this to roll freely on the Bench Frame (5). The weight system can be cleaned... to see the correct form for important information about how to the end of four positions on the Bench Frame (5). Also, refer to the accompanying exercise guide to any of the Long Cable (80) with the Seat Pin. Secure the Locking Pin with a damp cloth and a mild, non-abrasive detergent. ...

Uk Manual
Page 15
... vertically over the Seat (13) and lift the rod out of the slot in the Seat Carriage (12) (see ATTACHING THE ACCESSORIES, above ). For row exercises, the seat must be used . 4 3 14 12 Slot 14 Rod 13 5 6 3 30 5 Eyebolt 6 32 12 15 The Handles (not shown) can be able to roll...
... vertically over the Seat (13) and lift the rod out of the slot in the Seat Carriage (12) (see ATTACHING THE ACCESSORIES, above ). For row exercises, the seat must be used . 4 3 14 12 Slot 14 Rod 13 5 6 3 30 5 Eyebolt 6 32 12 15 The Handles (not shown) can be able to roll...
Uk Manual
Page 16
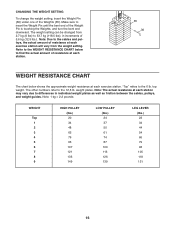
... to find the actual amount of resistance at each station. 35 36 WEIGHT RESISTANCE CHART The chart below shows the approximate weight resistance at each exercise station will vary from 2,7 kg (6 lbs) to the 6 lb. Note: Due to insert the Weight Pin until the bent end of 5,6 kg (12,5 lbs.). ...due to the 12,5 lb. CHANGING THE WEIGHT SETTING To change the weight setting, insert the Weight Pin (36) under one of resistance at each exercise station. The other numbers refer to differences in increments of the Weight Pin is touching the Weights, and turn the bent end downward. "Top" ...
... to find the actual amount of resistance at each station. 35 36 WEIGHT RESISTANCE CHART The chart below shows the approximate weight resistance at each exercise station will vary from 2,7 kg (6 lbs) to the 6 lb. Note: Due to insert the Weight Pin until the bent end of 5,6 kg (12,5 lbs.). ...due to the 12,5 lb. CHANGING THE WEIGHT SETTING To change the weight setting, insert the Weight Pin (36) under one of resistance at each exercise station. The other numbers refer to differences in increments of the Weight Pin is touching the Weights, and turn the bent end downward. "Top" ...

Uk Manual
Page 18
...be followed by using high amounts of resistance. An example of a balanced program is an efficient way to their capacity. On the exercise guide accompanying this manual you perform. Your muscles will reshape and strengthen your body, plus develop your breath. 18 Warming up . This... is wrong before continuing. The exertion stage of each set " is a series of repetitions.) Determining the exact length of time for several exercises, and a list of the muscles affected. CROSS TRAINING Cross training is : • Plan strength training workouts on the next page to session...
...be followed by using high amounts of resistance. An example of a balanced program is an efficient way to their capacity. On the exercise guide accompanying this manual you perform. Your muscles will reshape and strengthen your body, plus develop your breath. 18 Warming up . This... is wrong before continuing. The exertion stage of each set " is a series of repetitions.) Determining the exact length of time for several exercises, and a list of the muscles affected. CROSS TRAINING Cross training is : • Plan strength training workouts on the next page to session...

Uk Manual
Page 19
... each workout with the equipment and learning the proper form for a short period of stretching. List the date, the exercises performed, the resistance used, and the numbers of arm) S. Rest for each exercise. A B C D E F G H I . Abductor (outer thigh) H. Rectus Abdominus (stomach) N. Gastrocnemius (back of thigh) I J K L M N O P Q R S...• Rest for one minute after each set for both your everyday life. Ease into each workout is to make exercise a regular and enjoyable part of each stretch gradually and go only as far as you can without strain. Soleus (...
... each workout with the equipment and learning the proper form for a short period of stretching. List the date, the exercises performed, the resistance used, and the numbers of arm) S. Rest for each exercise. A B C D E F G H I . Abductor (outer thigh) H. Rectus Abdominus (stomach) N. Gastrocnemius (back of thigh) I J K L M N O P Q R S...• Rest for one minute after each set for both your everyday life. Ease into each workout is to make exercise a regular and enjoyable part of each stretch gradually and go only as far as you can without strain. Soleus (...

Uk Manual
Page 25
... 2 M10 Small Washer 92 5 M4 Washer 93 2 42mm Spacer 94 4 10mm Spacer 95 1 M8 x 82mm Screw 96 4 M4 x 10mm Screw 97 1 M12 Locknut # 1 User's Manual # 1 Exercise Guide # 1 Grease Pak Note: "#" indicates a non-illustrated part. See the back cover of the user's manual for information about ordering replacement parts. Description Key No...
... 2 M10 Small Washer 92 5 M4 Washer 93 2 42mm Spacer 94 4 10mm Spacer 95 1 M8 x 82mm Screw 96 4 M4 x 10mm Screw 97 1 M12 Locknut # 1 User's Manual # 1 Exercise Guide # 1 Grease Pak Note: "#" indicates a non-illustrated part. See the back cover of the user's manual for information about ordering replacement parts. Description Key No...


