
English Manual
Page 1
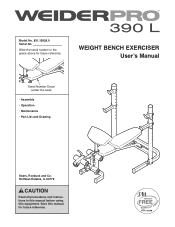
Save this equipment. Hoffman Estates, IL 60179 CAUTION Read all precautions and instructions in the space above for future reference. Write the serial number in this manual before using this manual for future reference. Model No. 831.15928.0 Serial No. WEIGHT BENCH EXERCISER Userʼs Manual Serial Number Decal (under the seat) • Assembly • Operation • Maintenance • Part List and Drawing Sears, Roebuck and Co.
Save this equipment. Hoffman Estates, IL 60179 CAUTION Read all precautions and instructions in the space above for future reference. Write the serial number in this manual before using this manual for future reference. Model No. 831.15928.0 Serial No. WEIGHT BENCH EXERCISER Userʼs Manual Serial Number Decal (under the seat) • Assembly • Operation • Maintenance • Part List and Drawing Sears, Roebuck and Co.
English Manual
Page 3
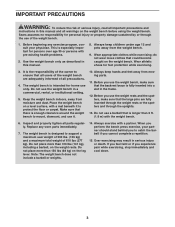
... . 10. Wear athletic shoes for personal injury or property damage sustained by or through the uprights. 13. It is enough clearance around the weight bench to ensure that all precautions. 4. Make sure that there is the responsibility of the owner to mount, dismount, and use it to... if you cannot complete a repetition. 15. Do not place more than 310 lbs (141 kg), including a barbell, on the weight bench. Before you use the weight bench, make sure that the backrest brace is intended for persons over age 35 or persons with a partner. Inspect and properly tighten...
... . 10. Wear athletic shoes for personal injury or property damage sustained by or through the uprights. 13. It is enough clearance around the weight bench to ensure that all precautions. 4. Make sure that there is the responsibility of the owner to mount, dismount, and use it to... if you cannot complete a repetition. 15. Do not place more than 310 lbs (141 kg), including a barbell, on the weight bench. Before you use the weight bench, make sure that the backrest brace is intended for persons over age 35 or persons with a partner. Inspect and properly tighten...
English Manual
Page 4
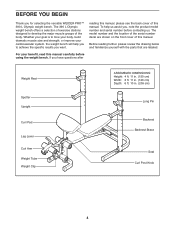
...that are shown on the front cover of this manual. If you , note the product model number and serial number before using the weight bench. reading this manual, please see the back cover of this manual. To help you to develop the major muscle groups of ... to achieve the specific results you for selecting the versatile WEIDER PRO™ 390 L Olympic weight bench. For your cardiovascular system, the weight bench will help us assist you have questions after Weight Rest Spotter Upright Curl Pad Leg Lever Curl Arm Weight Tube Weight Clip ASSEMBLED DIMENSIONS: Height: 4 ft. 11 in. ...
...that are shown on the front cover of this manual. If you , note the product model number and serial number before using the weight bench. reading this manual, please see the back cover of this manual. To help you to develop the major muscle groups of ... to achieve the specific results you for selecting the versatile WEIDER PRO™ 390 L Olympic weight bench. For your cardiovascular system, the weight bench will help us assist you have questions after Weight Rest Spotter Upright Curl Pad Leg Lever Curl Arm Weight Tube Weight Clip ASSEMBLED DIMENSIONS: Height: 4 ft. 11 in. ...

English Manual
Page 6
To make assembly easier, read the tips at 1 the top of this page before your begin. Attach the Front Leg (4) to walk around the weight bench as you assemble it will be used. Then, tighten an M8 x 65mm Screw (56) with two M10 x 82mm Carriage Bolts (55) and two M10 ...-end wrenches, or a set of ratchet wrenches. 1. Do not tighten the Locknuts yet. ASSEMBLY • Assembly requires two persons. • Because of its size and weight, assemble the weight bench in a cleared area and remove the packing materials.
To make assembly easier, read the tips at 1 the top of this page before your begin. Attach the Front Leg (4) to walk around the weight bench as you assemble it will be used. Then, tighten an M8 x 65mm Screw (56) with two M10 x 82mm Carriage Bolts (55) and two M10 ...-end wrenches, or a set of ratchet wrenches. 1. Do not tighten the Locknuts yet. ASSEMBLY • Assembly requires two persons. • Because of its size and weight, assemble the weight bench in a cleared area and remove the packing materials.
English Manual
Page 8
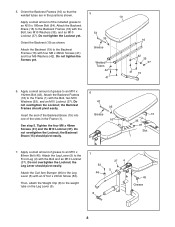
... Screw (53). the Backrest Frames should pivot easily. 6 43 35 Grease 16 15 35 37 Slot 1 7. See step 5. Attach the Backrest Frames (16) to the weight tube on the Leg Lever (5). 7 53 46 8 37 4 5 45 Grease 8 Tighten the four M6 x 48mm Screws (41) and the M10 Locknut (37). Do not overtighten... a small amount of the slots in the positions shown. Orient the Backrest (19) as shown. the Backrest Brace (15) should pivot easily. Then, attach the Weight Clip (8) to the Frame (1) with the Bolt, two M10 Washers (35), and an M10 Locknut (37). Do not tighten the Screws yet. 5 54 35 ...
... Screw (53). the Backrest Frames should pivot easily. 6 43 35 Grease 16 15 35 37 Slot 1 7. See step 5. Attach the Backrest Frames (16) to the weight tube on the Leg Lever (5). 7 53 46 8 37 4 5 45 Grease 8 Tighten the four M6 x 48mm Screws (41) and the M10 Locknut (37). Do not overtighten... a small amount of the slots in the positions shown. Orient the Backrest (19) as shown. the Backrest Brace (15) should pivot easily. Then, attach the Weight Clip (8) to the Frame (1) with the Bolt, two M10 Washers (35), and an M10 Locknut (37). Do not tighten the Screws yet. 5 54 35 ...
English Manual
Page 11
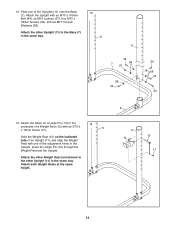
... (12) on a Large Pin (13) to the other Upright (11) to the Base (7) in the same way. 13. Attach both Weight Rests at the same height. 9 11 12 13 17 11 Attach the tether on the indicated side of the adjustment holes in the Upright. Slide ...one of an Upright (11), and align the Weight Rest with an M10 x 110mm Bolt (44), an M10 Locknut (37), four M10 x 18mm Screws (34), and six M10 Curved Washers (58...
... (12) on a Large Pin (13) to the other Upright (11) to the Base (7) in the same way. 13. Attach both Weight Rests at the same height. 9 11 12 13 17 11 Attach the tether on the indicated side of the adjustment holes in the Upright. Slide ...one of an Upright (11), and align the Weight Rest with an M10 x 110mm Bolt (44), an M10 Locknut (37), four M10 x 18mm Screws (34), and six M10 Curved Washers (58...

English Manual
Page 12
Attach the other Upright (11) in the Upright. Attach the tether on a Large Pin (13) to the other Spotter (29) to the underside of a Spotter (29) with an ST4.2 x 10mm Screw (17). 15 11 Hold the Spotter (29) on the indicated side of 29 an Upright (11), and align the Spotter with one of the adjustment holes in the same way. 15. Make sure that all parts are properly tightened before you use the weight bench. 12 Attach both Spotters at the same height. 11 29 13 17 16. Insert the Large Pin (13) through the Spotter and the Upright.
Attach the other Upright (11) in the Upright. Attach the tether on a Large Pin (13) to the other Spotter (29) to the underside of a Spotter (29) with an ST4.2 x 10mm Screw (17). 15 11 Hold the Spotter (29) on the indicated side of 29 an Upright (11), and align the Spotter with one of the adjustment holes in the same way. 15. Make sure that all parts are properly tightened before you use the weight bench. 12 Attach both Spotters at the same height. 11 29 13 17 16. Insert the Large Pin (13) through the Spotter and the Upright.
English Manual
Page 13
... (15) into one of the adjustment holes in the Curl Post. WARNING: Do not place more than 150 lbs. (68 kg) on the Leg Lever (5). 5 8 Weight USING THE CURL PAD To use the Curl Pad (20), insert the Curl Post (6) into a slot on the Frame (1). 19 15 1 Slot USING THE LEG... holes in the Curl Post. Also, refer to the accompanying exercise guide to see the correct form for important information about how to adjust the weight bench. Replace any worn parts immediately. ADJUSTMENT This section explains how to get the most benefit from your exercise program. do not require the Curl...
... (15) into one of the adjustment holes in the Curl Post. WARNING: Do not place more than 150 lbs. (68 kg) on the Leg Lever (5). 5 8 Weight USING THE CURL PAD To use the Curl Pad (20), insert the Curl Post (6) into a slot on the Frame (1). 19 15 1 Slot USING THE LEG... holes in the Curl Post. Also, refer to the accompanying exercise guide to see the correct form for important information about how to adjust the weight bench. Replace any worn parts immediately. ADJUSTMENT This section explains how to get the most benefit from your exercise program. do not require the Curl...

English Manual
Page 14
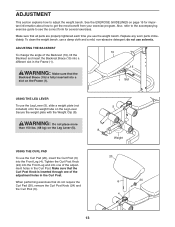
The 29 13 Spotter should be attached at the same height. Make sure that both Spotters are at the same height and that both Weight Rests are fully inserted. Do not place more than 310 lbs. (136 kg), including a barbell, on the indicated side of an Upright (11), and align ... Curl Arm Bushings. In addition, make sure that do not require the Curl Arm (50), remove it. 50 52 5 47 ADJUSTING THE SPOTTERS AND THE WEIGHT RESTS To adjust the height of the Spotters (29), first 12 remove the Large Pins (13). 11 Hold a Spotter (29) on the...
The 29 13 Spotter should be attached at the same height. Make sure that both Spotters are at the same height and that both Weight Rests are fully inserted. Do not place more than 310 lbs. (136 kg), including a barbell, on the indicated side of an Upright (11), and align ... Curl Arm Bushings. In addition, make sure that do not require the Curl Arm (50), remove it. 50 52 5 47 ADJUSTING THE SPOTTERS AND THE WEIGHT RESTS To adjust the height of the Spotters (29), first 12 remove the Large Pins (13). 11 Hold a Spotter (29) on the...
English Manual
Page 15
...a regular and enjoyable part of 8 repetitions for exercise. Adjust the intensity level of an individual exercise as one sit-up increases your weight and key body measurements once a month. EXERCISE GUIDELINES FOUR TYPES OF STRENGTH WORKOUTS Note: A "repetition" is one complete cycle of an... the appropriate parts of rest. Select a moderate amount of resistance and increase the number of repetitions in each exercise. Weight Loss-To lose weight, use a low amount of resistance and increase the number of repetitions in each workout. Select exercises for every major muscle...
...a regular and enjoyable part of 8 repetitions for exercise. Adjust the intensity level of an individual exercise as one sit-up increases your weight and key body measurements once a month. EXERCISE GUIDELINES FOUR TYPES OF STRENGTH WORKOUTS Note: A "repetition" is one complete cycle of an... the appropriate parts of rest. Select a moderate amount of resistance and increase the number of repetitions in each exercise. Weight Loss-To lose weight, use a low amount of resistance and increase the number of repetitions in each workout. Select exercises for every major muscle...
English Manual
Page 17
...-Model No. 831.15928.0 R0710A Key No. Description 1 1 Frame 2 1 Front Stabilizer 3 1 Rear Stabilizer 4 1 Front Leg 5 1 Leg Lever 6 1 Curl Post 7 1 Base 8 1 Weight Clip 9 2 Base Stabilizer 10 1 Front Leg Bushing 11 2 Upright 12 2 Weight Rest 13 4 Large Pin 14 2 95mm Round Inner Cap 15 1 Backrest Brace 16 2 Backrest Frame 17 11 ST4.2 x 10mm Screw...
...-Model No. 831.15928.0 R0710A Key No. Description 1 1 Frame 2 1 Front Stabilizer 3 1 Rear Stabilizer 4 1 Front Leg 5 1 Leg Lever 6 1 Curl Post 7 1 Base 8 1 Weight Clip 9 2 Base Stabilizer 10 1 Front Leg Bushing 11 2 Upright 12 2 Weight Rest 13 4 Large Pin 14 2 95mm Round Inner Cap 15 1 Backrest Brace 16 2 Backrest Frame 17 11 ST4.2 x 10mm Screw...
English Manual
Page 20
... Sears Brands, LLC ® Marca Registrada / TM Marca de Fábrica / SM Marca de Servicio de Sears Brands, LLC 90 DAY FULL WARRANTY If this Weight Bench Exerciser fails due to do-it fixed, at your home-of your nearest Sears Parts & Repair Center. 1-800-488-1222 Call anytime, day or... garage door openers and water heaters. 1-800-4-MY-HOME® (1-800-469-4663) Call anytime, day or night (U.S.A. This warranty does not apply when the Weight Bench Exerciser is used commercially or for free repair (or replacement if repair proves impossible). Get it -yourself.
... Sears Brands, LLC ® Marca Registrada / TM Marca de Fábrica / SM Marca de Servicio de Sears Brands, LLC 90 DAY FULL WARRANTY If this Weight Bench Exerciser fails due to do-it fixed, at your home-of your nearest Sears Parts & Repair Center. 1-800-488-1222 Call anytime, day or... garage door openers and water heaters. 1-800-4-MY-HOME® (1-800-469-4663) Call anytime, day or night (U.S.A. This warranty does not apply when the Weight Bench Exerciser is used commercially or for free repair (or replacement if repair proves impossible). Get it -yourself.


