
English Manual
Page 2
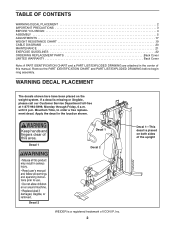
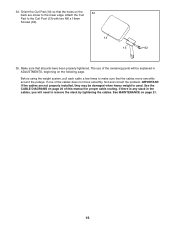
... trademark of the upright Decal 2 WEIDER is missing or illegible, please call our Customer Service Department toll-free at 1-877-992-5999, Monday through Friday, 6 a.m. Decal 1 Decal 1 Decal 2 Decal 1-This decal is placed on the weight system. Keep hands and fingers clear...center of this manual. TABLE OF CONTENTS WARNING DECAL PLACEMENT 2 IMPORTANT PRECAUTIONS 3 BEFORE YOU BEGIN 4 ASSEMBLY 5 ADJUSTMENTS 17 WEIGHT RESISTANCE CHART 19 CABLE DIAGRAMS 20 MAINTENANCE 21 EXERCISE GUIDELINES 22 ORDERING REPLACEMENT PARTS Back Cover LIMITED WARRANTY Back Cover Note: A...
... trademark of the upright Decal 2 WEIDER is missing or illegible, please call our Customer Service Department toll-free at 1-877-992-5999, Monday through Friday, 6 a.m. Decal 1 Decal 1 Decal 2 Decal 1-This decal is placed on the weight system. Keep hands and fingers clear...center of this manual. TABLE OF CONTENTS WARNING DECAL PLACEMENT 2 IMPORTANT PRECAUTIONS 3 BEFORE YOU BEGIN 4 ASSEMBLY 5 ADJUSTMENTS 17 WEIGHT RESISTANCE CHART 19 CABLE DIAGRAMS 20 MAINTENANCE 21 EXERCISE GUIDELINES 22 ORDERING REPLACEMENT PARTS Back Cover LIMITED WARRANTY Back Cover Note: A...
English Manual
Page 3
...while exercising, stop immediately and make sure that all parts are raised. Do not use the lat bar. 15. Make sure all users of the weight system are on a level surface. If the cables bind as described in this product. 3 If you are exercising, stop immediately and begin cooling...with pre-existing health problems. Read all times. Never release the arms, leg lever, lat bar, or handle strap while weights are properly tightened each time the weight system is designed to prevent unauthorized use of 300 pounds. 10. Always disconnect the lat bar from moving parts. 11. ICON...
...while exercising, stop immediately and make sure that all parts are raised. Do not use the lat bar. 15. Make sure all users of the weight system are on a level surface. If the cables bind as described in this product. 3 If you are exercising, stop immediately and begin cooling...with pre-existing health problems. Read all times. Never release the arms, leg lever, lat bar, or handle strap while weights are properly tightened each time the weight system is designed to prevent unauthorized use of 300 pounds. 10. Always disconnect the lat bar from moving parts. 11. ICON...
English Manual
Page 4
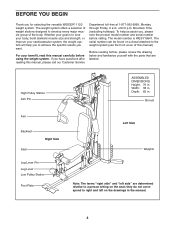
...labeled. Whether your goal is WESY19541. Shroud Arm Backrest Seat Right Side Leg Lever Pin Leg Lever Low Pulley Station Foot Plate Left Side Weights Note: The terms "right side" and "left on the seat; To help you to tone your body, build dramatic muscle size and...strength, or improve your benefit, read this manual). Depth: 65 in . For your cardiovascular system, the weight system will help us assist you for selecting the versatile WEIDER® 1120 weight system. The model number is to achieve the specific results you have questions after reading this manual, please ...
...labeled. Whether your goal is WESY19541. Shroud Arm Backrest Seat Right Side Leg Lever Pin Leg Lever Low Pulley Station Foot Plate Left Side Weights Note: The terms "right side" and "left on the seat; To help you to tone your body, build dramatic muscle size and...strength, or improve your benefit, read this manual). Depth: 65 in . For your cardiovascular system, the weight system will help us assist you for selecting the versatile WEIDER® 1120 weight system. The model number is to achieve the specific results you have questions after reading this manual, please ...
English Manual
Page 5
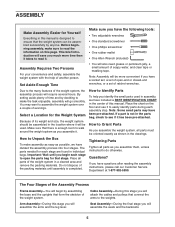
... the chart on this page. Questions? ASSEMBLY Make Assembly Easier for Yourself Everything in this manual is enough room to walk around the weight system as you assemble it. Before beginning assembly, make the task enjoyable, assembly will be more time than it will go smoothly. ...ratchet wrenches. Arm Assembly-During this manual. Make sure you will require several hours. The parts needed for the Weight System Because of its weight and size, the weight system should be assembled in the location where it takes to open -end or closed-end wrenches, or a set...
... the chart on this page. Questions? ASSEMBLY Make Assembly Easier for Yourself Everything in this manual is enough room to walk around the weight system as you assemble it. Before beginning assembly, make the task enjoyable, assembly will be more time than it will go smoothly. ...ratchet wrenches. Arm Assembly-During this manual. Make sure you will require several hours. The parts needed for the Weight System Because of its weight and size, the weight system should be assembled in the location where it takes to open -end or closed-end wrenches, or a set...
English Manual
Page 6
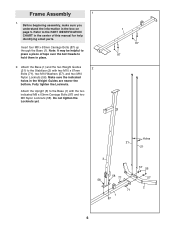
Before beginning assembly, make sure you understand the information in place. 2. Attach the Base (1) and the two Weight Guides 2 (21) to hold them in the box on page 5. Note: It may be helpful to place a piece of this manual for help identifying small ... Locknuts yet. 1 87 87 Holes 21 21 3 58 71 58 71 1 87 57 56 57 2 6 Attach the Upright (3) to the PART IDENTIFICATION CHART in the Weight Guides are nearer the bottom. Refer to the Base (1) with two M10 x 67mm Bolts (71), two M10 Washers (57), and two M10 Nylon Locknuts (56...
Before beginning assembly, make sure you understand the information in place. 2. Attach the Base (1) and the two Weight Guides 2 (21) to hold them in the box on page 5. Note: It may be helpful to place a piece of this manual for help identifying small ... Locknuts yet. 1 87 87 Holes 21 21 3 58 71 58 71 1 87 57 56 57 2 6 Attach the Upright (3) to the PART IDENTIFICATION CHART in the Weight Guides are nearer the bottom. Refer to the Base (1) with two M10 x 67mm Bolts (71), two M10 Washers (57), and two M10 Nylon Locknuts (56...
English Manual
Page 7
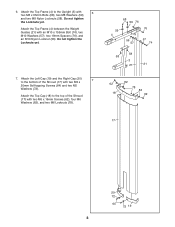
... (21). Lubricate the indicated holes in the same manner. 4 68 68 6 59 58 59 68 68 7 3 59 58 58 59 5. Orient the six Weights (22) with the 3 two M8 x 63mm Carriage Bolts (87) and two M8 Nylon Locknuts (58). Make sure the end of the Bumper is oriented as ...shown. Slide the Top Weight onto the Weight Guides (21). 21 25 Pin Hole 21 Grease Pin 24 23 22 27 7 Do not tighten the Locknut yet. Slide the...
... (21). Lubricate the indicated holes in the same manner. 4 68 68 6 59 58 59 68 68 7 3 59 58 58 59 5. Orient the six Weights (22) with the 3 two M8 x 63mm Carriage Bolts (87) and two M8 Nylon Locknuts (58). Make sure the end of the Bumper is oriented as ...shown. Slide the Top Weight onto the Weight Guides (21). 21 25 Pin Hole 21 Grease Pin 24 23 22 27 7 Do not tighten the Locknut yet. Slide the...
English Manual
Page 8
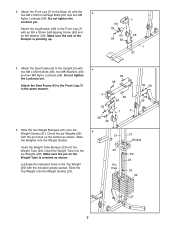
Do not tighten the Locknuts yet. Do not tighten the Locknuts yet. 7. Attach the Top Frame (4) between the Weight Guides (21) with two M6 x 16mm Screws (62), four M6 Washers (82), and two M6 Locknuts (78). 68 59 76 59 4 56 57 76 57 ...
Do not tighten the Locknuts yet. Do not tighten the Locknuts yet. 7. Attach the Top Frame (4) between the Weight Guides (21) with two M6 x 16mm Screws (62), four M6 Washers (82), and two M6 Locknuts (78). 68 59 76 59 4 56 57 76 57 ...
English Manual
Page 14
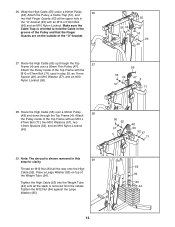
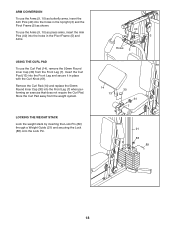
... Trap (51), and two Half Finger Guards (43) at the upper hole in this 29 step for clarity. Tighten the High Cable (55) into the Weight Tube (24) until all the way onto the High Cable (55). Tighten the M12 Nut (84) against the Large Washer (85). 55 84 85 24... inside of the Top Frame with an M10 x 51mm Bolt (66) and an M10 Nylon Locknut. Place a Large Washer (85) on the outside of the Weight Tube (24). Make sure the Cable Trap is shown removed in the "U"-bracket (45) with the M10 x 67mm Bolt (71) used in the groove of...
... Trap (51), and two Half Finger Guards (43) at the upper hole in this 29 step for clarity. Tighten the High Cable (55) into the Weight Tube (24) until all the way onto the High Cable (55). Tighten the M12 Nut (84) against the Large Washer (85). 55 84 85 24... inside of the Top Frame with an M10 x 51mm Bolt (66) and an M10 Nylon Locknut. Place a Large Washer (85) on the outside of the Weight Tube (24). Make sure the Cable Trap is shown removed in the "U"-bracket (45) with the M10 x 67mm Bolt (71) used in the groove of...
English Manual
Page 16
... edge. 34. The use of the cables does not move smoothly around the pulleys. If one of the remaining parts will be damaged when heavy weight is used. See the CABLE DIAGRAMS on page 21. 16 Attach the Curl Pad to make sure that all parts have been properly tightened. Before...
... edge. 34. The use of the cables does not move smoothly around the pulleys. If one of the remaining parts will be damaged when heavy weight is used. See the CABLE DIAGRAMS on page 21. 16 Attach the Curl Pad to make sure that all parts have been properly tightened. Before...
English Manual
Page 17
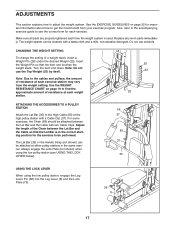
... A PULLEY STATION Attach the Lat Bar (35) to the High Cable (55) at either pulley stations in the correct starting position for each time the weight system is in the same manner. Note: Do not use solvents. Adjust the length of resistance at each exercise station may vary from your exercise...) should be performed. ADJUSTMENTS This section explains how to be attached between the Lat Bar and the Cable so that the bent end touches the weight stack. Always engage the Lock Plate (not shown) when using the low pulley station, engage the Leg Lever Pin (38) into the Leg Lever (8) ...
... A PULLEY STATION Attach the Lat Bar (35) to the High Cable (55) at either pulley stations in the correct starting position for each time the weight system is in the same manner. Note: Do not use solvents. Adjust the length of resistance at each exercise station may vary from your exercise...) should be performed. ADJUSTMENTS This section explains how to be attached between the Lat Bar and the Cable so that the bent end touches the weight stack. Always engage the Lock Plate (not shown) when using the low pulley station, engage the Leg Lever Pin (38) into the Leg Lever (8) ...
English Manual
Page 18
... use the Curl Pad (14), remove the 50mm Round Inner Cap (30) from the weight system. Store the Curl Pad away from the Front Leg (7). LOCKING THE WEIGHT STACK Lock the weight stack by inserting the Lock Pin (89) through a Weight Guide (21) and securing the Lock (88) onto the Lock Pin. 40 3 Holes...
... use the Curl Pad (14), remove the 50mm Round Inner Cap (30) from the weight system. Store the Curl Pad away from the Front Leg (7). LOCKING THE WEIGHT STACK Lock the weight stack by inserting the Lock Pin (89) through a Weight Guide (21) and securing the Lock (88) onto the Lock Pin. 40 3 Holes...
English Manual
Page 19
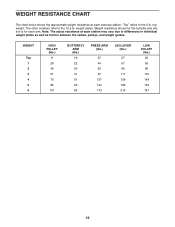
... LOW PULLEY (lbs.) 26 55 86 119 148 163 187 19 WEIGHT RESISTANCE CHART The chart below shows the approximate weight resistance at each station may vary due to the 12.5 lb. top weight. Note: The actual resistance at each arm. Weight resistance shown for the butterfly arm station is for each exercise station...
... LOW PULLEY (lbs.) 26 55 86 119 148 163 187 19 WEIGHT RESISTANCE CHART The chart below shows the approximate weight resistance at each station may vary due to the 12.5 lb. top weight. Note: The actual resistance at each arm. Weight resistance shown for the butterfly arm station is for each exercise station...
English Manual
Page 20
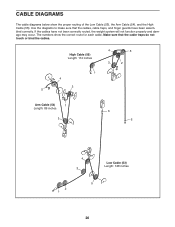
Make sure that the cables, cable traps, and finger guards have not been correctly routed, the weight system will not function properly and damage may occur. If the cables have been assembled correctly. The numbers show the proper routing of the Low ...
Make sure that the cables, cable traps, and finger guards have not been correctly routed, the weight system will not function properly and damage may occur. If the cables have been assembled correctly. The numbers show the proper routing of the Low ...
English Manual
Page 21
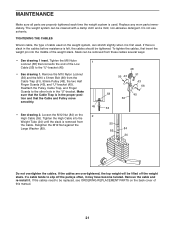
... Loosen the M12 Nut (84) on the back cover of the Low Cable (53) to slip off the weight stack. Remove the M10 Nylon Locknut (56) and the M10 x 51mm Bolt (66) from the Cable. If... a cable tends to the "U"-bracket (45). • See drawing 1. The weight system can be cleaned with a damp cloth and a mild, non-abrasive detergent. Do not use solvents. Slack can... is in the "U"-bracket. Tighten the High Cable into the middle of cable used on the weight system, can stretch slightly when it . Retighten the M12 Nut against the Large Washer (85)....
... Loosen the M12 Nut (84) on the back cover of the Low Cable (53) to slip off the weight stack. Remove the M10 Nylon Locknut (56) and the M10 x 51mm Bolt (66) from the Cable. If... a cable tends to the "U"-bracket (45). • See drawing 1. The weight system can be cleaned with a damp cloth and a mild, non-abrasive detergent. Do not use solvents. Slack can... is in the "U"-bracket. Tighten the High Cable into the middle of cable used on the weight system, can stretch slightly when it . Retighten the M12 Nut against the Large Washer (85)....
English Manual
Page 22
... of your limits and select the amount of resistance that is important to a moderate percentage of resistance used • by at any exercise program. Weight Loss To lose weight, use a low amount of resistance and increase the number of repetitions in two ways: • by changing the amount of their maximum capacity...
... of your limits and select the amount of resistance that is important to a moderate percentage of resistance used • by at any exercise program. Weight Loss To lose weight, use a low amount of resistance and increase the number of repetitions in two ways: • by changing the amount of their maximum capacity...
English Manual
Page 23
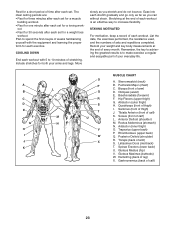
...after each set for a toning work- Ease into each stretch gradually and go only as far as you can without strain. Record your weight and key body measurements at the end of calf) K. Biceps (front of every month. Obliques (waist) E. Adductor (inner thigh)... X. Include stretches for both your everyday life. List the date, the exercises performed, the resistance used, and the numbers of each set for a weight loss workout. Sternomastoid (neck) B. Abductor (outer thigh) H. Rectus Abdominus (stomach) N. Rhomboideus (upper back) Q. Posterior Deltoid (shoulder) R. The ...
...after each set for a toning work- Ease into each stretch gradually and go only as far as you can without strain. Record your weight and key body measurements at the end of calf) K. Biceps (front of every month. Obliques (waist) E. Adductor (inner thigh)... X. Include stretches for both your everyday life. List the date, the exercises performed, the resistance used, and the numbers of each set for a weight loss workout. Sternomastoid (neck) B. Abductor (outer thigh) H. Rectus Abdominus (stomach) N. Rhomboideus (upper back) Q. Posterior Deltoid (shoulder) R. The ...

English Manual
Page 25
... 14 1 Curl Pad 15 1 Seat 16 1 Backrest 17 1 Shroud 18 1 Top Cap 19 1 Left Cap 20 1 Right Cap 21 2 Weight Guide 22 6 Weight 23 1 Weight Tube Cap 24 1 Weight Tube 25 1 Top Weight 26 1 Weight Pin 27 2 Weight Bumper 28 4 Small Foam Pad 29 1 Pad Tube 30 8 50mm Round Inner Cap 31 5 50mm Square Inner Cap 32...
... 14 1 Curl Pad 15 1 Seat 16 1 Backrest 17 1 Shroud 18 1 Top Cap 19 1 Left Cap 20 1 Right Cap 21 2 Weight Guide 22 6 Weight 23 1 Weight Tube Cap 24 1 Weight Tube 25 1 Top Weight 26 1 Weight Pin 27 2 Weight Bumper 28 4 Small Foam Pad 29 1 Pad Tube 30 8 50mm Round Inner Cap 31 5 50mm Square Inner Cap 32...
English Manual
Page 28
The MODEL NUMBER of the product (WEIDER® 1120 weight system) 3. The KEY NUMBER and DESCRIPTION of the part(s) (see the front cover of this product to freight damage, abuse, misuse, improper or abnormal usage ...
The MODEL NUMBER of the product (WEIDER® 1120 weight system) 3. The KEY NUMBER and DESCRIPTION of the part(s) (see the front cover of this product to freight damage, abuse, misuse, improper or abnormal usage ...


