
English Manual
Page 2
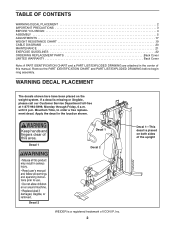
...6 p.m. Mountain Time, to order a free replacement decal. If a decal is a registered trademark of the upright Decal 2 WEIDER is missing or illegible, please call our Customer Service Department toll-free at 1-877-992-5999, Monday through Friday, 6 a.m....2 IMPORTANT PRECAUTIONS 3 BEFORE YOU BEGIN 4 ASSEMBLY 5 ADJUSTMENTS 17 WEIGHT RESISTANCE CHART 19 CABLE DIAGRAMS 20 MAINTENANCE 21 EXERCISE GUIDELINES 22 ORDERING REPLACEMENT PARTS Back Cover LIMITED WARRANTY Back Cover Note: A PART IDENTIFICATION CHART and a PART LIST/EXPLODED DRAWING are attached in the location shown. Apply ...
...6 p.m. Mountain Time, to order a free replacement decal. If a decal is a registered trademark of the upright Decal 2 WEIDER is missing or illegible, please call our Customer Service Department toll-free at 1-877-992-5999, Monday through Friday, 6 a.m....2 IMPORTANT PRECAUTIONS 3 BEFORE YOU BEGIN 4 ASSEMBLY 5 ADJUSTMENTS 17 WEIGHT RESISTANCE CHART 19 CABLE DIAGRAMS 20 MAINTENANCE 21 EXERCISE GUIDELINES 22 ORDERING REPLACEMENT PARTS Back Cover LIMITED WARRANTY Back Cover Note: A PART IDENTIFICATION CHART and a PART LIST/EXPLODED DRAWING are attached in the location shown. Apply ...
English Manual
Page 17
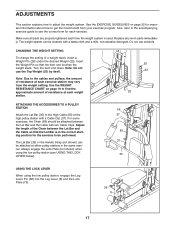
... how to get the most benefit from the weight setting. Insert the Weight Pin so that the Lat Bar is used. Use the WEIGHT RESISTANCE CHART on page 22 for important information about how to adjust the weight system. Always engage the Lock Plate (not shown) when using the low pulley... weight system is in the same manner. The Lat Bar (35) or the Handle Strap (not shown) can be performed. Also, refer to the accompanying exercise guide to be cleaned with two Cable Clips. Adjust the length of a weight stack, insert a Weight Pin (26) under the desired Weight (22). The weight...
... how to get the most benefit from the weight setting. Insert the Weight Pin so that the Lat Bar is used. Use the WEIGHT RESISTANCE CHART on page 22 for important information about how to adjust the weight system. Always engage the Lock Plate (not shown) when using the low pulley... weight system is in the same manner. The Lat Bar (35) or the Handle Strap (not shown) can be performed. Also, refer to the accompanying exercise guide to be cleaned with two Cable Clips. Adjust the length of a weight stack, insert a Weight Pin (26) under the desired Weight (22). The weight...
English Manual
Page 19
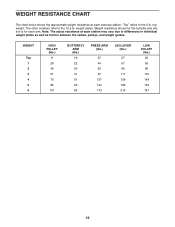
... as well as friction between the cables, pulleys, and weight guides. Note: The actual resistance at each arm. weight plates. WEIGHT RESISTANCE CHART The chart below shows the approximate weight resistance at each station may vary due to the 6 lb. top weight. The other numbers refer to the 12....5 lb. Weight resistance shown for the butterfly arm station is for each exercise station. WEIGHT Top 1 2 3 4 5 6 HIGH PULLEY (lbs.) 11 26 42 61 ...
... as well as friction between the cables, pulleys, and weight guides. Note: The actual resistance at each arm. weight plates. WEIGHT RESISTANCE CHART The chart below shows the approximate weight resistance at each station may vary due to the 6 lb. top weight. The other numbers refer to the 12....5 lb. Weight resistance shown for the butterfly arm station is for each exercise station. WEIGHT Top 1 2 3 4 5 6 HIGH PULLEY (lbs.) 11 26 42 61 ...
English Manual
Page 22
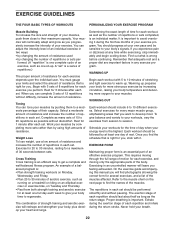
...You should be performed smoothly and without pausing. Warming up prepares your body for at your exercise. Select exercises for several exercises, and a list of the muscles affected. Refer to the muscle chart on Tuesday and Thursday. • Rest from session to regenerate. Select a moderate amount ...of resistance and increase the number of repetitions in each exercise, and moving through the full range of motion for 3...
...You should be performed smoothly and without pausing. Warming up prepares your body for at your exercise. Select exercises for several exercises, and a list of the muscles affected. Refer to the muscle chart on Tuesday and Thursday. • Rest from session to regenerate. Select a moderate amount ...of resistance and increase the number of repetitions in each exercise, and moving through the full range of motion for 3...
English Manual
Page 23
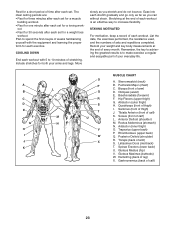
... and key body measurements at the end of each set for a muscle building workout. • Rest for one minute after each workout is to make exercise a regular and enjoyable part of thigh) J. A B C D E F G H I . Biceps (front of calf) L. Soleus (front of arm) D. ... for a short period of stretching. Stretching at the end of thigh) I J K L M N O P Q R S T U V W X MUSCLE CHART A. List the date, the exercises performed, the resistance used, and the numbers of leg) X. Obliques (waist) E. Hamstring (back of sets and repetitions completed. Move slowly as you stretch...
... and key body measurements at the end of each set for a muscle building workout. • Rest for one minute after each workout is to make exercise a regular and enjoyable part of thigh) J. A B C D E F G H I . Biceps (front of calf) L. Soleus (front of arm) D. ... for a short period of stretching. Stretching at the end of thigh) I J K L M N O P Q R S T U V W X MUSCLE CHART A. List the date, the exercises performed, the resistance used, and the numbers of leg) X. Obliques (waist) E. Hamstring (back of sets and repetitions completed. Move slowly as you stretch...


