Operating Instructions
Page 41
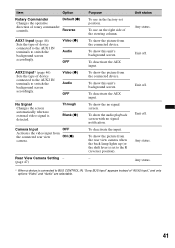
... the connected device. To show this unit's background screen. To deactivate the AUX input. Any status. * When a device is connected to BUS CONTROL IN, "Sony BUS Input" appears instead of device connected to the AUX1 IN terminals to switch the background screen accordingly. Rear View ...show this unit's background screen. To deactivate the input. Unit status Any status. Reverse AUX1 Input (page 46) Sets the type of "AUX2 Input," and only options "Video" and "Audio" are selectable. 41 Any status. To deactivate the AUX input. Unit off . Video (z) Audio OFF No ...
... the connected device. To show this unit's background screen. To deactivate the AUX input. Any status. * When a device is connected to BUS CONTROL IN, "Sony BUS Input" appears instead of device connected to the AUX1 IN terminals to switch the background screen accordingly. Rear View ...show this unit's background screen. To deactivate the input. Unit status Any status. Reverse AUX1 Input (page 46) Sets the type of "AUX2 Input," and only options "Video" and "Audio" are selectable. 41 Any status. To deactivate the AUX input. Unit off . Video (z) Audio OFF No ...

Operating Instructions
Page 46
...15 Level 0 12:00 2 Touch "AUX1" or "AUX2" to "AUX1" and "AUX2." 1 Reduce the volume on the unit. 2 Touch "Source List," then "AUX." The volume level is adjustable in another car or charging the battery. Touch the number keys to enter your security code. The security unlock display...To return to reenter your security code, then "OK." 4 To confirm, touch the number keys to the previous display, touch "Back." The 4-digit input prompt appears when you need to enter the security code to discourage theft. Setting the clock The clock uses a 12-hour indication. 1 Touch "Source ...
...15 Level 0 12:00 2 Touch "AUX1" or "AUX2" to "AUX1" and "AUX2." 1 Reduce the volume on the unit. 2 Touch "Source List," then "AUX." The volume level is adjustable in another car or charging the battery. Touch the number keys to enter your security code. The security unlock display...To return to reenter your security code, then "OK." 4 To confirm, touch the number keys to the previous display, touch "Back." The 4-digit input prompt appears when you need to enter the security code to discourage theft. Setting the clock The clock uses a 12-hour indication. 1 Touch "Source ...
Operating Instructions
Page 47
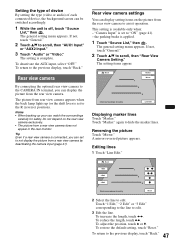
To deactivate the AUX input, select "OFF." Tip Even if a rear view camera is connected... the surroundings carefully for safety. Do not depend on the picture from the rear view camera to assist operation. "Camera Input" is complete. To reduce the length, touch bB. This setting is applied. 1 Touch "Source List," then . ... List," then . To increase the length, touch B b. If not, touch "General." 2 Touch v/V to scroll, then "AUX1 Input" or "AUX2 Input." 3 Touch "Audio" or "Video." Marker Mirror 1 2 3 Line Edit Displaying marker lines Touch "Marker." Setting the type of...
To deactivate the AUX input, select "OFF." Tip Even if a rear view camera is connected... the surroundings carefully for safety. Do not depend on the picture from the rear view camera to assist operation. "Camera Input" is complete. To reduce the length, touch bB. This setting is applied. 1 Touch "Source List," then . ... List," then . To increase the length, touch B b. If not, touch "General." 2 Touch v/V to scroll, then "AUX1 Input" or "AUX2 Input." 3 Touch "Audio" or "Video." Marker Mirror 1 2 3 Line Edit Displaying marker lines Touch "Marker." Setting the type of...
Operating Instructions
Page 51
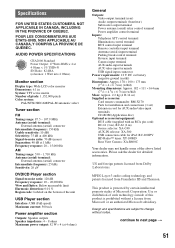
... Inputs: Telephone ATT control terminal Illumination control terminal BUS control input terminal Remote controller input terminal Antenna (aerial) input terminal Parking break control terminal Reverse input terminal Camera input terminal AUX audio input terminals AUX video input terminals USB signal input connector...(4 lb 14 oz) Supplied accessories: Card remote commander: RM-X170 Parts for installation and connections (1 set) Extension cord for AUX audio/video input terminals CD-ROM (Application disc) Optional accessories/equipment: BUS cable (supplied with an RCA pin cord): RC-61 (1 m), ...
... Inputs: Telephone ATT control terminal Illumination control terminal BUS control input terminal Remote controller input terminal Antenna (aerial) input terminal Parking break control terminal Reverse input terminal Camera input terminal AUX audio input terminals AUX video input terminals USB signal input connector...(4 lb 14 oz) Supplied accessories: Card remote commander: RM-X170 Parts for installation and connections (1 set) Extension cord for AUX audio/video input terminals CD-ROM (Application disc) Optional accessories/equipment: BUS cable (supplied with an RCA pin cord): RC-61 (1 m), ...
Operating Instructions
Page 53
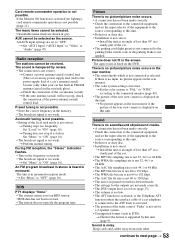
... is not correct. If the Monitor Off function is not correct. All AUX input settings are set to "ON" (page 16). The sound is hampered ...color system setting is fixed on this unit (page 9). The aspect ratio is incorrect. If there is no input, no lighting), card remote commander operation is not correct. t No picture appears in the rear/side glass)....too weak. t Perform manual tuning. t Set "Mono" to "Video" or "Audio" (page 47). t Set "AUX1 Input"/"AUX2 Input" to "OFF" (page 16). Radio reception The stations cannot be selected as DTS). t Set "Mono" to the connected monitor...
... is not correct. If the Monitor Off function is not correct. All AUX input settings are set to "ON" (page 16). The sound is hampered ...color system setting is fixed on this unit (page 9). The aspect ratio is incorrect. If there is no input, no lighting), card remote commander operation is not correct. t No picture appears in the rear/side glass)....too weak. t Perform manual tuning. t Set "Mono" to "Video" or "Audio" (page 47). t Set "AUX1 Input"/"AUX2 Input" to "OFF" (page 16). Radio reception The stations cannot be selected as DTS). t Set "Mono" to the connected monitor...


