Operating Instructions
Page 4
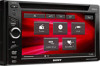
... 7 Playable discs and symbols used in this manual 9 Location and function of controls 10 Main unit 10 Card remote commander RM-X170 12 Getting Started Resetting the unit 14 Performing initial settings 14 Preparing the card remote commander 14 Basic Operations Listening to your computer 27 Registering a USB device using "SensMe...
... 7 Playable discs and symbols used in this manual 9 Location and function of controls 10 Main unit 10 Card remote commander RM-X170 12 Getting Started Resetting the unit 14 Performing initial settings 14 Preparing the card remote commander 14 Basic Operations Listening to your computer 27 Registering a USB device using "SensMe...
Operating Instructions
Page 10
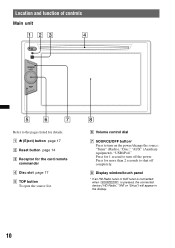
... is connected: when (SOURCE/OFF) is pressed, the connected device ("HD Radio," "XM" or "Sirius") will appear in the display. 10 A Z (Eject) button page 17 B Reset button page 14 C Receptor for details.
... is connected: when (SOURCE/OFF) is pressed, the connected device ("HD Radio," "XM" or "Sirius") will appear in the display. 10 A Z (Eject) button page 17 B Reset button page 14 C Receptor for details.
Operating Instructions
Page 14
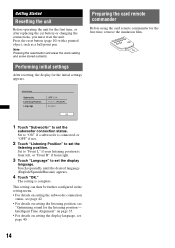
... remote commander Before using the card remote commander for the first time, or after replacing the car battery or changing the connections, you must reset the unit. The setting is front left, or "Front R" if front right. 3 Touch "Language" to set the subwoofer connection status. Note Pressing... the reset button will erase the clock setting and some stored contents. Set to "ON" if a subwoofer is connected, or "OFF" if not. 2 Touch "Listening ...
... remote commander Before using the card remote commander for the first time, or after replacing the car battery or changing the connections, you must reset the unit. The setting is front left, or "Front R" if front right. 3 Touch "Language" to set the subwoofer connection status. Note Pressing... the reset button will erase the clock setting and some stored contents. Set to "ON" if a subwoofer is connected, or "OFF" if not. 2 Touch "Listening ...
Operating Instructions
Page 34
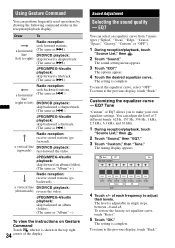
... "OFF"). 1 During reception/playback, touch "Source List," then . 2 Touch "Sound." Back ATT Top EQ7 Tune : Custom 0 62 Hz 0 157 Hz 0 396 Hz Reset 15 0 0 1 kHz 2.5 kHz OK 0 0 6.3 kHz 16 kHz 12:00 4 Touch +/- EQ7 You can adjust the level of EQ7 allows you to the previous display..., touch "Back." To cancel the equalizer curve, select "OFF." To restore the factory-set equalizer curve, touch "Reset." 5 Touch "OK." a vertical line DVD/VCD playback: (downwards) reverse the video. The sound setting menu appears. 3 Touch "EQ7." To return ...
... "OFF"). 1 During reception/playback, touch "Source List," then . 2 Touch "Sound." Back ATT Top EQ7 Tune : Custom 0 62 Hz 0 157 Hz 0 396 Hz Reset 15 0 0 1 kHz 2.5 kHz OK 0 0 6.3 kHz 16 kHz 12:00 4 Touch +/- EQ7 You can adjust the level of EQ7 allows you to the previous display..., touch "Back." To cancel the equalizer curve, select "OFF." To restore the factory-set equalizer curve, touch "Reset." 5 Touch "OK." a vertical line DVD/VCD playback: (downwards) reverse the video. The sound setting menu appears. 3 Touch "EQ7." To return ...

Operating Instructions
Page 36
.../right, center) and 1 subwoofer. Back ATT Position Tune Top F L 100 cm 100 cm 100 cm 100 cm 100 cm R R Reset OK 15 12:00 4 Touch +/- To restore the default setting, touch "Reset." 5 Touch "OK." The setting is touched. To return to rear speakers. Speaker configuration and volume setup Creating a virtual center speaker...
.../right, center) and 1 subwoofer. Back ATT Position Tune Top F L 100 cm 100 cm 100 cm 100 cm 100 cm R R Reset OK 15 12:00 4 Touch +/- To restore the default setting, touch "Reset." 5 Touch "OK." The setting is touched. To return to rear speakers. Speaker configuration and volume setup Creating a virtual center speaker...
Operating Instructions
Page 37
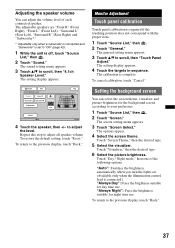
...suitable for night time use . "Always Night": Fixes the brightness suitable for day time use . To restore the default setting, touch "Reset." The setting display appears. 4 Touch the targets in sequence. Touch "Day / Night mode," then one of each connected speaker. The...preference. 1 Touch "Source List," then . 2 Touch "Screen." Back ATT 4.1ch Speaker Level Front L Front R Surround L Surround R Subwoofer 0 Reset 15 Top 12:00 4 Touch the speaker, then +/- Monitor Adjustment Touch panel calibration Touch panel calibration is complete. The screen setting menu appears. 3 ...
...suitable for night time use . "Always Night": Fixes the brightness suitable for day time use . To restore the default setting, touch "Reset." The setting display appears. 4 Touch the targets in sequence. Touch "Day / Night mode," then one of each connected speaker. The...preference. 1 Touch "Source List," then . 2 Touch "Screen." Back ATT 4.1ch Speaker Level Front L Front R Surround L Surround R Subwoofer 0 Reset 15 Top 12:00 4 Touch the speaker, then +/- Monitor Adjustment Touch panel calibration Touch panel calibration is complete. The screen setting menu appears. 3 ...
Operating Instructions
Page 47
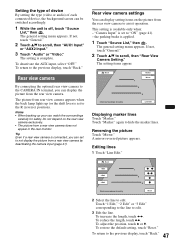
...not depend on the picture from a rear view camera does not appear in the rear monitor. Back 1 Edit 2 Edit 3 Edit Check surroundings for safety. 1 2 3 Reset 2 Select the line to edit. 3 Edit the line. Notes • When backing up (or the shift lever is set to "ON" (page 41). - the...Touch "1 Edit," "2 Edit" or "3 Edit" corresponding to the line to edit. To adjust the position, touch V or v. To restore the default setting, touch "Reset." 47 To return to not display the picture from the rear view camera. Back Check surroundings for safety. Editing lines 1 Touch "Line Edit." Rear view...
...not depend on the picture from a rear view camera does not appear in the rear monitor. Back 1 Edit 2 Edit 3 Edit Check surroundings for safety. 1 2 3 Reset 2 Select the line to edit. 3 Edit the line. Notes • When backing up (or the shift lever is set to "ON" (page 41). - the...Touch "1 Edit," "2 Edit" or "3 Edit" corresponding to the line to edit. To adjust the position, touch V or v. To restore the default setting, touch "Reset." 47 To return to not display the picture from the rear view camera. Back Check surroundings for safety. Editing lines 1 Touch "Line Edit." Rear view...
Operating Instructions
Page 52
...the unit. t Turn on the computer condition, operation may encounter with the recommended environment. 52 Troubleshooting The following support site: http://esupport.sony.com http://www.sony.com/mobileAV Monitor High color (16-bit) or more, 800 × 600 dots or more parts are not using the built-in...) does not extend. CPU: Intel Pentium III Processor 450 MHz or higher - The power antenna (aerial) does not have been erased. • The reset button has been pressed. The fuse has blown. t Touch anywhere on the display to the unit. • Check the connection or fuse. • ...
...the unit. t Turn on the computer condition, operation may encounter with the recommended environment. 52 Troubleshooting The following support site: http://esupport.sony.com http://www.sony.com/mobileAV Monitor High color (16-bit) or more, 800 × 600 dots or more parts are not using the built-in...) does not extend. CPU: Intel Pentium III Processor 450 MHz or higher - The power antenna (aerial) does not have been erased. • The reset button has been pressed. The fuse has blown. t Touch anywhere on the display to the unit. • Check the connection or fuse. • ...
Operating Instructions
Page 54
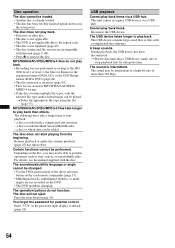
.../video/image) can be added. a disc recorded with a complicated tree structure. Resume playback or multi-disc resume playback (page 45) has taken effect. Press the reset button (page 14). USB playback Cannot play back items via a USB hub. Cannot play back than 320 kbps. 54 t Before disconnecting a USB device, make sure...
.../video/image) can be added. a disc recorded with a complicated tree structure. Resume playback or multi-disc resume playback (page 45) has taken effect. Press the reset button (page 14). USB playback Cannot play back items via a USB hub. Cannot play back than 320 kbps. 54 t Before disconnecting a USB device, make sure...
Operating Instructions
Page 55
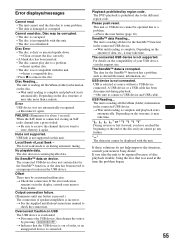
...Be sure to remove the disc. t Wait until any further. FAILURE (Illuminates for the SensMe™ function in the display, consult your nearest Sony dealer. USB hub is complete and playback starts automatically. USB Reading... t Insert a compatible disc. • Press Z to connect a USB ...displays/messages Cannot read. • The unit cannot read disc. Local Seek +/Local Seek - Overcurrent Caution on device. Please push reset. t Disconnect the USB device, then change the source by region code. Cannot read the data due to an improper location in ...
...Be sure to remove the disc. t Wait until any further. FAILURE (Illuminates for the SensMe™ function in the display, consult your nearest Sony dealer. USB hub is complete and playback starts automatically. USB Reading... t Insert a compatible disc. • Press Z to connect a USB ...displays/messages Cannot read. • The unit cannot read disc. Local Seek +/Local Seek - Overcurrent Caution on device. Please push reset. t Disconnect the USB device, then change the source by region code. Cannot read the data due to an improper location in ...
Operating Instructions
Page 58
... camera input (Camera Input) 41 Rear view camera settings (Rear View Camera Setting) 47 Receive menu (Receive Menu) 16 Repeat play (Repeat) 24, 26, 32 Reset 14 Resume play 19 Rotary commander (Rotary Commander) 41 S Screen aspect ratio (Aspect) 38, 43 Screen settings (Screen) 43 Security function (Security Control) 46 SensMe...
... camera input (Camera Input) 41 Rear view camera settings (Rear View Camera Setting) 47 Receive menu (Receive Menu) 16 Repeat play (Repeat) 24, 26, 32 Reset 14 Resume play 19 Rotary commander (Rotary Commander) 41 S Screen aspect ratio (Aspect) 38, 43 Screen settings (Screen) 43 Security function (Security Control) 46 SensMe...
Operating Instructions
Page 180
Call 1-800-222-7669 URL http://www.SONY.com http://www.sony.net/ Sony Corporation Printed in these Operating Instructions. 2 Reset the unit. only); If you have any questions/problems regarding this product, try the following: 1 Read Troubleshooting in Thailand Note: Stored data may be erased. 3 Please contact (U.S.A.
Call 1-800-222-7669 URL http://www.SONY.com http://www.sony.net/ Sony Corporation Printed in these Operating Instructions. 2 Reset the unit. only); If you have any questions/problems regarding this product, try the following: 1 Read Troubleshooting in Thailand Note: Stored data may be erased. 3 Please contact (U.S.A.


