Operating Instructions
Page 2
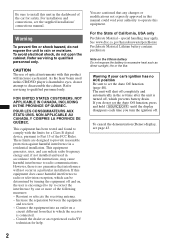
... correct the interference by turning the equipment off and on a circuit different from that interference will shut off completely and automatically in the set the Auto Off function, press and hold (SOURCE/OFF) until the display disappears each time you turn the ignition off , which the...display, see the supplied installation/ connections manual. POUR LES CONSOMMATEURS AUX ÉTATS-UNIS. Warning To prevent fire or shock hazard, do not set time after the unit is turned off . To avoid electrical shock, do not attempt to disassemble the cabinet. NOT APPLICABLE IN CANADA, INCLUDING ...
... correct the interference by turning the equipment off and on a circuit different from that interference will shut off completely and automatically in the set the Auto Off function, press and hold (SOURCE/OFF) until the display disappears each time you turn the ignition off , which the...display, see the supplied installation/ connections manual. POUR LES CONSOMMATEURS AUX ÉTATS-UNIS. Warning To prevent fire or shock hazard, do not set time after the unit is turned off . To avoid electrical shock, do not attempt to disassemble the cabinet. NOT APPLICABLE IN CANADA, INCLUDING ...
Operating Instructions
Page 4
... music according to the USB device using "SensMe™ Setup 28 Transferring tracks to your mood - Playback control . . . 22 Configuring audio settings 23 Changing the audio language/format . . . . . 23 Changing the audio channel 23 Adjusting the audio output level - BTM 21 Storing... manually 21 Receiving stored stations 21 RDS 21 Overview 21 Selecting PTY 22 Setting CT 22 Advanced Operations - SensMe 27 Before using the SensMe™ function . . . . . 27 Installing "SensMe™ Setup" ...
... music according to the USB device using "SensMe™ Setup 28 Transferring tracks to your mood - Playback control . . . 22 Configuring audio settings 23 Changing the audio language/format . . . . . 23 Changing the audio channel 23 Adjusting the audio output level - BTM 21 Storing... manually 21 Receiving stored stations 21 RDS 21 Overview 21 Selecting PTY 22 Setting CT 22 Advanced Operations - SensMe 27 Before using the SensMe™ function . . . . . 27 Installing "SensMe™ Setup" ...
Operating Instructions
Page 5
... the sound quality - EQ7 34 Customizing the equalizer curve - RBE 36 Adjusting the speaker volume 37 Monitor Adjustment Touch panel calibration 37 Setting the background screen 37 Selecting the picture quality - Intelligent Time Alignment Tune . . . . . 36 Speaker configuration and volume setup....the picture quality 38 Selecting the aspect ratio 38 Settings Basic setting operation 39 General settings 40 Sound settings 42 Screen settings 43 DVD and other playback settings 44 Setting the security code 46 Setting the clock 46 Using Optional Equipment Auxiliary audio/video...
... the sound quality - EQ7 34 Customizing the equalizer curve - RBE 36 Adjusting the speaker volume 37 Monitor Adjustment Touch panel calibration 37 Setting the background screen 37 Selecting the picture quality - Intelligent Time Alignment Tune . . . . . 36 Speaker configuration and volume setup....the picture quality 38 Selecting the aspect ratio 38 Settings Basic setting operation 39 General settings 40 Sound settings 42 Screen settings 43 DVD and other playback settings 44 Setting the security code 46 Setting the clock 46 Using Optional Equipment Auxiliary audio/video...
Operating Instructions
Page 7
... and watch the monitor while driving. Installing the unit with your attention from Dolby Laboratories. "Dolby" and the double-D symbol are trademarks of Sony Corporation. Do not use the setup feature or any car parts such as insecticide, hair spray, insect repellent, etc. - Keep small articles... out of the reach of the car. If you park the car and set the parking brake. Manufactured under license from the road. - Microsoft, Windows, Windows Vista and Windows Media and logos are trademarks. Do not expose...
... and watch the monitor while driving. Installing the unit with your attention from Dolby Laboratories. "Dolby" and the double-D symbol are trademarks of Sony Corporation. Do not use the setup feature or any car parts such as insecticide, hair spray, insect repellent, etc. - Keep small articles... out of the reach of the car. If you park the car and set the parking brake. Manufactured under license from the road. - Microsoft, Windows, Windows Vista and Windows Media and logos are trademarks. Do not expose...
Operating Instructions
Page 11
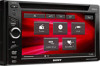
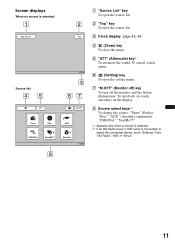
...: 45 ATT Tuner Disc USB/iPod SensMe™ 2 Top 12:00 3 67 M.OFF AUX External 12:00 A "Source List" key To open the source list. F (Setting) key To open the setting menu. C Clock display page 43, 46 D (Close) key To close the menu.
...: 45 ATT Tuner Disc USB/iPod SensMe™ 2 Top 12:00 3 67 M.OFF AUX External 12:00 A "Source List" key To open the source list. F (Setting) key To open the setting menu. C Clock display page 43, 46 D (Close) key To close the menu.
Operating Instructions
Page 13
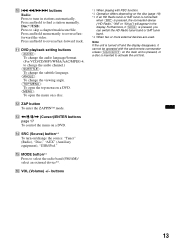
Press and hold to reverse/fastforward the video. K DVD playback setting buttons (AUDIO): To change the audio language/format. (For VCD/CD/MP3/WMA/AAC/MPEG-4, to reverse/fast-forward track. L ZAP button To enter the ...
Press and hold to reverse/fastforward the video. K DVD playback setting buttons (AUDIO): To change the audio language/format. (For VCD/CD/MP3/WMA/AAC/MPEG-4, to reverse/fast-forward track. L ZAP button To enter the ...
Operating Instructions
Page 14
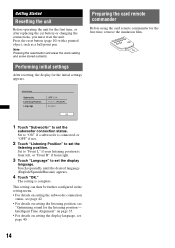
...unit Before operating the unit for the first time, remove the insulation film. Set to "ON" if a subwoofer is front left, or "Front R" if front right. 3 Touch "Language" to set the display language. Preparing the card remote commander Before using the card remote ... if not. 2 Touch "Listening Position" to set the listening position. The setting is complete. Performing initial settings After resetting, the display for the listening position - This setting can then be further configured in the setting menu. • For details on setting the subwoofer connection status, see page 42. ...
...unit Before operating the unit for the first time, remove the insulation film. Set to "ON" if a subwoofer is front left, or "Front R" if front right. 3 Touch "Language" to set the display language. Preparing the card remote commander Before using the card remote ... if not. 2 Touch "Listening Position" to set the listening position. The setting is complete. Performing initial settings After resetting, the display for the listening position - This setting can then be further configured in the setting menu. • For details on setting the subwoofer connection status, see page 42. ...

Operating Instructions
Page 16
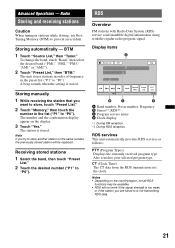
... C Band Receive Menu Preset List PTY List 12:00 D A Current source icon*1 B Band number, Preset number*2, Frequency/status C Volume level*3 D Setting status (CSO, EQ7, RBE) *1 Appears only when the controls are not shown. 1 2 3 Source List ATT Top No. Reception controls Touch the... station stored in stereo and with stronger signal. tune automatically. To tune normal stations, select "OFF." • "IF": Touch to set to "Wide" to activate the monaural mode if FM reception is activated, appears. To narrow the reception frequency automatically to skip frequencies continuously...
... C Band Receive Menu Preset List PTY List 12:00 D A Current source icon*1 B Band number, Preset number*2, Frequency/status C Volume level*3 D Setting status (CSO, EQ7, RBE) *1 Appears only when the controls are not shown. 1 2 3 Source List ATT Top No. Reception controls Touch the... station stored in stereo and with stronger signal. tune automatically. To tune normal stations, select "OFF." • "IF": Touch to set to "Wide" to activate the monaural mode if FM reception is activated, appears. To narrow the reception frequency automatically to skip frequencies continuously...

Operating Instructions
Page 20
... Top A Current source icon B Volume level*1 C Format, Playback status, Elapsed playback time*2, Chapter/title/album (folder)/track number*3*4, Audio Format*5, Setting status (CSO, EQ7, RBE) D Playback status, Elapsed playback time*2 E Track name, Album name, Artist name F Album artwork display*6 G Format, ...Track number, Album number*7, Setting status (CSO, EQ7, RBE) *1 When ATT is activated, appears. *2 During JPEG playback or VCD playback with the PBC function, no indication...
... Top A Current source icon B Volume level*1 C Format, Playback status, Elapsed playback time*2, Chapter/title/album (folder)/track number*3*4, Audio Format*5, Setting status (CSO, EQ7, RBE) D Playback status, Elapsed playback time*2 E Track name, Album name, Artist name F Album artwork display*6 G Format, ...Track number, Album number*7, Setting status (CSO, EQ7, RBE) *1 When ATT is activated, appears. *2 During JPEG playback or VCD playback with the PBC function, no indication...
Operating Instructions
Page 21
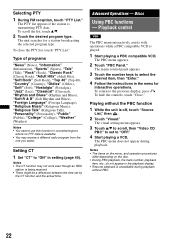
...Storing and receiving stations Caution When tuning in the preset list ("P1" to "P6"). BTM 1 Touch "Source List," then "Tuner." A beep sounds when the setting is stored. The station is stored. Receiving stored stations 1 Select the band, then touch "Preset List." 2 Touch the desired number ("P1" to "P6").... CT (Clock Time) The CT data from the RDS transmission sets the clock. The number and the confirmation display appear on the same number, the previously stored station will not work if the signal strength is...
...Storing and receiving stations Caution When tuning in the preset list ("P1" to "P6"). BTM 1 Touch "Source List," then "Tuner." A beep sounds when the setting is stored. The station is stored. Receiving stored stations 1 Select the band, then touch "Preset List." 2 Touch the desired number ("P1" to "P6").... CT (Clock Time) The CT data from the RDS transmission sets the clock. The number and the confirmation display appear on the same number, the previously stored station will not work if the signal strength is...
Operating Instructions
Page 22
... - To return to "ON" in the menu for a station broadcasting the selected program type. The visual setting menu appears. 3 Touch v/V to scroll, then "Video CD PBC" to set by the CT function and the actual time. The unit searches for interactive operations. Selecting PTY 1 During FM... playback display. • Resume playback is being received. • There might be a difference between the time set to select the desired item, then "Enter." 4 Follow the instructions in setting (page 40). To scroll the list, touch v/V. 2 Touch the desired program type. The PTY list appears ...
... - To return to "ON" in the menu for a station broadcasting the selected program type. The visual setting menu appears. 3 Touch v/V to scroll, then "Video CD PBC" to set by the CT function and the actual time. The unit searches for interactive operations. Selecting PTY 1 During FM... playback display. • Resume playback is being received. • There might be a difference between the time set to select the desired item, then "Enter." 4 Follow the instructions in setting (page 40). To scroll the list, touch v/V. 2 Touch the desired program type. The PTY list appears ...

Operating Instructions
Page 23
... a disc recorded in single steps, between disc and source. 1 During playback, touch "Play Menu." 2 Touch the "Adjust" box to set to "ON." 3 Touch -/+ repeatedly to adjust the output level. Note You may not be changed if the disc is recorded with multilingual tracks... options are not supported. Tip The operation by the card remote commander (pressing (AUDIO) repeatedly) is selected. Dolby D level You can also change the audio setting depending on the disc. Example: Dolby Digital 5.1 ch Rear component × 2 Dolby D 3 / 2 . 1 Front component × 2 + LFE component × 1 Center...
... a disc recorded in single steps, between disc and source. 1 During playback, touch "Play Menu." 2 Touch the "Adjust" box to set to "ON." 3 Touch -/+ repeatedly to adjust the output level. Note You may not be changed if the disc is recorded with multilingual tracks... options are not supported. Tip The operation by the card remote commander (pressing (AUDIO) repeatedly) is selected. Dolby D level You can also change the audio setting depending on the disc. Example: Dolby Digital 5.1 ch Rear component × 2 Dolby D 3 / 2 . 1 Front component × 2 + LFE component × 1 Center...

Operating Instructions
Page 24
...5 To confirm, touch the number keys to enter your password, then "OK." To return to 3 above. The options appear. The visual setting menu appears. 3 Touch v/V to the previous display, touch "Back." The parental unlock display appears. 2 Touch the number keys to reenter ...DVD Parental Rating." Activating parental control 1 While the unit is off , touch "Source List," then . 2 Touch "Visual." To change the setting, enter your password appears. To return to scroll, then "DVD Parental Area." Repeat and shuffle play MPEG-4 1 During playback, touch "Play Menu...
...5 To confirm, touch the number keys to enter your password, then "OK." To return to 3 above. The options appear. The visual setting menu appears. 3 Touch v/V to the previous display, touch "Back." The parental unlock display appears. 2 Touch the number keys to reenter ...DVD Parental Rating." Activating parental control 1 While the unit is off , touch "Source List," then . 2 Touch "Visual." To change the setting, enter your password appears. To return to scroll, then "DVD Parental Area." Repeat and shuffle play MPEG-4 1 During playback, touch "Play Menu...

Operating Instructions
Page 25
...disc/format are indicated below . "Title": Plays chapters in current title in random order. *1 "OFF": Returns to normal play mode. The setting is complete. "Track": Repeats the current track. MPEG-4 "OFF": Returns to normal play mode. "Album": Plays tracks/images/ video files... You can directly locate a desired point by specifying the title number, chapter number, etc. 1 During playback, press the number buttons on the setting. *2 Available only when playing a VCD without PBC function. *2 Excluding DVD-R/DVD-R DL/DVD-RW in random order. "Chapter": Repeats the ...
...disc/format are indicated below . "Title": Plays chapters in current title in random order. *1 "OFF": Returns to normal play mode. The setting is complete. "Track": Repeats the current track. MPEG-4 "OFF": Returns to normal play mode. "Album": Plays tracks/images/ video files... You can directly locate a desired point by specifying the title number, chapter number, etc. 1 During playback, press the number buttons on the setting. *2 Available only when playing a VCD without PBC function. *2 Excluding DVD-R/DVD-R DL/DVD-RW in random order. "Chapter": Repeats the ...
Operating Instructions
Page 26
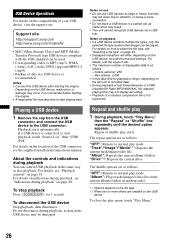
...may be used. • Corresponding codec is not supported. About the controls and indications during playback" on the USB device, recorded format and settings. Notes on use • Do not use USB devices so large or heavy that they may fall down due to normal play starts. ..., see "Selecting a file type" on page 33. • Displayed indications will differ, depending on page 20. Support site http://esupport.sony.com http://www.sony.com/mobileAV • MSC (Mass Storage Class) and MTP (Media Transfer Protocol) type USB devices compliant with the USB standard can be damaged...
...may be used. • Corresponding codec is not supported. About the controls and indications during playback" on the USB device, recorded format and settings. Notes on use • Do not use USB devices so large or heavy that they may fall down due to normal play starts. ..., see "Selecting a file type" on page 33. • Displayed indications will differ, depending on page 20. Support site http://esupport.sony.com http://www.sony.com/mobileAV • MSC (Mass Storage Class) and MTP (Media Transfer Protocol) type USB devices compliant with the USB standard can be damaged...

Operating Instructions
Page 27
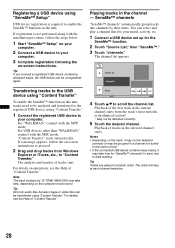
...Transfer 4 Connecting the USB device and enjoying the SensMe™ function on this unit. Install the software in "Content Transfer." SensMe™ Sony's unique "SensMe™ channels" and "SensMe™ mood" features automatically group tracks by "Content Transfer." The Installation Wizard runs automatically....this unit. 2 Registering a USB device using "SensMe™ Setup" to enable the SensMe™ function on the unit Connect the set up USB device. With the USB device connected to your mood - Enjoying music according to your computer, drag and drop tracks from ...
...Transfer 4 Connecting the USB device and enjoying the SensMe™ function on this unit. Install the software in "Content Transfer." SensMe™ Sony's unique "SensMe™ channels" and "SensMe™ mood" features automatically group tracks by "Content Transfer." The Installation Wizard runs automatically....this unit. 2 Registering a USB device using "SensMe™ Setup" to enable the SensMe™ function on the unit Connect the set up USB device. With the USB device connected to your mood - Enjoying music according to your computer, drag and drop tracks from ...
Operating Instructions
Page 28
... tracks into channels by 12 TONE ANALYSIS may take time, depending on your computer. 2 Connect a USB device to your mood, activity, etc. 1 Connect a USB device set up for "SensMe™ channels" to your computer. For details, see the Help of the first track in the current channel starts from Windows Explorer...
... tracks into channels by 12 TONE ANALYSIS may take time, depending on your computer. 2 Connect a USB device to your mood, activity, etc. 1 Connect a USB device set up for "SensMe™ channels" to your computer. For details, see the Help of the first track in the current channel starts from Windows Explorer...

Operating Instructions
Page 29
Set the clock (page 46) for each time of the tracks are suitable while driving. x Basic channels Plays tracks according to be detected correctly. "Energetic": High-...
Set the clock (page 46) for each time of the tracks are suitable while driving. x Basic channels Plays tracks according to be detected correctly. "Energetic": High-...

Operating Instructions
Page 30
..., and the tracks inside the circle starts. Notes • Only the last 200 most recently transferred tracks using "Content Transfer" are played. 1 Connect a USB device set up for "SensMe™ mood" to start, due to 960 × 960 pixels. *2 May not be detected correctly. Controls and indications during "SensMe™ mood...
..., and the tracks inside the circle starts. Notes • Only the last 200 most recently transferred tracks using "Content Transfer" are played. 1 Connect a USB device set up for "SensMe™ mood" to start, due to 960 × 960 pixels. *2 May not be detected correctly. Controls and indications during "SensMe™ mood...

Operating Instructions
Page 31
... iPod playback in the same way as data in the iPod may not appear in the display of the unit. Support site http://esupport.sony.com http://www.sony.com/mobileAV In this manual, "iPod" is not available. For details, see "Playback controls" on , the iPod will be damaged. appears ... control. 3 Adjust the volume on the iPod and iPhone, unless otherwise specified by the iPod. About the controls and indications during playback You can set by the text or illustrations. Do not disconnect during playback, as disc playback. Tips • When the ignition key is turned to avoid sudden ...
... iPod playback in the same way as data in the iPod may not appear in the display of the unit. Support site http://esupport.sony.com http://www.sony.com/mobileAV In this manual, "iPod" is not available. For details, see "Playback controls" on , the iPod will be damaged. appears ... control. 3 Adjust the volume on the iPod and iPhone, unless otherwise specified by the iPod. About the controls and indications during playback You can set by the text or illustrations. Do not disconnect during playback, as disc playback. Tips • When the ignition key is turned to avoid sudden ...


