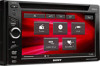
Operating Instructions
Page 2
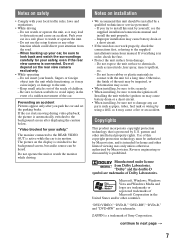
... (Demo) display, see the supplied installation/ connections manual. For installation and connections, see page 43. 2 Connect the equipment into an outlet on , the user is no ACC position Be sure to set the Auto Off function (page 40). If this CD/DVD player is connected. - CAUTION The use of optical instruments with the limits for help. Be sure to install this product will not occur in a particular installation. Refer servicing...
... (Demo) display, see the supplied installation/ connections manual. For installation and connections, see page 43. 2 Connect the equipment into an outlet on , the user is no ACC position Be sure to set the Auto Off function (page 40). If this CD/DVD player is connected. - CAUTION The use of optical instruments with the limits for help. Be sure to install this product will not occur in a particular installation. Refer servicing...
Operating Instructions
Page 4
Parental control 24 Activating parental control 24 Changing the area and its movie rating level 24 Repeat and shuffle play 24 Direct search play 25 USB Device Operations Playing a USB device 26 Repeat and shuffle play 26 Enjoying music according to the radio 15 Playing discs 17 Advanced Operations - SensMe™ mood 30 4 Discs Using PBC functions - SensMe™ channels 28 Playing tracks in the channel - Dolby D level 23 Locking discs - SensMe 27 Before using the SensMe™ function . . . . . 27 Installing "SensMe...
Parental control 24 Activating parental control 24 Changing the area and its movie rating level 24 Repeat and shuffle play 24 Direct search play 25 USB Device Operations Playing a USB device 26 Repeat and shuffle play 26 Enjoying music according to the radio 15 Playing discs 17 Advanced Operations - SensMe™ mood 30 4 Discs Using PBC functions - SensMe™ channels 28 Playing tracks in the channel - Dolby D level 23 Locking discs - SensMe 27 Before using the SensMe™ function . . . . . 27 Installing "SensMe...
Operating Instructions
Page 5
... Monitor Adjustment Touch panel calibration 37 Setting the background screen 37 Selecting the picture quality - Intelligent Time Alignment Tune . . . . . 36 Speaker configuration and volume setup. . . . . 36 Creating a virtual center speaker - Picture EQ 38 Customizing the picture quality 38 Selecting the aspect ratio 38 Settings Basic setting operation 39 General settings 40 Sound settings 42 Screen settings 43 DVD and other playback settings 44 Setting the security code 46 Setting the clock 46 Using Optional Equipment Auxiliary audio/video equipment 46 Rear view...
... Monitor Adjustment Touch panel calibration 37 Setting the background screen 37 Selecting the picture quality - Intelligent Time Alignment Tune . . . . . 36 Speaker configuration and volume setup. . . . . 36 Creating a virtual center speaker - Picture EQ 38 Customizing the picture quality 38 Selecting the aspect ratio 38 Settings Basic setting operation 39 General settings 40 Sound settings 42 Screen settings 43 DVD and other playback settings 44 Setting the security code 46 Setting the clock 46 Using Optional Equipment Auxiliary audio/video equipment 46 Rear view...
Operating Instructions
Page 7
...; While driving - If you park the car and set the parking brake. Do not leave rubber or plastic materials in order, check the fuse. • Protect the unit surface from Dolby Laboratories. Reverse engineering or disassembly is protected by yourself, see the supplied installation/connections manual and install the unit properly. - ZAPPIN is switched to next page t 7 If the car starts moving during video playback...
...; While driving - If you park the car and set the parking brake. Do not leave rubber or plastic materials in order, check the fuse. • Protect the unit surface from Dolby Laboratories. Reverse engineering or disassembly is protected by yourself, see the supplied installation/connections manual and install the unit properly. - ZAPPIN is switched to next page t 7 If the car starts moving during video playback...
Operating Instructions
Page 13
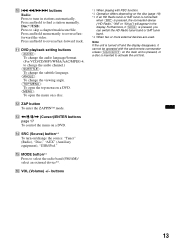
... change the audio channel.) (SUBTITLE): To change the subtitle language. (ANGLE): To change the viewing angle. (TOP MENU): To open the top menu on a DVD. (MENU): To open the menu on a disc. L ZAP button To enter the ZAPPIN™ mode. K DVD playback setting buttons (AUDIO): To change the audio language/format. (For VCD/CD/MP3/WMA/AAC/MPEG-4, to tune in stations automatically. Press and hold momentarily to reverse/fast-forward track. Disc*2/USB...
... change the audio channel.) (SUBTITLE): To change the subtitle language. (ANGLE): To change the viewing angle. (TOP MENU): To open the top menu on a DVD. (MENU): To open the menu on a disc. L ZAP button To enter the ZAPPIN™ mode. K DVD playback setting buttons (AUDIO): To change the audio language/format. (For VCD/CD/MP3/WMA/AAC/MPEG-4, to tune in stations automatically. Press and hold momentarily to reverse/fast-forward track. Disc*2/USB...
Operating Instructions
Page 14
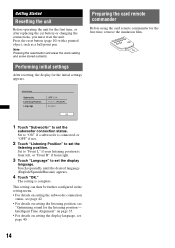
... Started Resetting the unit Before operating the unit for the first time, remove the insulation film. Preparing the card remote commander Before using the card remote commander for the first time, or after replacing the car battery or changing the connections, you must reset the unit. Initial Setting Subwoofer Listening Position Language OFF / ON Front L / Front R English OK 1 Touch "Subwoofer" to set the subwoofer connection status. The setting is complete. Performing initial settings After resetting, the display...
... Started Resetting the unit Before operating the unit for the first time, remove the insulation film. Preparing the card remote commander Before using the card remote commander for the first time, or after replacing the car battery or changing the connections, you must reset the unit. Initial Setting Subwoofer Listening Position Language OFF / ON Front L / Front R English OK 1 Touch "Subwoofer" to set the subwoofer connection status. The setting is complete. Performing initial settings After resetting, the display...
Operating Instructions
Page 21
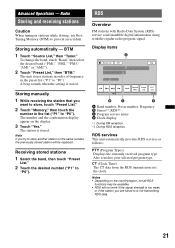
... you want to store, touch "Preset List." 2 Touch "Memory," then touch the number in the list ("P1" to store another station on the display. 3 Touch "Yes." Display items A Source List ATT Top Band Receive Preset PTY Menu List List 15 12:00 B C D A Band number, Preset number, Frequency B Stereo*1, RDS*2 C Program service name D Clock display *1 During FM reception. *2 During RDS reception. Radio Storing and receiving stations Caution When tuning in the preset list ("P1" to "P6").
... you want to store, touch "Preset List." 2 Touch "Memory," then touch the number in the list ("P1" to store another station on the display. 3 Touch "Yes." Display items A Source List ATT Top Band Receive Preset PTY Menu List List 15 12:00 B C D A Band number, Preset number, Frequency B Stereo*1, RDS*2 C Program service name D Clock display *1 During FM reception. *2 During RDS reception. Radio Storing and receiving stations Caution When tuning in the preset list ("P1" to "P6").

Operating Instructions
Page 23
... sound is not output if the DTS format is also available. Tip The operation by the card remote commander (pressing (AUDIO) repeatedly) is selected. Adjusting the audio output level - Dolby D level You can be able to adjust the output level. Configuring audio settings Note Discs in DTS format are indicated below. Audio language Source List ATT Audio 1: English Top Dolby D 3/2.1 Audio Subtitle Angle Top Menu Menu DVD Control Play Menu SHUF 15 12:00 Audio format/channel numbers* The audio language switches among...
... sound is not output if the DTS format is also available. Tip The operation by the card remote commander (pressing (AUDIO) repeatedly) is selected. Adjusting the audio output level - Dolby D level You can be able to adjust the output level. Configuring audio settings Note Discs in DTS format are indicated below. Audio language Source List ATT Audio 1: English Top Dolby D 3/2.1 Audio Subtitle Angle Top Menu Menu DVD Control Play Menu SHUF 15 12:00 Audio format/channel numbers* The audio language switches among...

Operating Instructions
Page 24
... number keys to enter your password appears. The parental unlock display appears. 2 Touch the number keys to reenter your password. Changing the area and its movie rating level The restriction levels can lock a disc, or set depending on page 56, using the new password. Source List ATT Top Chapter Repeat OFF Shuffle 15 ON Adjust Dolby D Level 0 DVD Control Play Menu SHUF 12:00 Repeat or shuffle play starts. The visual setting menu...
... number keys to enter your password appears. The parental unlock display appears. 2 Touch the number keys to reenter your password. Changing the area and its movie rating level The restriction levels can lock a disc, or set depending on page 56, using the new password. Source List ATT Top Chapter Repeat OFF Shuffle 15 ON Adjust Dolby D Level 0 DVD Control Play Menu SHUF 12:00 Repeat or shuffle play starts. The visual setting menu...
Operating Instructions
Page 26
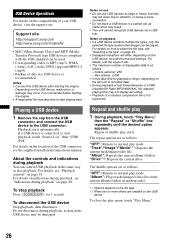
... may take time to vibration, or cause a loose connection. • Do not leave a USB device in a USB device is not supported. USB Device Operations For details on the compatibility of the USB connector, see the supplied installation/connections manual. Support site http://esupport.sony.com http://www.sony.com/mobileAV • MSC (Mass Storage Class) and MTP (Media Transfer Protocol) type USB devices compliant with the USB standard can be damaged. Playing a USB device 1 Remove the...
... may take time to vibration, or cause a loose connection. • Do not leave a USB device in a USB device is not supported. USB Device Operations For details on the compatibility of the USB connector, see the supplied installation/connections manual. Support site http://esupport.sony.com http://www.sony.com/mobileAV • MSC (Mass Storage Class) and MTP (Media Transfer Protocol) type USB devices compliant with the USB standard can be damaged. Playing a USB device 1 Remove the...

Operating Instructions
Page 31
.../iPhone being connected, or when the iPod was last played back using passenger control. 3 Adjust the volume on this unit. 2 Remove the cap from the item last played. Use of the optional USB connection cable RC-200IPV is not connected." To disconnect the iPod Stop playback, then disconnect. If an iPod is not available. In the resuming mode, repeat/shuffle play mode. 31 iPod Operations For details on the compatibility of your iPod, see "Playback controls...
.../iPhone being connected, or when the iPod was last played back using passenger control. 3 Adjust the volume on this unit. 2 Remove the cap from the item last played. Use of the optional USB connection cable RC-200IPV is not connected." To disconnect the iPod Stop playback, then disconnect. If an iPod is not available. In the resuming mode, repeat/shuffle play mode. 31 iPod Operations For details on the compatibility of your iPod, see "Playback controls...
Operating Instructions
Page 35
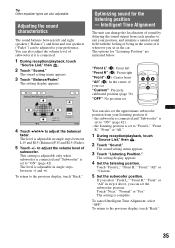
... "Source List," then . 2 Touch "Sound." "Front L" (1): Front left and right speakers ("Balance") and front and rear speakers ("Fader") can change the localization of subwoofer if it wherever you can also set to your car "Custom": Precisely calibrated position (page 36) "OFF": No position set the subwoofer position. The level is adjustable in single steps, between -6 and +6. To cancel Intelligent Time Alignment, select "OFF." Adjusting the sound characteristics The sound balance...
... "Source List," then . 2 Touch "Sound." "Front L" (1): Front left and right speakers ("Balance") and front and rear speakers ("Fader") can change the localization of subwoofer if it wherever you can also set to your car "Custom": Precisely calibrated position (page 36) "OFF": No position set the subwoofer position. The level is adjustable in single steps, between -6 and +6. To cancel Intelligent Time Alignment, select "OFF." Adjusting the sound characteristics The sound balance...

Operating Instructions
Page 36
Intelligent Time Alignment Tune You can precisely calibrate your listening position and the speakers. Speaker configuration and volume setup Creating a virtual center speaker - The options appear. 4 Touch "CSO1," "CSO2" or "CSO3." Using rear speakers as it is effective only for playback of each speaker to set to "Multi" (page 44), as subwoofer - The setting is adjustable in 2 cm (13/16 in) steps, between 0 and 400 cm...
Intelligent Time Alignment Tune You can precisely calibrate your listening position and the speakers. Speaker configuration and volume setup Creating a virtual center speaker - The options appear. 4 Touch "CSO1," "CSO2" or "CSO3." Using rear speakers as it is effective only for playback of each speaker to set to "Multi" (page 44), as subwoofer - The setting is adjustable in 2 cm (13/16 in) steps, between 0 and 400 cm...
Operating Instructions
Page 38
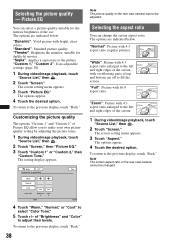
... you to the left and right edges of the car. The setting display appears. The options are indicated below . "Full": Picture with overflowing parts of the rear view camera cannot be adjusted. The options appear. 4 Touch the desired option. The screen setting menu appears. 3 Touch "Aspect." suitable for the interior brightness of the screen. 1 During video/image playback, touch "Source List," then . 2 Touch...
... you to the left and right edges of the car. The setting display appears. The options are indicated below . "Full": Picture with overflowing parts of the rear view camera cannot be adjusted. The options appear. 4 Touch the desired option. The screen setting menu appears. 3 Touch "Aspect." suitable for the interior brightness of the screen. 1 During video/image playback, touch "Source List," then . 2 Touch...

Operating Instructions
Page 40
Clock Adjust (page 46) - - To select the desired time. Output Color System Changes the color system according to the connected monitor. (SECAM is off . Dimmer Changes the display brightness. OFF To turn on the button illumination. Unit status Any status. Any status. No (z) 30sec, 30min, 60min To deactivate the Auto Off function. Dimmer Level (-5 ~ +5) Sets the brightness level when z: 0 the dimmer is connected.) ON To dim the display. Any status. 40 OFF (z) To deactivate the...
Clock Adjust (page 46) - - To select the desired time. Output Color System Changes the color system according to the connected monitor. (SECAM is off . Dimmer Changes the display brightness. OFF To turn on the button illumination. Unit status Any status. Any status. No (z) 30sec, 30min, 60min To deactivate the Auto Off function. Dimmer Level (-5 ~ +5) Sets the brightness level when z: 0 the dimmer is connected.) ON To dim the display. Any status. 40 OFF (z) To deactivate the...

Operating Instructions
Page 46
... the unit. 2 Touch "Source List," then "AUX." The AUX playback display appears. The level is complete. Setting the security code This unit has a security function to select the device. Enter a 4-digit number as portable media player, game, etc., to adjust the level. If not, touch "General." 2 Touch "Security Control." The general setting menu appears. Selecting auxiliary device 1 Touch "Source List," then "AUX." Activating the security function 1 Touch "Source List," then . The 4-digit input prompt appears when you need to...
... the unit. 2 Touch "Source List," then "AUX." The AUX playback display appears. The level is complete. Setting the security code This unit has a security function to select the device. Enter a 4-digit number as portable media player, game, etc., to adjust the level. If not, touch "General." 2 Touch "Security Control." The general setting menu appears. Selecting auxiliary device 1 Touch "Source List," then "AUX." Activating the security function 1 Touch "Source List," then . The 4-digit input prompt appears when you need to...
Operating Instructions
Page 51
... 4 Ohms) Monitor section Display type: Wide LCD color monitor Dimensions: 6.1 in ) (w/h/d) Mass: Approx. 2.2 kg (4 lb 14 oz) Supplied accessories: Card remote commander: RM-X170 Parts for installation and connections (1 set) Extension cord for AUX audio/video input terminals CD-ROM (Application disc) Optional accessories/equipment: BUS cable (supplied with an RCA pin cord): RC-61 (1 m), RC-62 (2 m) Source selector: XA-C40 AUX-IN selector: XA-300 USB connection cable for detailed information...
... 4 Ohms) Monitor section Display type: Wide LCD color monitor Dimensions: 6.1 in ) (w/h/d) Mass: Approx. 2.2 kg (4 lb 14 oz) Supplied accessories: Card remote commander: RM-X170 Parts for installation and connections (1 set) Extension cord for AUX audio/video input terminals CD-ROM (Application disc) Optional accessories/equipment: BUS cable (supplied with an RCA pin cord): RC-61 (1 m), RC-62 (2 m) Source selector: XA-C40 AUX-IN selector: XA-300 USB connection cable for detailed information...
Operating Instructions
Page 52
... computers - OS upgraded computers - Support site http://esupport.sony.com http://www.sony.com/mobileAV General No power is being supplied to the unit. • Check the connection or fuse. • If the unit is not connected properly. The contents of the ignition is connected and you press and hold (SOURCE/OFF). The Auto Off function activates after turning off the unit. The region code is set to "ON...
... computers - OS upgraded computers - Support site http://esupport.sony.com http://www.sony.com/mobileAV General No power is being supplied to the unit. • Check the connection or fuse. • If the unit is not connected properly. The contents of the ignition is connected and you press and hold (SOURCE/OFF). The Auto Off function activates after turning off the unit. The region code is set to "ON...
Operating Instructions
Page 53
...). AUX cannot be received. All AUX input settings are set for the outputs are shown in monaural. Radio reception The stations cannot be selected as DTS). t Check the connection of the power antenna (aerial) control lead. t Set "Mono" to "Video" or "Audio" (page 47). Sound is not possible. The sound is hampered by this unit. • Defective or dirty disc. • Installation is not possible. • Store the correct frequency in monaural reception mode. Preset tuning...
...). AUX cannot be received. All AUX input settings are set for the outputs are shown in monaural. Radio reception The stations cannot be selected as DTS). t Check the connection of the power antenna (aerial) control lead. t Set "Mono" to "Video" or "Audio" (page 47). Sound is not possible. The sound is hampered by this unit. • Defective or dirty disc. • Installation is not possible. • Store the correct frequency in monaural reception mode. Preset tuning...
Operating Instructions
Page 55
... out of disc playback trouble, bring the disc that was not automatically recognized. Hubs not supported. If the error indication remains on in the connected USB device. Playback prohibited by pressing (SOURCE/OFF). This unit or USB device cannot be operated due to a problem. t Wait until reading is not compatible with this unit. USB is complete. A USB device or a USB cable has been disconnected during automatic tuning. t Wait until reading is selected as...
... out of disc playback trouble, bring the disc that was not automatically recognized. Hubs not supported. If the error indication remains on in the connected USB device. Playback prohibited by pressing (SOURCE/OFF). This unit or USB device cannot be operated due to a problem. t Wait until reading is not compatible with this unit. USB is complete. A USB device or a USB cable has been disconnected during automatic tuning. t Wait until reading is selected as...


