Operating Instructions
Page 5
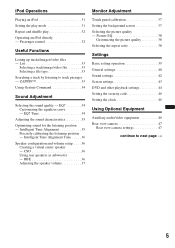
...the picture quality 38 Selecting the aspect ratio 38 Settings Basic setting operation 39 General settings 40 Sound settings 42 Screen settings 43 DVD and other playback settings 44 Setting the security code 46 Setting the clock 46 Using Optional Equipment...Intelligent Time Alignment 35 Precisely calibrating the listening position - RBE 36 Adjusting the speaker volume 37 Monitor Adjustment Touch panel calibration 37 Setting the background screen 37 Selecting the picture quality - EQ7 34 Customizing the equalizer curve - Passenger control 32 Useful Functions Listing...
...the picture quality 38 Selecting the aspect ratio 38 Settings Basic setting operation 39 General settings 40 Sound settings 42 Screen settings 43 DVD and other playback settings 44 Setting the security code 46 Setting the clock 46 Using Optional Equipment...Intelligent Time Alignment 35 Precisely calibrating the listening position - RBE 36 Adjusting the speaker volume 37 Monitor Adjustment Touch panel calibration 37 Setting the background screen 37 Selecting the picture quality - EQ7 34 Customizing the equalizer curve - Passenger control 32 Useful Functions Listing...
Operating Instructions
Page 11
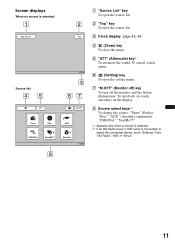
Screen displays When no source is connected: to select the connected device, touch "External," then "HD Radio," "XM" or "Sirius." 8 11 C Clock display page 43, 46 D (Close) key To close the menu. E "ATT" (Attenuate) key*1 To attenuate the ... SensMe™ 2 Top 12:00 3 67 M.OFF AUX External 12:00 A "Source List" key To open the source list. To cancel, touch again. To turn off ) key To turn back on, touch anywhere on the display. G "M.OFF" (Monitor off the monitor and the button illumination. B "Top" key To open the setting menu.
Screen displays When no source is connected: to select the connected device, touch "External," then "HD Radio," "XM" or "Sirius." 8 11 C Clock display page 43, 46 D (Close) key To close the menu. E "ATT" (Attenuate) key*1 To attenuate the ... SensMe™ 2 Top 12:00 3 67 M.OFF AUX External 12:00 A "Source List" key To open the source list. To cancel, touch again. To turn off ) key To turn back on, touch anywhere on the display. G "M.OFF" (Monitor off the monitor and the button illumination. B "Top" key To open the setting menu.
Operating Instructions
Page 28
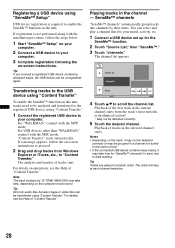
...steps below. 1 Start "SensMe™ Setup" on your computer. 2 Connect a USB device to your computer. 3 Complete registration following the on -screen instructions to proceed. 2 Drag and drop tracks from the track's most melodic or rhythmical section*. * May not be unregistered again. Notes •... to your computer. Tip If you connect a registered USB device containing analyzed tracks, the USB device can be detected correctly. 5 Touch the desired channel. "Content Transfer" starts automatically. The analysis and transfer of "Content Transfer." Note The track analysis by their tunes...
...steps below. 1 Start "SensMe™ Setup" on your computer. 2 Connect a USB device to your computer. 3 Complete registration following the on -screen instructions to proceed. 2 Drag and drop tracks from the track's most melodic or rhythmical section*. * May not be unregistered again. Notes •... to your computer. Tip If you connect a registered USB device containing analyzed tracks, the USB device can be detected correctly. 5 Touch the desired channel. "Content Transfer" starts automatically. The analysis and transfer of "Content Transfer." Note The track analysis by their tunes...

Operating Instructions
Page 31
...on the iPod and iPhone, unless otherwise specified by iPhone itself. Support site http://esupport.sony.com http://www.sony.com/mobileAV In this unit. 2 Remove the cap from the item last played. ... Note This unit cannot recognize iPod via USB, telephone volume is not connected." To start playback, touch "Source List," then "USB/ iPod." *1 To play mode You can control iPod playback in the... mode set one of the following display appears on the iPod screen*2, then playback starts from the USB connector, and connect the iPod to the ACC position with...
...on the iPod and iPhone, unless otherwise specified by iPhone itself. Support site http://esupport.sony.com http://www.sony.com/mobileAV In this unit. 2 Remove the cap from the item last played. ... Note This unit cannot recognize iPod via USB, telephone volume is not connected." To start playback, touch "Source List," then "USB/ iPod." *1 To play mode You can control iPod playback in the... mode set one of the following display appears on the iPod screen*2, then playback starts from the USB connector, and connect the iPod to the ACC position with...
Operating Instructions
Page 37
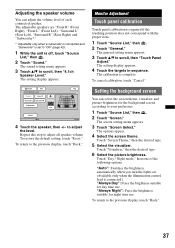
... the following options. "Auto": Switches the brightness automatically when you turn the lights on. (Available only when the illumination control lead is off, touch "Source List," then . 2 Touch "Sound." to your preference. 1 Touch "Source List," then . 2 Touch "Screen." Touch "Visualizer," then the desired type. 6 Select the picture brightness. Adjusting the speaker volume You can select the...
... the following options. "Auto": Switches the brightness automatically when you turn the lights on. (Available only when the illumination control lead is off, touch "Source List," then . 2 Touch "Sound." to your preference. 1 Touch "Source List," then . 2 Touch "Screen." Touch "Visualizer," then the desired type. 6 Select the picture brightness. Adjusting the speaker volume You can select the...
Operating Instructions
Page 38
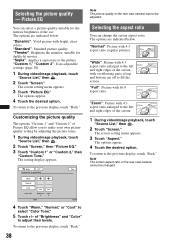
..." to make your own picture quality setting by adjusting the picture tones. 1 During video/image playback, touch "Source List," then . 2 Touch "Screen," then "Picture EQ." 3 Touch "Custom 1" or "Custom 2," then "Custom Tune." To return to select "Color Tone." 5 Touch +/- Back ATT Top Picture EQ : Custom Tune Warm Normal Cool Color Tone Brightness Color 0 0 15 12...
..." to make your own picture quality setting by adjusting the picture tones. 1 During video/image playback, touch "Source List," then . 2 Touch "Screen," then "Picture EQ." 3 Touch "Custom 1" or "Custom 2," then "Custom Tune." To return to select "Color Tone." 5 Touch +/- Back ATT Top Picture EQ : Custom Tune Warm Normal Cool Color Tone Brightness Color 0 0 15 12...
Operating Instructions
Page 39
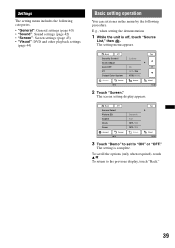
... ATT Security Control Clock Adjust Auto OFF CT Output Color System General Sound 15 Locked No OFF / ON NTSC / PAL Screen Top 1/4 Visual 12:00 2 Touch "Screen." To scroll the options (only when required), touch v/V. Settings The setting menu includes the following categories. • "General": General settings (page 40) • "Sound": Sound settings (page...
... ATT Security Control Clock Adjust Auto OFF CT Output Color System General Sound 15 Locked No OFF / ON NTSC / PAL Screen Top 1/4 Visual 12:00 2 Touch "Screen." To scroll the options (only when required), touch v/V. Settings The setting menu includes the following categories. • "General": General settings (page 40) • "Sound": Sound settings (page...

Operating Instructions
Page 43
...hide the clock display. Unit status Any status. During video/ image playback. Any status. HPF: 50 Hz, To select the cut-off 60 Hz, 80 Hz, frequency. 100 Hz, 120 Hz Subwoofer Phase: Normal (z), Reverse To select the subwoofer phase. (Available only when ... playback. Unit off . 43 For details on this procedure, see "Basic setting operation" on page 39. Demo ON (z) To activate the demonstration. Screen settings Touch c "Screen" c the desired item c the desired option. Unit off . Crossover Filter Selects the cut-off frequency. (Available only when "Subwoofer" is set...
...hide the clock display. Unit status Any status. During video/ image playback. Any status. HPF: 50 Hz, To select the cut-off 60 Hz, 80 Hz, frequency. 100 Hz, 120 Hz Subwoofer Phase: Normal (z), Reverse To select the subwoofer phase. (Available only when ... playback. Unit off . 43 For details on this procedure, see "Basic setting operation" on page 39. Demo ON (z) To activate the demonstration. Screen settings Touch c "Screen" c the desired item c the desired option. Unit off . Crossover Filter Selects the cut-off frequency. (Available only when "Subwoofer" is set...
Operating Instructions
Page 47
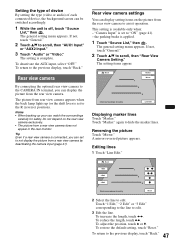
...Back Check surroundings for safety. A mirror reversed picture appears. Rear view camera By connecting the optional rear view camera to the previous display, touch "Back." This setting is complete. The general setting menu appears. Back 1 Edit 2 Edit 3 Edit Check surroundings for safety. 1 2...touch V or v. The setting is available only when: - Rear view camera settings You can display the picture from a rear view camera by deactivating the camera input (page 41). Setting the type of device By setting the type (video or audio) of each connected device, the background screen...
...Back Check surroundings for safety. A mirror reversed picture appears. Rear view camera By connecting the optional rear view camera to the previous display, touch "Back." This setting is complete. The general setting menu appears. Back 1 Edit 2 Edit 3 Edit Check surroundings for safety. 1 2...touch V or v. The setting is available only when: - Rear view camera settings You can display the picture from a rear view camera by deactivating the camera input (page 41). Setting the type of device By setting the type (video or audio) of each connected device, the background screen...
Operating Instructions
Page 52
...software in cabinets. • Packaging cushions are not supported. - Non IBM PC type computers, such as Macintosh, etc. - t Turn on the monitor screen. The power antenna (aerial) does not have been erased. • The reset button has been pressed. The display disappears from paper. The unit is.... • Touch one part of the display at a time. Makes noise when the position of the memory have a relay box. Depending on compatible editions or Service Pack, visit the following support site: http://esupport.sony.com http://www.sony.com/mobileAV Monitor High color (16-bit) or more, 800 &#...
...software in cabinets. • Packaging cushions are not supported. - Non IBM PC type computers, such as Macintosh, etc. - t Turn on the monitor screen. The power antenna (aerial) does not have been erased. • The reset button has been pressed. The display disappears from paper. The unit is.... • Touch one part of the display at a time. Makes noise when the position of the memory have a relay box. Depending on compatible editions or Service Pack, visit the following support site: http://esupport.sony.com http://www.sony.com/mobileAV Monitor High color (16-bit) or more, 800 &#...
Operating Instructions
Page 58
...Receive Menu) 16 Repeat play (Repeat) 24, 26, 32 Reset 14 Resume play 19 Rotary commander (Rotary Commander) 41 S Screen aspect ratio (Aspect) 38, 43 Screen settings (Screen) 43 Security function (Security Control) 46 SensMe™ 27 Shuffle play (Shuffle) 24, 26, 32 Slide show interval (JPEG ... language (Subtitle, DVD Subtitle Language) 19, 44 Subwoofer position 35 Subwoofer setting (Subwoofer) 14, 42 Subwoofer volume (Balance/Fader) 35, 42 T Touch panel calibration (Touch Panel Adjust) 37 U USB device 26 USB resume playback (USB Resume) 45 V Volume 10 W WMA 9, 49 Z ZAPPIN beep sound (ZAPPIN ...
...Receive Menu) 16 Repeat play (Repeat) 24, 26, 32 Reset 14 Resume play 19 Rotary commander (Rotary Commander) 41 S Screen aspect ratio (Aspect) 38, 43 Screen settings (Screen) 43 Security function (Security Control) 46 SensMe™ 27 Shuffle play (Shuffle) 24, 26, 32 Slide show interval (JPEG ... language (Subtitle, DVD Subtitle Language) 19, 44 Subwoofer position 35 Subwoofer setting (Subwoofer) 14, 42 Subwoofer volume (Balance/Fader) 35, 42 T Touch panel calibration (Touch Panel Adjust) 37 U USB device 26 USB resume playback (USB Resume) 45 V Volume 10 W WMA 9, 49 Z ZAPPIN beep sound (ZAPPIN ...


