Operating Instructions
Page 4
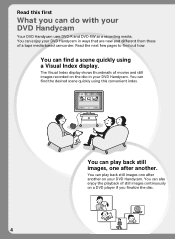
...camcorder. You can also enjoy the playback of still images continuously on a DVD player if you can play back still images, one after another on the disc in ways that are new and different from those of movies and still images recorded on your DVD Handycam. You can do with your DVD Handycam Your DVD Handycam uses DVD-R and DVD...-RW as a recording media. You can find the desired scene quickly using a Visual Index display. You can enjoy your DVD Handycam in your DVD Handycam. ...
...camcorder. You can also enjoy the playback of still images continuously on a DVD player if you can play back still images, one after another on the disc in ways that are new and different from those of movies and still images recorded on your DVD Handycam. You can do with your DVD Handycam Your DVD Handycam uses DVD-R and DVD...-RW as a recording media. You can find the desired scene quickly using a Visual Index display. You can enjoy your DVD Handycam in your DVD Handycam. ...
Operating Instructions
Page 5
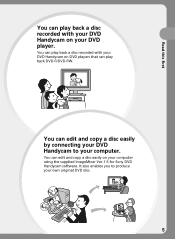
You can edit and copy a disc easily by connecting your DVD Handycam to produce your DVD player. You can edit and copy a disc easily on your own original DVD disc. 5 Read this first You can play back DVD-R/DVD-RW. It also enables you to your computer using the supplied ImageMixer Ver.1.5 for Sony DVD Handycam software. You can play back a disc recorded with your DVD Handycam on DVD players that can play back a disc recorded with your DVD Handycam on your computer.
You can edit and copy a disc easily by connecting your DVD Handycam to produce your DVD player. You can edit and copy a disc easily on your own original DVD disc. 5 Read this first You can play back DVD-R/DVD-RW. It also enables you to your computer using the supplied ImageMixer Ver.1.5 for Sony DVD Handycam software. You can play back a disc recorded with your DVD Handycam on DVD players that can play back a disc recorded with your DVD Handycam on your computer.

Operating Instructions
Page 6
...DVD Handycam. How can be overwritten repeatedly. Two types of recordable times is the difference between these two types cannot be used in VIDEO mode. Examples of incompatible discs • 12cm DVD-R • 12cm DVD-RW • DVD+R • DVD-RAM • DVD+RW • DVD-ROM • CD-R 6 • CD-RW DVD-Rs can I use? 8cm DVD...-Rs and 8cm DVD-RWs are different in the ...
...DVD Handycam. How can be overwritten repeatedly. Two types of recordable times is the difference between these two types cannot be used in VIDEO mode. Examples of incompatible discs • 12cm DVD-R • 12cm DVD-RW • DVD+R • DVD-RAM • DVD+RW • DVD-ROM • CD-R 6 • CD-RW DVD-Rs can I use? 8cm DVD...-Rs and 8cm DVD-RWs are different in the ...
Operating Instructions
Page 7
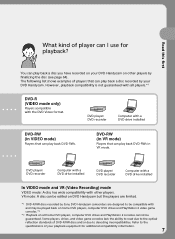
... discs recorded by finalizing the disc (see page 64). Refer to the specifications of your playback equipment for playback? DVD player/ DVD recorder Computer with other players by Sony DVD Handycam camcorders are designed to decoding incompatibilities. Some players, drives, and video game consoles lack the ability to read due to the optical reflection standards of...
... discs recorded by finalizing the disc (see page 64). Refer to the specifications of your playback equipment for playback? DVD player/ DVD recorder Computer with other players by Sony DVD Handycam camcorders are designed to decoding incompatibilities. Some players, drives, and video game consoles lack the ability to read due to the optical reflection standards of...

Operating Instructions
Page 8
.... Shooting Both movies and still images can play it back on DVD players, etc.. Because your DVD Handycam Preparing Prepare a new disc. • You can start recording promptly with a DVD-R. • You need to play it back immediately on DVD players, etc.. Continued on a single disc. If you finalize ... can play back from the Visual Index display. Select a recording format (either VIDEO mode or VR mode) when using a once recorded DVD-RW again. How to prepare and use your movies and still images are recorded in free areas on the disc automatically, important recordings are...
.... Shooting Both movies and still images can play it back on DVD players, etc.. Because your DVD Handycam Preparing Prepare a new disc. • You can start recording promptly with a DVD-R. • You need to play it back immediately on DVD players, etc.. Continued on a single disc. If you finalize ... can play back from the Visual Index display. Select a recording format (either VIDEO mode or VR mode) when using a once recorded DVD-RW again. How to prepare and use your movies and still images are recorded in free areas on the disc automatically, important recordings are...

Operating Instructions
Page 9
... Yes*3 Yes*3 *1 Unfinalizing is required. *2 Unfinalizing is not required. *3 Recorded data will be able to your computer with other DVD players. Read this first Editing Finalizing You can produce an original DVD by connecting your DVD Handycam to record additional material, edit, or format a disc after finalizing it becomes compatible with the supplied software.
... Yes*3 Yes*3 *1 Unfinalizing is required. *2 Unfinalizing is not required. *3 Recorded data will be able to your computer with other DVD players. Read this first Editing Finalizing You can produce an original DVD by connecting your DVD Handycam to record additional material, edit, or format a disc after finalizing it becomes compatible with the supplied software.
Operating Instructions
Page 10
...camcorder ...... 56 Choosing and viewing a recording - BATTERY INFO 18 Connecting to a wall outlet 18 Step 2 Turning on a computer with special effects 53 Using fader (for the wide-screen TV - 16:9 Wide mode 48 Adjusting the white balance manually 50 Shooting techniques to prepare and use your DVD Handycam... 8 Getting Started Using this first What you can do with your DVD Handycam 4 What is the difference between DVD-R and DVD-RW 6 How to match your circumstances - Mirror mode ........ 34 ...
...camcorder ...... 56 Choosing and viewing a recording - BATTERY INFO 18 Connecting to a wall outlet 18 Step 2 Turning on a computer with special effects 53 Using fader (for the wide-screen TV - 16:9 Wide mode 48 Adjusting the white balance manually 50 Shooting techniques to prepare and use your DVD Handycam... 8 Getting Started Using this first What you can do with your DVD Handycam 4 What is the difference between DVD-R and DVD-RW 6 How to match your circumstances - Mirror mode ........ 34 ...
Operating Instructions
Page 93
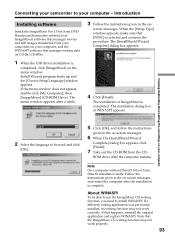
...CD-Rs/CD-RWs. 1 When the USB driver installation is completed. Introduction Installing software Install the ImageMixer Ver.1.5 for Sony DVD Handycam (hereinafter referred to as ImageMixer) software that manages movies and still images transferred from the CD- Viewing/duplicating discs/...given in the on the menu window. Note that happens, reinstall the original application and replace WINASPI. screen messages. Connecting your camcorder to your computer, and the WINASPI software that [NTSC] is complete. The installation of WINASPI appears. The installation dialog box ...
...CD-Rs/CD-RWs. 1 When the USB driver installation is completed. Introduction Installing software Install the ImageMixer Ver.1.5 for Sony DVD Handycam (hereinafter referred to as ImageMixer) software that manages movies and still images transferred from the CD- Viewing/duplicating discs/...given in the on the menu window. Note that happens, reinstall the original application and replace WINASPI. screen messages. Connecting your camcorder to your computer, and the WINASPI software that [NTSC] is complete. The installation of WINASPI appears. The installation dialog box ...
Operating Instructions
Page 94
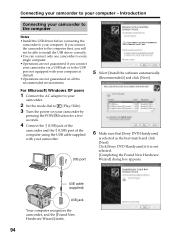
... for a few seconds. 4 Connect the (USB) jack of the camcorder and the (USB) port of the computer using the USB cable supplied with your computer - USB port 6 Make sure that [Sony DVD Handycam] is not selected. [Completing the Found New Hardware Wizard] dialog box...cable (supplied) USB jack Your computer recognizes the camcorder, and the [Found New Hardware Wizard] starts. 94 Introduction Connecting your camcorder to the computer Notes •Install the USB driver before connecting the camcorder to your camcorder. Click [Sony DVD Handycam] if it is selected as the best match...
... for a few seconds. 4 Connect the (USB) jack of the camcorder and the (USB) port of the computer using the USB cable supplied with your computer - USB port 6 Make sure that [Sony DVD Handycam] is not selected. [Completing the Found New Hardware Wizard] dialog box...cable (supplied) USB jack Your computer recognizes the camcorder, and the [Found New Hardware Wizard] starts. 94 Introduction Connecting your camcorder to the computer Notes •Install the USB driver before connecting the camcorder to your camcorder. Click [Sony DVD Handycam] if it is selected as the best match...
Operating Instructions
Page 97
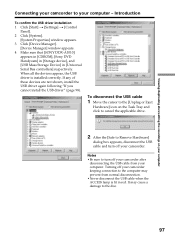
...appears. 4 Make sure that [SONY DDX-A1010] appears in [CDROM], [Sony DVD Handycam] in [Storage device], and [USB Mass Storage Device] in red. To disconnect the USB cable 1 Move the cursor to the [Unplug or Eject Hardware] icon on your computer Connecting your camcorder to the disc. 97 It may... install the USB driver again following "If you cannot install the USB driver" (page 98). Turning off your camcorder keeping connection to turn off your camcorder after disconnecting the USB cable from normal disconnection. •Never disconnect the USB cable when the ACCESS lamp is ...
...appears. 4 Make sure that [SONY DDX-A1010] appears in [CDROM], [Sony DVD Handycam] in [Storage device], and [USB Mass Storage Device] in red. To disconnect the USB cable 1 Move the cursor to the [Unplug or Eject Hardware] icon on your computer Connecting your camcorder to the disc. 97 It may... install the USB driver again following "If you cannot install the USB driver" (page 98). Turning off your camcorder keeping connection to turn off your camcorder after disconnecting the USB cable from normal disconnection. •Never disconnect the USB cable when the ACCESS lamp is ...
Operating Instructions
Page 99
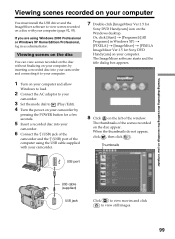
..., by pressing the POWER button for a few seconds. 5 Insert a recorded disc into your camcorder and connecting it to your computer. 7 Double-click [ImageMixer Ver.1.5 for Sony DVD Handycam] on the disc appear. The thumbnails of the window. The ImageMixer software starts and the title... Professional or Windows XP Home Edition/Professional, log in Windows XP) t [PIXELA] t [ImageMixer] t [PIXELA ImageMixer Ver.1.5 for Sony DVD Handycam] icon on a disc with your camcorder. 8 Click on the left of the scenes recorded on your computer (page 92, 93). Or, click [Start] t [Programs]...
..., by pressing the POWER button for a few seconds. 5 Insert a recorded disc into your camcorder and connecting it to your computer. 7 Double-click [ImageMixer Ver.1.5 for Sony DVD Handycam] on the disc appear. The thumbnails of the window. The ImageMixer software starts and the title... Professional or Windows XP Home Edition/Professional, log in Windows XP) t [PIXELA] t [ImageMixer] t [PIXELA ImageMixer Ver.1.5 for Sony DVD Handycam] icon on a disc with your camcorder. 8 Click on the left of the scenes recorded on your computer (page 92, 93). Or, click [Start] t [Programs]...


