Operating Instructions
Page 4
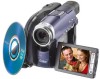
... images one after another . The Visual Index display shows thumbnails of a tape media-based camcorder. You can do with your DVD Handycam Your DVD Handycam uses DVD-R and DVD-RW as a recording media. Read this convenient index. You can enjoy your DVD Handycam in your DVD Handycam. You can play back still images, one after another on the disc in ways...
... images one after another . The Visual Index display shows thumbnails of a tape media-based camcorder. You can do with your DVD Handycam Your DVD Handycam uses DVD-R and DVD-RW as a recording media. Read this convenient index. You can enjoy your DVD Handycam in your DVD Handycam. You can play back still images, one after another on the disc in ways...
Operating Instructions
Page 7
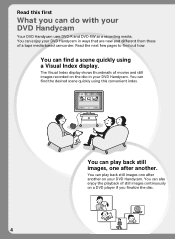
... VR mode) Players that can be edited on DVD Handycam but the players are limited. *1 DVD-R/RW discs recorded by Sony DVD Handycam camcorders are designed to be compatible with a DVD drive installed DVD-RW (in VR mode. However, playback compatibility is not guaranteed with all home DVD players, computer DVD drives and PlayStation 2 consoles cannot be played back on home...
... VR mode) Players that can be edited on DVD Handycam but the players are limited. *1 DVD-R/RW discs recorded by Sony DVD Handycam camcorders are designed to be compatible with a DVD drive installed DVD-RW (in VR mode. However, playback compatibility is not guaranteed with all home DVD players, computer DVD drives and PlayStation 2 consoles cannot be played back on home...
Operating Instructions
Page 10
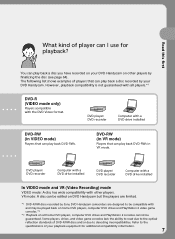
...removing the battery pack 15 Charging the installed battery pack 16 Showing the remaining battery time - BATTERY INFO 18 Connecting to prepare and use your camcorder ...... 56 Choosing and viewing a recording - PB ZOOM (Playback zoom) .. 61 Playing still images automatically - Table of the clock using ... the image - Review 55 Deleting the last scene (DVD-RWs only 55 Viewing the recordings Playing a disc on your DVD Handycam 8 Getting Started Using this first What you can do with your DVD Handycam 4 What is the difference between DVD-R and DVD-RW 6 How to a wall outlet 18 Step 2...
...removing the battery pack 15 Charging the installed battery pack 16 Showing the remaining battery time - BATTERY INFO 18 Connecting to prepare and use your camcorder ...... 56 Choosing and viewing a recording - PB ZOOM (Playback zoom) .. 61 Playing still images automatically - Table of the clock using ... the image - Review 55 Deleting the last scene (DVD-RWs only 55 Viewing the recordings Playing a disc on your DVD Handycam 8 Getting Started Using this first What you can do with your DVD Handycam 4 What is the difference between DVD-R and DVD-RW 6 How to a wall outlet 18 Step 2...
Operating Instructions
Page 11
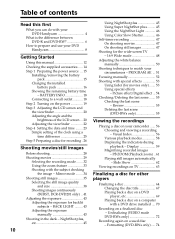
...disc 129 About the "InfoLITHIUM" battery pack 130 Using your computer - Playlist 76 Registering movies or still images in VR mode (DVD-RWs only) Selecting the playing order on your computer 99 Viewing scenes on the disc 99 Making a disc copy - Photomovie ...Dividing a movie 87 Deleting movies/still images ....... 89 Viewing/duplicating discs/ editing the recordings on your computer Connecting your camcorder to your camcorder abroad .......... 131 Maintenance information and precautions 132 Specifications 135 Parts and controls/Index Identifying parts and controls 137 Index 145 ...
...disc 129 About the "InfoLITHIUM" battery pack 130 Using your computer - Playlist 76 Registering movies or still images in VR mode (DVD-RWs only) Selecting the playing order on your computer 99 Viewing scenes on the disc 99 Making a disc copy - Photomovie ...Dividing a movie 87 Deleting movies/still images ....... 89 Viewing/duplicating discs/ editing the recordings on your computer Connecting your camcorder to your camcorder abroad .......... 131 Maintenance information and precautions 132 Specifications 135 Parts and controls/Index Identifying parts and controls 137 Index 145 ...
Operating Instructions
Page 13
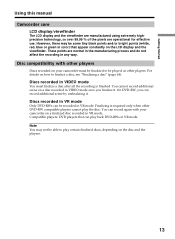
...finalized to be able to finalize a disc, see "Finalizing a disc" (page 64). Disc compatibility with your camcorder must finalize a disc after all the recording is required only when other players. On DVD-RW, you finalize it . Finalizing is finished. Note You may be recorded in VR mode. For details ...on the disc and the players. 13 Discs recorded in VR mode Only DVD-RWs can record again with other players Discs recorded on your camcorder on a finalized disc recorded in VIDEO mode once you can play certain finalized discs, depending on how to...
...finalized to be able to finalize a disc, see "Finalizing a disc" (page 64). Disc compatibility with your camcorder must finalize a disc after all the recording is required only when other players. On DVD-RW, you finalize it . Finalizing is finished. Note You may be recorded in VR mode. For details ...on the disc and the players. 13 Discs recorded in VR mode Only DVD-RWs can record again with other players Discs recorded on your camcorder on a finalized disc recorded in VIDEO mode once you can play certain finalized discs, depending on how to...
Operating Instructions
Page 14
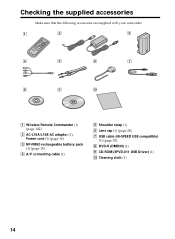
Cleaning cloth (1) 14 Checking the supplied accessories Make sure that the following accessories are supplied with your camcorder. 1 2 3 4 5 6 7 8 9 0 1 Wireless Remote Commander (1) (page 142) 2 AC-L15A/L15B AC adaptor (1), Power cord (1) (page 16) 3 NP-FM50 rechargeable battery pack (1) (page 15) 4 A/V connecting cable (1) 5 Shoulder strap (1) 6 Lens cap (1) (page 28) 7 USB cable (Hi-SPEED USB compatible) (1) (page 92) 8 DVD-R (DMR30) (1) 9 CD-ROM (SPVD-011 USB Driver) (1) q;
Cleaning cloth (1) 14 Checking the supplied accessories Make sure that the following accessories are supplied with your camcorder. 1 2 3 4 5 6 7 8 9 0 1 Wireless Remote Commander (1) (page 142) 2 AC-L15A/L15B AC adaptor (1), Power cord (1) (page 16) 3 NP-FM50 rechargeable battery pack (1) (page 15) 4 A/V connecting cable (1) 5 Shoulder strap (1) 6 Lens cap (1) (page 28) 7 USB cable (Hi-SPEED USB compatible) (1) (page 92) 8 DVD-R (DMR30) (1) 9 CD-ROM (SPVD-011 USB Driver) (1) q;
Operating Instructions
Page 26
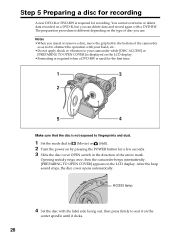
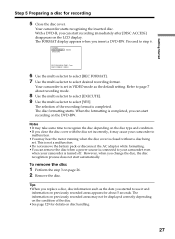
Opening melody rings once, then the camcorder beeps intermittently. [PREPARING TO OPEN COVER] appears on a DVD-R, but you use. The preparation procedure is different depending on the center spindle until it on the type of the arrow mark. Notes •When ... obstruct the operation with your hand, etc.. •Do not apply shock or vibration to your camcorder while [DISC ACCESS] or [PREPARING TO OPEN COVER] is displayed on the LCD display. •Formatting is required when a DVD-RW is used for the first time. 1 3 2 5 4 Make sure that the disc is not exposed...
Opening melody rings once, then the camcorder beeps intermittently. [PREPARING TO OPEN COVER] appears on a DVD-R, but you use. The preparation procedure is different depending on the center spindle until it on the type of the arrow mark. Notes •When ... obstruct the operation with your hand, etc.. •Do not apply shock or vibration to your camcorder while [DISC ACCESS] or [PREPARING TO OPEN COVER] is displayed on the LCD display. •Formatting is required when a DVD-RW is used for the first time. 1 3 2 5 4 Make sure that the disc is not exposed...
Operating Instructions
Page 27
...EXECUTE VIDEO EST. However, when you insert a DVD-RW. To remove the disc 1 Perform the step 3 on the DVD-RW. The selection of the disc. •See page 129 for details on the condition of the recording format is set . Your camcorder is completed. Refer to select [YES]. The... information on previously recorded areas may cause your camcorder is turned off. Getting Started ...
...EXECUTE VIDEO EST. However, when you insert a DVD-RW. To remove the disc 1 Perform the step 3 on the DVD-RW. The selection of the disc. •See page 129 for details on the condition of the recording format is set . Your camcorder is completed. Refer to select [YES]. The... information on previously recorded areas may cause your camcorder is turned off. Getting Started ...
Operating Instructions
Page 40
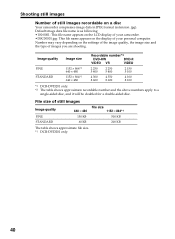
...500 KB 200 KB The table shows approximate file size. *1 DCR-DVD201 only. 40 File size of your camcorder. •DSC00001.jpg: This file name appears on a disc Your camcorder compresses image data in JPEG format (extension .jpg). Image quality FINE STANDARD Image size 1152 × 864...*1 640 × 480 1152 × 864*1 640 × 480 Recordable number*2 DVD-RW DVD-R VIDEO VR VIDEO 2 250 5 400 2 250 5 400 2 150...
...500 KB 200 KB The table shows approximate file size. *1 DCR-DVD201 only. 40 File size of your camcorder. •DSC00001.jpg: This file name appears on a disc Your camcorder compresses image data in JPEG format (extension .jpg). Image quality FINE STANDARD Image size 1152 × 864...*1 640 × 480 1152 × 864*1 640 × 480 Recordable number*2 DVD-RW DVD-R VIDEO VR VIDEO 2 250 5 400 2 250 5 400 2 150...
Operating Instructions
Page 64
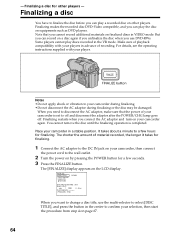
... the amount of playback compatibility with your camcorder again. FINALIZE FINALIZE button Notes •Do not apply shock or vibration to the wall outlet. 2 Turn the power on your player. Place your players in a stable position. The [FINALIZE] display appears on equipments such as DVD players. Make sure of material recorded, the...
... the amount of playback compatibility with your camcorder again. FINALIZE FINALIZE button Notes •Do not apply shock or vibration to the wall outlet. 2 Turn the power on your player. Place your players in a stable position. The [FINALIZE] display appears on equipments such as DVD players. Make sure of material recorded, the...
Operating Instructions
Page 71
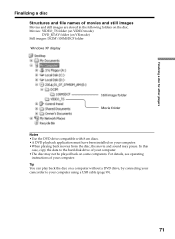
... mode) DVD_RTAV folder (on VR mode) Still images: DCIM\100MSDCF folder Windows XP display Still image folder Movie folder Notes •Use the DVD drive compatible with 8 cm discs. •A DVD playback application must have been installed on a computer without a DVD drive, by connecting your camcorder to the hard disk drive of your computer.
... mode) DVD_RTAV folder (on VR mode) Still images: DCIM\100MSDCF folder Windows XP display Still image folder Movie folder Notes •Use the DVD drive compatible with 8 cm discs. •A DVD playback application must have been installed on a computer without a DVD drive, by connecting your camcorder to the hard disk drive of your computer.

Operating Instructions
Page 72
...in VIDEO mode only. The confirmation display appears. Unfinalizing starts. UNFINALIZE EXECUTING AVOID ANY VIBRATION 0:10 6 Press SETUP when the [COMPLETED] appears. Insert a finalized DVD-RW into your camcorder beforehand. 1 Press SETUP. 2 Use the multi-selector to select (DISC SET). 3 Use the multi-selector to 4. 72 You do not have to select...AREA : [ SETUP ] : END 5 Use the multi-selector to select [YES]. The message disappears from 2 to select [UNFINALIZE]. Recording on the disc again. Unfinalizing (VIDEO mode DVD-RWs only) You can record on a finalized disc -
...in VIDEO mode only. The confirmation display appears. Unfinalizing starts. UNFINALIZE EXECUTING AVOID ANY VIBRATION 0:10 6 Press SETUP when the [COMPLETED] appears. Insert a finalized DVD-RW into your camcorder beforehand. 1 Press SETUP. 2 Use the multi-selector to select (DISC SET). 3 Use the multi-selector to 4. 72 You do not have to select...AREA : [ SETUP ] : END 5 Use the multi-selector to select [YES]. The message disappears from 2 to select [UNFINALIZE]. Recording on the disc again. Unfinalizing (VIDEO mode DVD-RWs only) You can record on a finalized disc -

Operating Instructions
Page 73
Tip It takes about 20 seconds for other players Recording on a finalized disc - Unfinalizing (VIDEO mode DVD-RWs only) Notes •Make sure that the power of your camcorder is supplied from a wall outlet using the AC adaptor. •If you disconnect the AC adaptor while unfinalizing a disc, the disc may not be unfinalized correctly and it cannot be used to record additional material. •Do not apply shock or vibration to your camcorder during unfinalizing. •You can unfinalize DVD-RWs only. You cannot unfinalize a DVD-R disc. Finalizing a disc for unfinalizing. 73
Tip It takes about 20 seconds for other players Recording on a finalized disc - Unfinalizing (VIDEO mode DVD-RWs only) Notes •Make sure that the power of your camcorder is supplied from a wall outlet using the AC adaptor. •If you disconnect the AC adaptor while unfinalizing a disc, the disc may not be unfinalized correctly and it cannot be used to record additional material. •Do not apply shock or vibration to your camcorder during unfinalizing. •You can unfinalize DVD-RWs only. You cannot unfinalize a DVD-R disc. Finalizing a disc for unfinalizing. 73

Operating Instructions
Page 74
... EXECUTING AVOID ANY VIBRATION 0:10 74 FORMAT REC FORMAT EXECUTE RETURN VIDEO VR ALL DATA TO BE DELETED CAN PLAYBACK ON VARIOUS DVD DEVICES. CANNOT EDIT IN CAMCORDER [ SETUP ] : END 5 Use the multi-selector to select [EXECUTE]. FORMAT REC FORMAT EXECUTE RETURN VIDEO ALL DATA TO...REC FORMAT : VIDEO [ SETUP ] : END 4 Use the multi-selector to select [YES]. Formatting (DVD-RWs only) You can format recorded DVD-RWs and make them new discs. Insert a recorded DVD-RW into your camcorder beforehand. 1 Press SETUP. 2 Use the multi-selector to select (DISC SET). 3 Use the multi...
... EXECUTING AVOID ANY VIBRATION 0:10 74 FORMAT REC FORMAT EXECUTE RETURN VIDEO VR ALL DATA TO BE DELETED CAN PLAYBACK ON VARIOUS DVD DEVICES. CANNOT EDIT IN CAMCORDER [ SETUP ] : END 5 Use the multi-selector to select [EXECUTE]. FORMAT REC FORMAT EXECUTE RETURN VIDEO ALL DATA TO...REC FORMAT : VIDEO [ SETUP ] : END 4 Use the multi-selector to select [YES]. Formatting (DVD-RWs only) You can format recorded DVD-RWs and make them new discs. Insert a recorded DVD-RW into your camcorder beforehand. 1 Press SETUP. 2 Use the multi-selector to select (DISC SET). 3 Use the multi...
Operating Instructions
Page 75
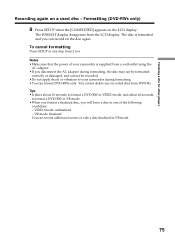
Tips •It takes about 10 seconds to format a DVD-RW in VIDEO mode, and about 40 seconds to format a DVD-RW in VR mode. 75 The FORMAT display disappears from 2 to your camcorder is formatted and you can record on the disc again. VIDEO mode: unfinalized - Finalizing a disc for ...other players Recording again on the LCD display. The disc is supplied from DVD-Rs. Notes •Make sure that the power of...
Tips •It takes about 10 seconds to format a DVD-RW in VIDEO mode, and about 40 seconds to format a DVD-RW in VR mode. 75 The FORMAT display disappears from 2 to your camcorder is formatted and you can record on the disc again. VIDEO mode: unfinalized - Finalizing a disc for ...other players Recording again on the LCD display. The disc is supplied from DVD-Rs. Notes •Make sure that the power of...
Operating Instructions
Page 76
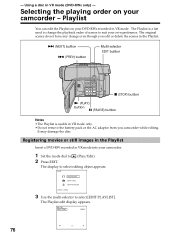
... not remove the battery pack or the AC adaptor from you edit or delete the scenes in VR mode into your camcorder - Registering movies or still images in the Playlist Insert a DVD-RW recorded in the Playlist. > (NEXT) button . (PREV) button Multi-selector EDIT button x (STOP) button N (PLAY) ... mode. The Playlist edit display appears. It may damage the disc. Playlist You can edit the Playlist on your camcorder. 1 Set the mode dial to suit your DVD-RWs recorded in VR mode (DVD-RWs only) - - EDIT EDIT MOVIE EDIT STILL EDIT PLAYLIST [ EDIT ] : END 3 Use the multi...
... not remove the battery pack or the AC adaptor from you edit or delete the scenes in VR mode into your camcorder - Registering movies or still images in the Playlist Insert a DVD-RW recorded in the Playlist. > (NEXT) button . (PREV) button Multi-selector EDIT button x (STOP) button N (PLAY) ... mode. The Playlist edit display appears. It may damage the disc. Playlist You can edit the Playlist on your camcorder. 1 Set the mode dial to suit your DVD-RWs recorded in VR mode (DVD-RWs only) - - EDIT EDIT MOVIE EDIT STILL EDIT PLAYLIST [ EDIT ] : END 3 Use the multi...
Operating Instructions
Page 77
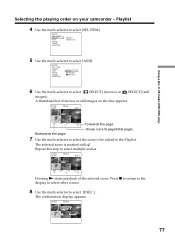
... the scene to be added to select [SEL.ITEM]. ADD RET. 004 JAN 1 04 1/1 6:30PM Pressing N starts playback of movies or still images on your camcorder - Playlist 4 Use the multi-selector to the Playlist. EDIT SEL. The selected scene is marked with . Selecting the playing order on the disc appears. A thumbnail...
... the scene to be added to select [SEL.ITEM]. ADD RET. 004 JAN 1 04 1/1 6:30PM Pressing N starts playback of movies or still images on your camcorder - Playlist 4 Use the multi-selector to the Playlist. EDIT SEL. The selected scene is marked with . Selecting the playing order on the disc appears. A thumbnail...
Operating Instructions
Page 79
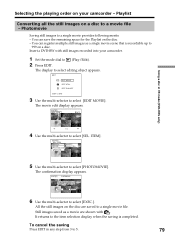
... 2 Press EDIT. Playlist Converting all the still images on a disc to 5. 79 ITEM RET. To cancel the saving Press EDIT in VR mode (DVD-RWs only) 1/2 4 Use the multi-selector to select [EDIT MOVIE]. You can register multiple still images as a movie are saved to the item selection... on a disc. The display to 999 on the disc. - EXEC. It returns to a single movie file. All the still images on your camcorder. 1 Set the mode dial to select [EXEC.]. Photomovie Saving still images to select [PHOTOMOVIE]. Selecting the playing order on the disc are shown with...
... 2 Press EDIT. Playlist Converting all the still images on a disc to 5. 79 ITEM RET. To cancel the saving Press EDIT in VR mode (DVD-RWs only) 1/2 4 Use the multi-selector to select [EDIT MOVIE]. You can register multiple still images as a movie are saved to the item selection... on a disc. The display to 999 on the disc. - EXEC. It returns to a single movie file. All the still images on your camcorder. 1 Set the mode dial to select [EXEC.]. Photomovie Saving still images to select [PHOTOMOVIE]. Selecting the playing order on the disc are shown with...
Operating Instructions
Page 80
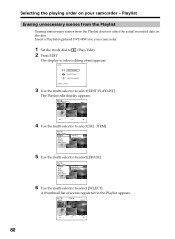
... 04 1/2 6:00PM Playlist Erasing unnecessary scenes from the Playlist Erasing unnecessary scenes from the Playlist does not affect the actual recorded data on your camcorder. 1 Set the mode dial to select [SELECT]. The display to select [ERASE]. ITEM RET. 80 1/2 4 Use the multi-selector to...[ EDIT ] : END 3 Use the multi-selector to select [SEL. EDIT SEL. The Playlist edit display appears. Insert a Playlist-registered DVD-RW into your camcorder - ITEM ERASE ADD MOVE DIVIDE RETURN SELECT SELECT ALL 6 Use the multi-selector to (Play/Edit). 2 Press EDIT. EDIT SEL. ITEM...
... 04 1/2 6:00PM Playlist Erasing unnecessary scenes from the Playlist Erasing unnecessary scenes from the Playlist does not affect the actual recorded data on your camcorder. 1 Set the mode dial to select [SELECT]. The display to select [ERASE]. ITEM RET. 80 1/2 4 Use the multi-selector to...[ EDIT ] : END 3 Use the multi-selector to select [SEL. EDIT SEL. The Playlist edit display appears. Insert a Playlist-registered DVD-RW into your camcorder - ITEM ERASE ADD MOVE DIVIDE RETURN SELECT SELECT ALL 6 Use the multi-selector to (Play/Edit). 2 Press EDIT. EDIT SEL. ITEM...
Operating Instructions
Page 81
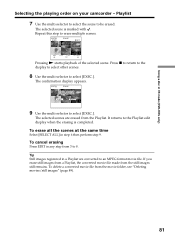
.... The selected scenes are converted to 8. To erase all the scenes at the same time Select [SELECT ALL] in VR mode (DVD-RWs only) Selecting the playing order on your camcorder - Repeat this step to be erased. Press x to return to the display to select other scenes. 8 Use the multi-selector to...
.... The selected scenes are converted to 8. To erase all the scenes at the same time Select [SELECT ALL] in VR mode (DVD-RWs only) Selecting the playing order on your camcorder - Repeat this step to be erased. Press x to return to the display to select other scenes. 8 Use the multi-selector to...


