Operating Instructions
Page 4
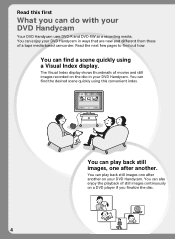
...a tape media-based camcorder. You can play back still images, one after another on a DVD player if you can also enjoy the playback of still images continuously on your DVD Handycam Your DVD Handycam uses DVD-R and DVD-RW as a recording media. You can... find the desired scene quickly using a Visual Index display. You can enjoy your DVD Handycam in ways that are new and different from those of movies and still images recorded on the disc in your DVD Handycam. You can do with your DVD Handycam...
...a tape media-based camcorder. You can play back still images, one after another on a DVD player if you can also enjoy the playback of still images continuously on your DVD Handycam Your DVD Handycam uses DVD-R and DVD-RW as a recording media. You can... find the desired scene quickly using a Visual Index display. You can enjoy your DVD Handycam in ways that are new and different from those of movies and still images recorded on the disc in your DVD Handycam. You can do with your DVD Handycam...
Operating Instructions
Page 5
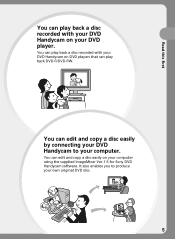
You can edit and copy a disc easily by connecting your DVD Handycam to produce your computer. It also enables you to your own original DVD disc. 5 You can edit and copy a disc easily on DVD players that can play back DVD-R/DVD-RW. You can play back a disc recorded with your DVD Handycam on your computer using the supplied ImageMixer Ver.1.5 for Sony DVD Handycam software. Read this first You can play back a disc recorded with your DVD Handycam on your DVD player.
You can edit and copy a disc easily by connecting your DVD Handycam to produce your computer. It also enables you to your own original DVD disc. 5 You can edit and copy a disc easily on DVD players that can play back DVD-R/DVD-RW. You can play back a disc recorded with your DVD Handycam on your computer using the supplied ImageMixer Ver.1.5 for Sony DVD Handycam software. Read this first You can play back a disc recorded with your DVD Handycam on your DVD player.

Operating Instructions
Page 6
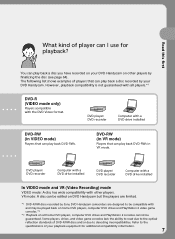
... mode or VR mode to make your recordings. You can use the following discs: • DMW30 (single-sided disc) • DMW60DS (double-sided disc) Discs other than these two discs? Which disc can be recorded only once. Examples of recordable times is the difference between these two types cannot be used in your DVD Handycam. What is different for making a backup...
... mode or VR mode to make your recordings. You can use the following discs: • DMW30 (single-sided disc) • DMW60DS (double-sided disc) Discs other than these two discs? Which disc can be recorded only once. Examples of recordable times is the difference between these two types cannot be used in your DVD Handycam. What is different for making a backup...
Operating Instructions
Page 7
VR mode: A disc can be edited on DVD Handycam but the players are limited. *1 DVD-R/RW discs recorded by Sony DVD Handycam camcorders are designed to be guaranteed. Some players, drives, and video game consoles lack the ability to read due to the optical reflection standards of DVD-R/RW discs and/or due to the specifications of your DVD Handycam. DVD player/ DVD recorder Computer with and may...
VR mode: A disc can be edited on DVD Handycam but the players are limited. *1 DVD-R/RW discs recorded by Sony DVD Handycam camcorders are designed to be guaranteed. Some players, drives, and video game consoles lack the ability to read due to the optical reflection standards of DVD-R/RW discs and/or due to the specifications of your DVD Handycam. DVD player/ DVD recorder Computer with and may...

Operating Instructions
Page 8
Because your DVD Handycam Preparing Prepare a new disc. • You can play it back on DVD players, etc.. Continued on a single disc. Select a recording format (either VIDEO mode or VR mode) when using a once recorded DVD-RW again. How to prepare and use your movies and still images are recorded in free areas on the disc automatically, important recordings are not overwritten...
Because your DVD Handycam Preparing Prepare a new disc. • You can play it back on DVD players, etc.. Continued on a single disc. Select a recording format (either VIDEO mode or VR mode) when using a once recorded DVD-RW again. How to prepare and use your movies and still images are recorded in free areas on the disc automatically, important recordings are not overwritten...

Operating Instructions
Page 9
...that it , depending on your computer. You can make a copy of a disc you have recorded by editing your movies/still images on the kind of the disc used. Overwrite Edit Format DVD-R (VIDEO mode) DVD-RW (VIDEO mode) DVD-RW (VR mode) No Yes*1 Yes*2 No No Yes*2 No Yes*3 ...your computer with other DVD players. For the recommended computer system environment, see page 91. You may not be erased. 9 Read this first Editing Finalizing You can produce an original DVD by connecting your DVD Handycam to record additional material, edit, or format a disc after finalizing it becomes...
...that it , depending on your computer. You can make a copy of a disc you have recorded by editing your movies/still images on the kind of the disc used. Overwrite Edit Format DVD-R (VIDEO mode) DVD-RW (VIDEO mode) DVD-RW (VR mode) No Yes*1 Yes*2 No No Yes*2 No Yes*3 ...your computer with other DVD players. For the recommended computer system environment, see page 91. You may not be erased. 9 Read this first Editing Finalizing You can produce an original DVD by connecting your DVD Handycam to record additional material, edit, or format a disc after finalizing it becomes...
Operating Instructions
Page 10
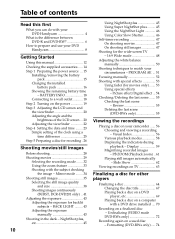
... special effects 53 Using fader (for other players Finalizing a disc 64 Changing the disc title 67 Playing back a disc on a DVD player, etc 69 Playing back a disc on a computer with your DVD Handycam 4 What is the difference between DVD-R and DVD-RW 6 How to match your camcorder ...... 56 Choosing and viewing a recording - NightShot plus, etc 45 10 Using NightShot plus 45...
... special effects 53 Using fader (for other players Finalizing a disc 64 Changing the disc title 67 Playing back a disc on a DVD player, etc 69 Playing back a disc on a computer with your DVD Handycam 4 What is the difference between DVD-R and DVD-RW 6 How to match your camcorder ...... 56 Choosing and viewing a recording - NightShot plus, etc 45 10 Using NightShot plus 45...
Operating Instructions
Page 11
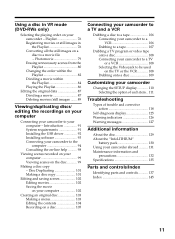
...the original data 87 Dividing a movie 87 Deleting movies/still images ....... 89 Viewing/duplicating discs/ editing the recordings on your computer Connecting your camcorder to your camcorder abroad .......... 131 Maintenance information and precautions 132 Specifications 135 Parts and controls/Index Identifying ... 98 Viewing scenes recorded on your camcorder - Playlist 76 Registering movies or still images in VR mode (DVD-RWs only) Selecting the playing order on your computer 99 Viewing scenes on the disc 99 Making a disc copy - Getting Started Using a disc in the Playlist ...
...the original data 87 Dividing a movie 87 Deleting movies/still images ....... 89 Viewing/duplicating discs/ editing the recordings on your computer Connecting your camcorder to your camcorder abroad .......... 131 Maintenance information and precautions 132 Specifications 135 Parts and controls/Index Identifying ... 98 Viewing scenes recorded on your camcorder - Playlist 76 Registering movies or still images in VR mode (DVD-RWs only) Selecting the playing order on your computer 99 Viewing scenes on the disc 99 Making a disc copy - Getting Started Using a disc in the Playlist ...
Operating Instructions
Page 13
... and do not affect the recording in VR mode. Disc compatibility with your camcorder must be finalized to finalize a disc, see "Finalizing a disc" (page 64). Note You may be played on other DVD-RW compatible players cannot play the disc. Discs recorded in VR mode Only DVD-RWs can record again with other players Discs recorded on your camcorder on the LCD display and...
... and do not affect the recording in VR mode. Disc compatibility with your camcorder must be finalized to finalize a disc, see "Finalizing a disc" (page 64). Note You may be played on other DVD-RW compatible players cannot play the disc. Discs recorded in VR mode Only DVD-RWs can record again with other players Discs recorded on your camcorder on the LCD display and...
Operating Instructions
Page 26
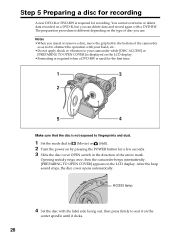
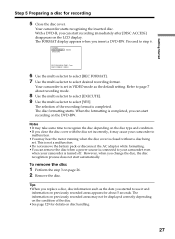
... intermittently. [PREPARING TO OPEN COVER] appears on a DVD-R, but you can delete data and record again with a DVD-RW. The preparation procedure is required for recording. ACCESS lamp 4 Set the disc with your hand, etc.. •Do not apply shock or vibration to your camcorder while [DISC ACCESS] or [PREPARING TO OPEN COVER] is displayed on the...
... intermittently. [PREPARING TO OPEN COVER] appears on a DVD-R, but you can delete data and record again with a DVD-RW. The preparation procedure is required for recording. ACCESS lamp 4 Set the disc with your hand, etc.. •Do not apply shock or vibration to your camcorder while [DISC ACCESS] or [PREPARING TO OPEN COVER] is displayed on the...
Operating Instructions
Page 27
... display appears when you change the disc, the disc recognition process does not start automatically. Notes •It may cause your camcorder is closed without a disc being set in VIDEO mode as the date you can start recording on the LCD display. With a DVD-R, you started to use it may... take some time to recognize the disc depending on the disc type and condition. •If ...
... display appears when you change the disc, the disc recognition process does not start automatically. Notes •It may cause your camcorder is closed without a disc being set in VIDEO mode as the date you can start recording on the LCD display. With a DVD-R, you started to use it may... take some time to recognize the disc depending on the disc type and condition. •If ...
Operating Instructions
Page 29
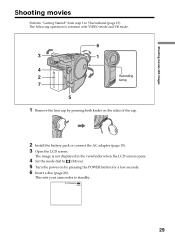
This sets your camcorder to 5 beforehand (page 15). STBY0:00:00 -R VIDEO 29 Shooting movies/still images Shooting movies Perform "Getting Started" from step 1 to standby. The following operation .... 2 Install the battery pack or connect the AC adaptor (page 15). 3 Open the LCD screen. The image is common with VIDEO mode and VR mode. 6 3 1 4 2 Recording lamp 7 5 1 Remove the lens cap by pressing the POWER button for a few seconds. 6 Insert...
This sets your camcorder to 5 beforehand (page 15). STBY0:00:00 -R VIDEO 29 Shooting movies/still images Shooting movies Perform "Getting Started" from step 1 to standby. The following operation .... 2 Install the battery pack or connect the AC adaptor (page 15). 3 Open the LCD screen. The image is common with VIDEO mode and VR mode. 6 3 1 4 2 Recording lamp 7 5 1 Remove the lens cap by pressing the POWER button for a few seconds. 6 Insert...
Operating Instructions
Page 30
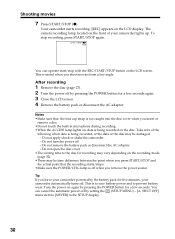
...button for a few seconds. Take note of your camcorder lights up. Do not turn the power off . Do not open the disc cover. •The writing time to [NEVER] in microphone during recording. •When the ACCESS lamp lights on the recording mode (page 32). •There may vary ...is not caught into the disc cover when you insert or remove a disc. •Do not touch the built-in the SETUP display. 30 After recording 1 Remove the disc (page 27). 2 Turn the power off when you leave your camcorder automatically turns off . - The camera recording lamp located on the LCD ...
...button for a few seconds. Take note of your camcorder lights up. Do not turn the power off . Do not open the disc cover. •The writing time to [NEVER] in microphone during recording. •When the ACCESS lamp lights on the recording mode (page 32). •There may vary ...is not caught into the disc cover when you insert or remove a disc. •Do not touch the built-in the SETUP display. 30 After recording 1 Remove the disc (page 27). 2 Turn the power off when you leave your camcorder automatically turns off . - The camera recording lamp located on the LCD ...
Operating Instructions
Page 31
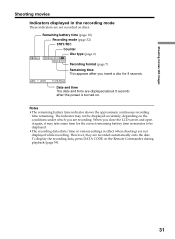
...after you are not displayed while recording. The indicator may take some time for 8 seconds. To display the recording data, press DATA CODE on discs. JAN 1 2004 11:23:45AM Date and time The date and time are not recorded on the Remote Commander during ...movies Indicators displayed in effect when shooting) are recording. However, they are recorded automatically onto the disc. Remaining battery time (page 18) Recording mode (page 32) STBY/REC Counter Disc type (page 6) 40min REC 0:00:01 -R [30min] VIDEO Recording format (page 7) Remaining time This appears after...
...after you are not displayed while recording. The indicator may take some time for 8 seconds. To display the recording data, press DATA CODE on discs. JAN 1 2004 11:23:45AM Date and time The date and time are not recorded on the Remote Commander during ...movies Indicators displayed in effect when shooting) are recording. However, they are recorded automatically onto the disc. Remaining battery time (page 18) Recording mode (page 32) STBY/REC Counter Disc type (page 6) 40min REC 0:00:01 -R [30min] VIDEO Recording format (page 7) Remaining time This appears after...
Operating Instructions
Page 32
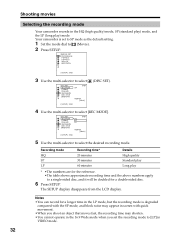
...The SETUP display disappears from the LCD display. DISC SET REC MODE FORMAT FINALIZE UNFINALIZE DISC TITLE RETURN STBY HQ SP LP REMAIN [30min] [ SETUP ] : END 5 Use the multi-selector to select [REC MODE]. Shooting movies Selecting the recording mode Your camcorder records in the HQ (high quality) mode, SP .... •The table shows approximate recording time and the above numbers apply to a single-sided disc, and it will be doubled for a longer time in VIDEO mode. 32 Notes •You can record for a double-sided disc. 6 Press SETUP. Your camcorder is degraded compared with the SP ...
...The SETUP display disappears from the LCD display. DISC SET REC MODE FORMAT FINALIZE UNFINALIZE DISC TITLE RETURN STBY HQ SP LP REMAIN [30min] [ SETUP ] : END 5 Use the multi-selector to select [REC MODE]. Shooting movies Selecting the recording mode Your camcorder records in the HQ (high quality) mode, SP .... •The table shows approximate recording time and the above numbers apply to a single-sided disc, and it will be doubled for a longer time in VIDEO mode. 32 Notes •You can record for a double-sided disc. 6 Press SETUP. Your camcorder is degraded compared with the SP ...
Operating Instructions
Page 35
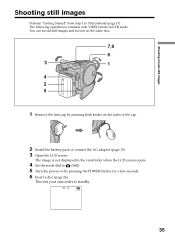
... Shooting still images Perform "Getting Started" from step 1 to standby. The image is common with VIDEO mode and VR mode. This sets your camcorder to 5 beforehand (page 15). The following operation is not displayed in the viewfinder when the LCD screen opens. 4 Set the mode dial to...(Still). 5 Turn the power on by pressing both knobs on the same disc. 7 8 6 3 1 4 2 5 1 Remove the lens cap by pressing the POWER button for a few seconds. 6 Insert a disc (page 26). FINE 0 -R VIDEO 35 You can record still images and movies on the sides of the cap. 2 Install the battery...
... Shooting still images Perform "Getting Started" from step 1 to standby. The image is common with VIDEO mode and VR mode. This sets your camcorder to 5 beforehand (page 15). The following operation is not displayed in the viewfinder when the LCD screen opens. 4 Set the mode dial to...(Still). 5 Turn the power on by pressing both knobs on the same disc. 7 8 6 3 1 4 2 5 1 Remove the lens cap by pressing the POWER button for a few seconds. 6 Insert a disc (page 26). FINE 0 -R VIDEO 35 You can record still images and movies on the sides of the cap. 2 Install the battery...
Operating Instructions
Page 37
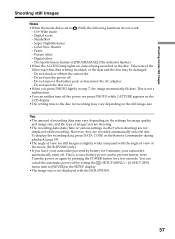
...is slightly wider compared with the DCR-DVD101. 37 Color Slow Shutter - Do not shock or vibrate the camcorder. - This is being recorded, or the data and the disc may vary depending on the Remote Commander during playback (page 59). •The angle of the movie (...lightly in effect when shooting) are recorded automatically onto the disc. Do not open the disc cover. •When you leave your camcorder powered by battery for 5 minutes, your camcorder automatically turns off . - However, they are not displayed while recording. To display the recording data, press DATA CODE on ...
...is slightly wider compared with the DCR-DVD101. 37 Color Slow Shutter - Do not shock or vibrate the camcorder. - This is being recorded, or the data and the disc may vary depending on the Remote Commander during playback (page 59). •The angle of the movie (...lightly in effect when shooting) are recorded automatically onto the disc. Do not open the disc cover. •When you leave your camcorder powered by battery for 5 minutes, your camcorder automatically turns off . - However, they are not displayed while recording. To display the recording data, press DATA CODE on ...
Operating Instructions
Page 64
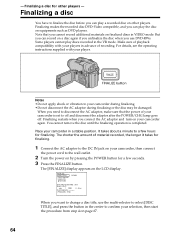
...] display appears on equipments such as DVD players. Place your player. Some players cannot play the disc on the LCD display. The shorter the amount of playback compatibility with your camcorder in the center to the wall outlet. 2 Turn the power on other players - Finalizing makes the recorded disc DVD-Video compatible, and you use the...
...] display appears on equipments such as DVD players. Place your player. Some players cannot play the disc on the LCD display. The shorter the amount of playback compatibility with your camcorder in the center to the wall outlet. 2 Turn the power on other players - Finalizing makes the recorded disc DVD-Video compatible, and you use the...
Operating Instructions
Page 99
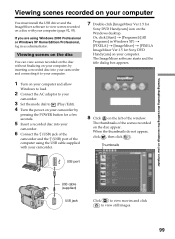
...-click [ImageMixer Ver.1.5 for Sony DVD Handycam] icon on the Windows desktop. If you are using the USB cable supplied with your computer. Thumbnails USB port USB cable (supplied) USB jack Click to view movies and click to (Play/Edit). 4 Turn the power on your camcorder by inserting a recorded disc into your camcorder. 6 Connect the (USB) jack...
...-click [ImageMixer Ver.1.5 for Sony DVD Handycam] icon on the Windows desktop. If you are using the USB cable supplied with your computer. Thumbnails USB port USB cable (supplied) USB jack Click to view movies and click to (Play/Edit). 4 Turn the power on your camcorder by inserting a recorded disc into your camcorder. 6 Connect the (USB) jack...
Operating Instructions
Page 107
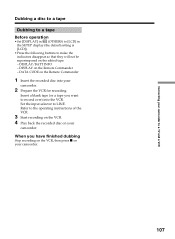
... your camcorder. 107 Insert a blank tape (or a tape you have finished dubbing Stop recording on the VCR, then press x on your camcorder. When you want to the operating instructions of the VCR. 3 Start recording on the VCR. 4 Play back the recorded disc on your camcorder. 2 Prepare the VCR for recording. DISPLAY on the Remote Commander 1 Insert the recorded disc into...
... your camcorder. 107 Insert a blank tape (or a tape you have finished dubbing Stop recording on the VCR, then press x on your camcorder. When you want to the operating instructions of the VCR. 3 Start recording on the VCR. 4 Play back the recorded disc on your camcorder. 2 Prepare the VCR for recording. DISPLAY on the Remote Commander 1 Insert the recorded disc into...


