Operating Instructions
Page 4
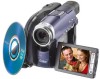
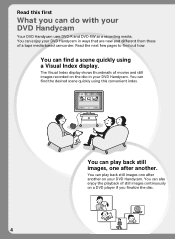
... play back still images one after another . You can enjoy your DVD Handycam Your DVD Handycam uses DVD-R and DVD-RW as a recording media. You can play back still images, one after another on your DVD Handycam. You can also enjoy the playback of a tape media-based camcorder. Read the next few pages to find the desired scene quickly...
... play back still images one after another . You can enjoy your DVD Handycam Your DVD Handycam uses DVD-R and DVD-RW as a recording media. You can play back still images, one after another on your DVD Handycam. You can also enjoy the playback of a tape media-based camcorder. Read the next few pages to find the desired scene quickly...
Operating Instructions
Page 7
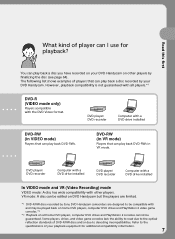
... mode. The following list shows examples of players that can play back a disc recorded by Sony DVD Handycam camcorders are limited. *1 DVD-R/RW discs recorded by your playback equipment for playback? DVD player/ DVD recorder Computer with a DVD drive installed DVD player/ DVD recorder Computer with a DVD drive installed In VIDEO mode and VR (Video Recording) mode VIDEO mode: A disc has...
... mode. The following list shows examples of players that can play back a disc recorded by Sony DVD Handycam camcorders are limited. *1 DVD-R/RW discs recorded by your playback equipment for playback? DVD player/ DVD recorder Computer with a DVD drive installed DVD player/ DVD recorder Computer with a DVD drive installed In VIDEO mode and VR (Video Recording) mode VIDEO mode: A disc has...
Operating Instructions
Page 10
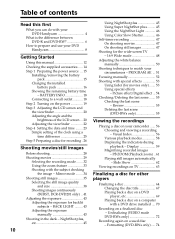
... for the wide-screen TV - 16:9 Wide mode 48 Adjusting the white balance manually 50 Shooting techniques to match your DVD Handycam 8 Getting Started Using this manual 12 Checking the supplied accessories ..... 14 Step 1 Preparing the power source ... 15 Installing... your camcorder ...... 56 Choosing and viewing a recording - Visual Index 56 Various playback modes 58 Displaying the indicators during playback - Display 59 Magnifying recorded images - Unfinalizing (VIDEO mode DVD-RWs only 72 Recording again on your DVD Handycam 4 What is the difference between DVD-R and DVD-RW ...
... for the wide-screen TV - 16:9 Wide mode 48 Adjusting the white balance manually 50 Shooting techniques to match your DVD Handycam 8 Getting Started Using this manual 12 Checking the supplied accessories ..... 14 Step 1 Preparing the power source ... 15 Installing... your camcorder ...... 56 Choosing and viewing a recording - Visual Index 56 Various playback modes 58 Displaying the indicators during playback - Display 59 Magnifying recorded images - Unfinalizing (VIDEO mode DVD-RWs only 72 Recording again on your DVD Handycam 4 What is the difference between DVD-R and DVD-RW ...
Operating Instructions
Page 93
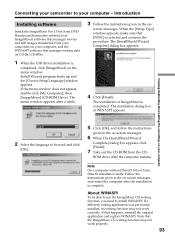
Introduction Installing software Install the ImageMixer Ver.1.5 for Sony DVD Handycam (hereinafter referred to as ImageMixer) software that manages movies and still images transferred from the CD- When the [Setup Type] window appears, make sure that...instructions given in the on-screen messages. 6 When The [InstallShield Wizard Complete] dialog box appears, click [Finish]. 7 Take out the CD-ROM from your camcorder on your computer - The [InstallShield Wizard Complete] dialog box appears. 4 Click [Finish]. The installation dialog box of ImageMixer is complete. Connecting your...
Introduction Installing software Install the ImageMixer Ver.1.5 for Sony DVD Handycam (hereinafter referred to as ImageMixer) software that manages movies and still images transferred from the CD- When the [Setup Type] window appears, make sure that...instructions given in the on-screen messages. 6 When The [InstallShield Wizard Complete] dialog box appears, click [Finish]. 7 Take out the CD-ROM from your camcorder on your computer - The [InstallShield Wizard Complete] dialog box appears. 4 Click [Finish]. The installation dialog box of ImageMixer is complete. Connecting your...
Operating Instructions
Page 94
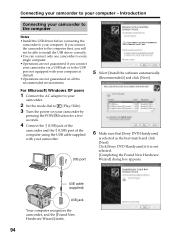
... the software automatically (Recommended)] and click [Next]. USB port 6 Make sure that [Sony DVD Handycam] is not selected. [Completing the Found New Hardware Wizard] dialog box appears. Click [Sony DVD Handycam] if it is selected as the best match and click [Next]. Connecting your camcorder to your computer. USB cable (supplied) USB jack Your computer recognizes the...
... the software automatically (Recommended)] and click [Next]. USB port 6 Make sure that [Sony DVD Handycam] is not selected. [Completing the Found New Hardware Wizard] dialog box appears. Click [Sony DVD Handycam] if it is selected as the best match and click [Next]. Connecting your camcorder to your computer. USB cable (supplied) USB jack Your computer recognizes the...
Operating Instructions
Page 97
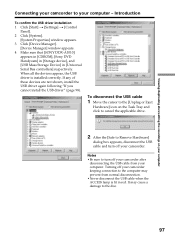
...to cancel the applicable drive. 2 After the [Safe to Remove Hardware] dialog box appears, disconnect the USB cable and turn off your camcorder after disconnecting the USB cable from normal disconnection. •Never disconnect the USB cable when the ACCESS lamp is installed correctly. Notes &#...Click [Start] t [Settings] t [Control Panel]. 2 Click [System]. [System Properties] window appears. 3 Click [Device Manager]. [Device Manager] window appears. 4 Make sure that [SONY DDX-A1010] appears in [CDROM], [Sony DVD Handycam] in [Storage device], and [USB Mass Storage Device] in red.
...to cancel the applicable drive. 2 After the [Safe to Remove Hardware] dialog box appears, disconnect the USB cable and turn off your camcorder after disconnecting the USB cable from normal disconnection. •Never disconnect the USB cable when the ACCESS lamp is installed correctly. Notes &#...Click [Start] t [Settings] t [Control Panel]. 2 Click [System]. [System Properties] window appears. 3 Click [Device Manager]. [Device Manager] window appears. 4 Make sure that [SONY DDX-A1010] appears in [CDROM], [Sony DVD Handycam] in [Storage device], and [USB Mass Storage Device] in red.
Operating Instructions
Page 99
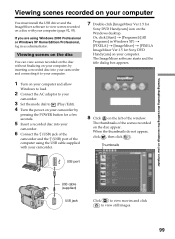
...computer, by pressing the POWER button for a few seconds. 5 Insert a recorded disc into your camcorder and connecting it to your computer. 7 Double-click [ImageMixer Ver.1.5 for Sony DVD Handycam] on your computer. When the thumbnails do not appear, click , then click . The ImageMixer ...Edition/Professional, log in Windows XP) t [PIXELA] t [ImageMixer] t [PIXELA ImageMixer Ver.1.5 for Sony DVD Handycam] icon on the left of the scenes recorded on a disc with your camcorder. 8 Click on the Windows desktop. Thumbnails USB port USB cable (supplied) USB jack Click to view...
...computer, by pressing the POWER button for a few seconds. 5 Insert a recorded disc into your camcorder and connecting it to your computer. 7 Double-click [ImageMixer Ver.1.5 for Sony DVD Handycam] on your computer. When the thumbnails do not appear, click , then click . The ImageMixer ...Edition/Professional, log in Windows XP) t [PIXELA] t [ImageMixer] t [PIXELA ImageMixer Ver.1.5 for Sony DVD Handycam] icon on the left of the scenes recorded on a disc with your camcorder. 8 Click on the Windows desktop. Thumbnails USB port USB cable (supplied) USB jack Click to view...


