
Operating Instructions
Page 6
... VIDEO mode. Choose the one that meets your needs. 8cm DVD-R You can use the following discs: • DMR30 (single-sided disc) • DMR60DS (double-sided disc) 8cm DVD-RW You can I use the following ways. Which disc can choose VIDEO mode or VR mode to make your DVD Handycam. The number of recordable times is the difference between these two types cannot be used in your recordings. You can I choose between DVD...
... VIDEO mode. Choose the one that meets your needs. 8cm DVD-R You can use the following discs: • DMR30 (single-sided disc) • DMR60DS (double-sided disc) 8cm DVD-RW You can I use the following ways. Which disc can choose VIDEO mode or VR mode to make your DVD Handycam. The number of recordable times is the difference between these two types cannot be used in your recordings. You can I choose between DVD...
Operating Instructions
Page 10
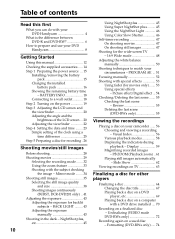
... Wide mode 48 Adjusting the white balance manually 50 Shooting techniques to match your DVD Handycam 8 Getting Started Using this manual 12 Checking the supplied accessories ..... 14 Step 1 Preparing the power source ... 15 Installing/removing the battery pack 15 Charging the installed battery pack 16 Showing the remaining battery time - PROGRAM AE ... 51 Focusing manually 52 Shooting with a DVD drive installed .... 70 Recording on a used disc - Review 55 Deleting the last scene (DVD-RWs only 55 Viewing the recordings Playing a disc on the power 19 Step 3 Adjusting the LCD screen...
... Wide mode 48 Adjusting the white balance manually 50 Shooting techniques to match your DVD Handycam 8 Getting Started Using this manual 12 Checking the supplied accessories ..... 14 Step 1 Preparing the power source ... 15 Installing/removing the battery pack 15 Charging the installed battery pack 16 Showing the remaining battery time - PROGRAM AE ... 51 Focusing manually 52 Shooting with a DVD drive installed .... 70 Recording on a used disc - Review 55 Deleting the last scene (DVD-RWs only 55 Viewing the recordings Playing a disc on the power 19 Step 3 Adjusting the LCD screen...
Operating Instructions
Page 11
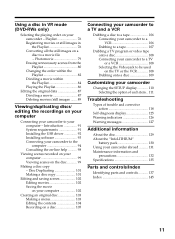
... Installing the USB driver 92 Installing software 93 Connecting your camcorder to the computer 94 Consulting the on-line help .......... 98 Viewing scenes recorded on your computer - Photomovie 79 Erasing unnecessary scenes from the Playlist 80 Changing the order within the Playlist 82 Dividing a movie within the Playlist 84 Playing the Playlist 86 Editing the original data 87 Dividing a movie 87 Deleting movies/still images ....... 89 Viewing/duplicating discs/ editing the recordings...
... Installing the USB driver 92 Installing software 93 Connecting your camcorder to the computer 94 Consulting the on-line help .......... 98 Viewing scenes recorded on your computer - Photomovie 79 Erasing unnecessary scenes from the Playlist 80 Changing the order within the Playlist 82 Dividing a movie within the Playlist 84 Playing the Playlist 86 Editing the original data 87 Dividing a movie 87 Deleting movies/still images ....... 89 Viewing/duplicating discs/ editing the recordings...
Operating Instructions
Page 12
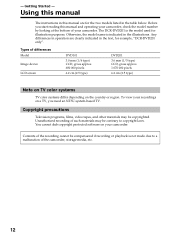
... operation are for the two models listed in the illustrations. Types of differences Model Image device LCD screen DVD101 3.0 mm (1/6 type) CCD, gross approx. 680 000 pixels 6.2 cm (2.5 type) DVD201 3.6 mm (1/5 type) CCD, gross approx. 1 070 000 pixels 6.2 cm (2.5 type) Note on TV color systems TV color systems differ depending on your camcorder, check the model number by looking at the bottom of the camcorder, storage media, etc. 12 Unauthorized recording of the recording...
... operation are for the two models listed in the illustrations. Types of differences Model Image device LCD screen DVD101 3.0 mm (1/6 type) CCD, gross approx. 680 000 pixels 6.2 cm (2.5 type) DVD201 3.6 mm (1/5 type) CCD, gross approx. 1 070 000 pixels 6.2 cm (2.5 type) Note on TV color systems TV color systems differ depending on your camcorder, check the model number by looking at the bottom of the camcorder, storage media, etc. 12 Unauthorized recording of the recording...
Operating Instructions
Page 29
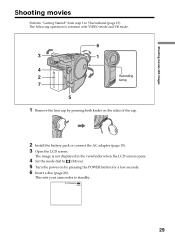
... sets your camcorder to 5 beforehand (page 15). The following operation is not displayed in the viewfinder when the LCD screen opens. 4 Set the mode dial to (Movie). 5 Turn the power on by pressing both knobs on the sides of the cap. 2 Install the battery pack or connect the AC adaptor (page 15). 3 Open the LCD screen. The image is common with VIDEO mode and VR mode. 6 3 1 4 2 Recording lamp 7 5 1 Remove the lens cap by pressing the POWER button...
... sets your camcorder to 5 beforehand (page 15). The following operation is not displayed in the viewfinder when the LCD screen opens. 4 Set the mode dial to (Movie). 5 Turn the power on by pressing both knobs on the sides of the cap. 2 Install the battery pack or connect the AC adaptor (page 15). 3 Open the LCD screen. The image is common with VIDEO mode and VR mode. 6 3 1 4 2 Recording lamp 7 5 1 Remove the lens cap by pressing the POWER button...
Operating Instructions
Page 32
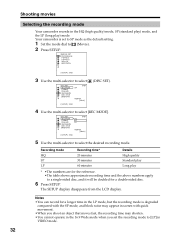
... WHT BAL AUTO SHTR [ SETUP ] : END 3 Use the multi-selector to select DISC SET REC MODE FORMAT FINALIZE UNFINALIZE DISC TITLE RETURN STBY SP REMAIN [30min] [ SETUP ] : END (DISC SET). 4 Use the multi-selector to select the desired recording mode. DISC SET REC MODE FORMAT FINALIZE UNFINALIZE DISC TITLE RETURN STBY HQ SP LP REMAIN [30min] [ SETUP ] : END 5 Use the multi-selector to select [REC MODE]. The SETUP display disappears from the LCD display. Shooting movies Selecting the recording mode Your camcorder records in the...
... WHT BAL AUTO SHTR [ SETUP ] : END 3 Use the multi-selector to select DISC SET REC MODE FORMAT FINALIZE UNFINALIZE DISC TITLE RETURN STBY SP REMAIN [30min] [ SETUP ] : END (DISC SET). 4 Use the multi-selector to select the desired recording mode. DISC SET REC MODE FORMAT FINALIZE UNFINALIZE DISC TITLE RETURN STBY HQ SP LP REMAIN [30min] [ SETUP ] : END 5 Use the multi-selector to select [REC MODE]. The SETUP display disappears from the LCD display. Shooting movies Selecting the recording mode Your camcorder records in the...
Operating Instructions
Page 35
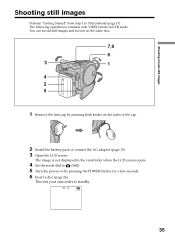
... record still images and movies on the sides of the cap. 2 Install the battery pack or connect the AC adaptor (page 15). 3 Open the LCD screen. This sets your camcorder to 5 beforehand (page 15). The following operation is not displayed in the viewfinder when the LCD screen opens. 4 Set the mode dial to (Still). 5 Turn the power on by pressing both knobs on the same disc. 7 8 6 3 1 4 2 5 1 Remove the lens cap by pressing the POWER button...
... record still images and movies on the sides of the cap. 2 Install the battery pack or connect the AC adaptor (page 15). 3 Open the LCD screen. This sets your camcorder to 5 beforehand (page 15). The following operation is not displayed in the viewfinder when the LCD screen opens. 4 Set the mode dial to (Still). 5 Turn the power on by pressing both knobs on the same disc. 7 8 6 3 1 4 2 5 1 Remove the lens cap by pressing the POWER button...
Operating Instructions
Page 37
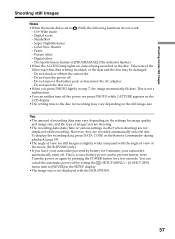
... LCD display. •The writing time to the disc for 5 minutes, your camcorder automatically turns off. Tips •The amount of recording data may vary depending on the settings for image quality and image size, and the type of images you are shooting. •The recording data (date/time or various settings in the SETUP display. •The image size is not displayed with the angle of view of [PROGRAM AE] (The indicator flashes.) •When the ACCESS...
... LCD display. •The writing time to the disc for 5 minutes, your camcorder automatically turns off. Tips •The amount of recording data may vary depending on the settings for image quality and image size, and the type of images you are shooting. •The recording data (date/time or various settings in the SETUP display. •The image size is not displayed with the angle of view of [PROGRAM AE] (The indicator flashes.) •When the ACCESS...
Operating Instructions
Page 41
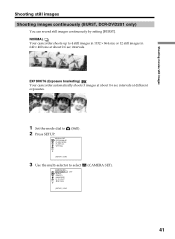
... intervals. S. MANUAL SET PROGRAM AE FLASH MODE FLASH LVL WHT BAL (Still). [ SETUP ] : END 3 Use the multi-selector to 2 Press SETUP. Shooting movies/still images Shooting still images Shooting images continuously (BURST, DCR-DVD201 only) You can record still images continuously by setting [BURST]. NORMAL Your camcorder shoots up to 4 still images in 1152 × 864 size or 12 still images in 640 × 480 size at different exposures. 1 Set the mode dial to select CAMERA SET SELFTIMER BURST...
... intervals. S. MANUAL SET PROGRAM AE FLASH MODE FLASH LVL WHT BAL (Still). [ SETUP ] : END 3 Use the multi-selector to 2 Press SETUP. Shooting movies/still images Shooting still images Shooting images continuously (BURST, DCR-DVD201 only) You can record still images continuously by setting [BURST]. NORMAL Your camcorder shoots up to 4 still images in 1152 × 864 size or 12 still images in 640 × 480 size at different exposures. 1 Set the mode dial to select CAMERA SET SELFTIMER BURST...
Operating Instructions
Page 63
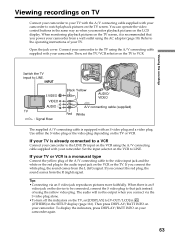
... IN input on the VCR using the A/V connecting cable supplied with your camcorder to watch playback pictures on the TV screen, it is an S video jack on the device to [V-OUT/LCD] in (OTHERS) in the same way as when you connect the red plug, the sound comes from the L (left) signal. If you monitor playback pictures on the VCR or the TV. Then, set [DISPLAY] to be output when you power your...
... IN input on the VCR using the A/V connecting cable supplied with your camcorder to watch playback pictures on the TV screen, it is an S video jack on the device to [V-OUT/LCD] in (OTHERS) in the same way as when you connect the red plug, the sound comes from the L (left) signal. If you monitor playback pictures on the VCR or the TV. Then, set [DISPLAY] to be output when you power your...

Operating Instructions
Page 91
... environment upgraded to your computer - Viewing/duplicating discs/editing the recordings on the size of the files edited) Display: Video card with 4 MB or more of VRAM, Minimum 800 × 600 Hi color (16 bit color, 65 000 colors), DirectDraw display driver capability (At 800 × 600 or less, 256 colors and less, this happens, set [USB SPEED] to [FULL-SPEED] in (SETUP MENU) in the supplied CD-ROM does not work with a Mac...
... environment upgraded to your computer - Viewing/duplicating discs/editing the recordings on the size of the files edited) Display: Video card with 4 MB or more of VRAM, Minimum 800 × 600 Hi color (16 bit color, 65 000 colors), DirectDraw display driver capability (At 800 × 600 or less, 256 colors and less, this happens, set [USB SPEED] to [FULL-SPEED] in (SETUP MENU) in the supplied CD-ROM does not work with a Mac...
Operating Instructions
Page 94
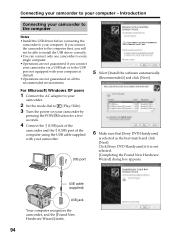
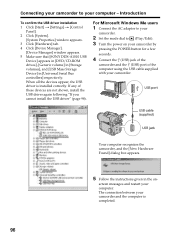
...;Operations are not guaranteed on your camcorder by pressing the POWER button for a few seconds. 4 Connect the (USB) jack of the camcorder and the (USB) port of the computer using the USB cable supplied with your computer. Connecting your camcorder to your camcorder. For Microsoft Windows XP users 1 Connect the AC adaptor to your camcorder. 2 Set the mode dial to (Play/Edit). 3 Turn the power on all the recommended environments. 5 Select [Install the software automatically...
...;Operations are not guaranteed on your camcorder by pressing the POWER button for a few seconds. 4 Connect the (USB) jack of the camcorder and the (USB) port of the computer using the USB cable supplied with your computer. Connecting your camcorder to your camcorder. For Microsoft Windows XP users 1 Connect the AC adaptor to your camcorder. 2 Set the mode dial to (Play/Edit). 3 Turn the power on all the recommended environments. 5 Select [Install the software automatically...
Operating Instructions
Page 95
... installed correctly. For Microsoft Windows 2000 users 1 Connect the AC adaptor to (Play/Edit). 3 Turn the power on - The connection between your camcorder and the computer is completed. 95 When all the devices appear, the USB driver is completed. Introduction 7 Click [Finish]. Viewing/duplicating discs/editing the recordings on your computer Connecting your camcorder to your camcorder. 2 Set the mode dial to your computer - If any of the computer using the USB cable...
... installed correctly. For Microsoft Windows 2000 users 1 Connect the AC adaptor to (Play/Edit). 3 Turn the power on - The connection between your camcorder and the computer is completed. 95 When all the devices appear, the USB driver is completed. Introduction 7 Click [Finish]. Viewing/duplicating discs/editing the recordings on your computer Connecting your camcorder to your camcorder. 2 Set the mode dial to your computer - If any of the computer using the USB cable...
Operating Instructions
Page 96
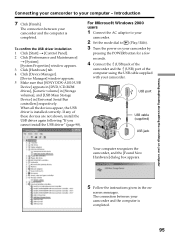
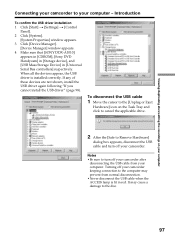
... the instructions given in [Universal Serial Bus controllers] respectively. Introduction To confirm the USB driver installation 1 Click [Start] t [Settings] t [Control Panel]. 2 Click [System]. [System Properties] window appears. 3 Click [Hardware] tab. 4 Click [Device Manager]. [Device Manager] window appears. 5 Make sure that [SONY DDX-A1010 USB Device] appears in [DVD/CD-ROM drives], [Generic volume] in [Storage volumes], and [USB Mass Storage Device] in the on your camcorder by pressing the POWER button for a few seconds. 4 Connect the (USB...
... the instructions given in [Universal Serial Bus controllers] respectively. Introduction To confirm the USB driver installation 1 Click [Start] t [Settings] t [Control Panel]. 2 Click [System]. [System Properties] window appears. 3 Click [Hardware] tab. 4 Click [Device Manager]. [Device Manager] window appears. 5 Make sure that [SONY DDX-A1010 USB Device] appears in [DVD/CD-ROM drives], [Generic volume] in [Storage volumes], and [USB Mass Storage Device] in the on your camcorder by pressing the POWER button for a few seconds. 4 Connect the (USB...
Operating Instructions
Page 97
... to Remove Hardware] dialog box appears, disconnect the USB cable and turn off your camcorder keeping connection to the computer may cause a damage to the disc. 97 Introduction To confirm the USB driver installation 1 Click [Start] t [Settings] t [Control Panel]. 2 Click [System]. [System Properties] window appears. 3 Click [Device Manager]. [Device Manager] window appears. 4 Make sure that [SONY DDX-A1010] appears in [CDROM], [Sony DVD Handycam] in [Storage device], and [USB Mass Storage Device] in red.
... to Remove Hardware] dialog box appears, disconnect the USB cable and turn off your camcorder keeping connection to the computer may cause a damage to the disc. 97 Introduction To confirm the USB driver installation 1 Click [Start] t [Settings] t [Control Panel]. 2 Click [System]. [System Properties] window appears. 3 Click [Device Manager]. [Device Manager] window appears. 4 Make sure that [SONY DDX-A1010] appears in [CDROM], [Sony DVD Handycam] in [Storage device], and [USB Mass Storage Device] in red.
Operating Instructions
Page 99
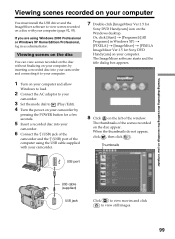
... pressing the POWER button for Sony DVD Handycam] icon on the Windows desktop. The thumbnails of the window. If you are using the USB cable supplied with your computer (page 92, 93). When the thumbnails do not appear, click , then click . Viewing/duplicating discs/editing the recordings on your computer Viewing scenes recorded on your computer You must install the USB driver and the ImageMixer software to view still images. 99
... pressing the POWER button for Sony DVD Handycam] icon on the Windows desktop. The thumbnails of the window. If you are using the USB cable supplied with your computer (page 92, 93). When the thumbnails do not appear, click , then click . Viewing/duplicating discs/editing the recordings on your computer Viewing scenes recorded on your computer You must install the USB driver and the ImageMixer software to view still images. 99
Operating Instructions
Page 110
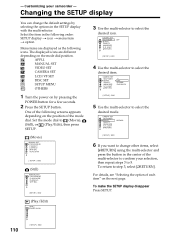
... your camcorder - MANUAL SET VIDEO SET CAMERA SET LCD/VF SET DISC SET SETUP MENU OTHERS 1 Turn the power on the next page. CAMERA SET SELFTIMER BURST QUALITY IMAGESIZE N. S. Select the item in the SETUP display with the multi-selector. APPLI. Set the mode dial to select the desired mode. LIGHT RETURN OFF NORMAL EXP BRKTG [ SETUP ] : END 5 Use the multi-selector to (Movie), (Still), or (Play/Edit), then press SETUP. (Movie) MANUAL SET PROGRAM AE P EFFECT D EFFECT WHT BAL AUTO SHTR [ SETUP...
... your camcorder - MANUAL SET VIDEO SET CAMERA SET LCD/VF SET DISC SET SETUP MENU OTHERS 1 Turn the power on the next page. CAMERA SET SELFTIMER BURST QUALITY IMAGESIZE N. S. Select the item in the SETUP display with the multi-selector. APPLI. Set the mode dial to select the desired mode. LIGHT RETURN OFF NORMAL EXP BRKTG [ SETUP ] : END 5 Use the multi-selector to (Movie), (Still), or (Play/Edit), then press SETUP. (Movie) MANUAL SET PROGRAM AE P EFFECT D EFFECT WHT BAL AUTO SHTR [ SETUP...
Operating Instructions
Page 124
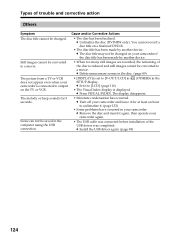
... USB cable was connected before installation of the USB driver was completed. c Delete unnecessary scenes in the computer using the USB connection. Still images cannot be changed on your camcorder if the disc title has been made by another device. • When too many still images are recorded, the remaining of the disc is reduced and still images cannot be saved in the disc. (page 89) • [DISPLAY] is set to output on a finalized DVD...
... USB cable was connected before installation of the USB driver was completed. c Delete unnecessary scenes in the computer using the USB connection. Still images cannot be changed on your camcorder if the disc title has been made by another device. • When too many still images are recorded, the remaining of the disc is reduced and still images cannot be saved in the disc. (page 89) • [DISPLAY] is set to output on a finalized DVD...
Operating Instructions
Page 135
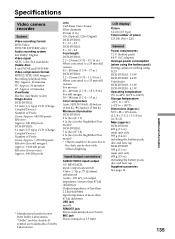
... lighting. Specifications Video camera recorder System Video recording format DVD-Video DVD-VR (DVD-RW only) Audio recording system 2ch Dolby* Digital Video signal NTSC color, EIA standards Usable discs 8 cm DVD-R and DVD-RW Video compression format MPEG2/JPEG (Still images) Recording/playback time HQ: Approx. 20 minutes SP: Approx. 30 minutes LP: Approx. 60 minutes Viewfinder Electric viewfinder (color) Image device DCR-DVD101: 3.0 mm (1/6 type) CCD (Charge Coupled Device) Number of Pixels Gross: Approx. 680 000 pixels Effective : Approx. 340 000 pixels DCR-DVD201: 3.6 mm (1/5 type) CCD...
... lighting. Specifications Video camera recorder System Video recording format DVD-Video DVD-VR (DVD-RW only) Audio recording system 2ch Dolby* Digital Video signal NTSC color, EIA standards Usable discs 8 cm DVD-R and DVD-RW Video compression format MPEG2/JPEG (Still images) Recording/playback time HQ: Approx. 20 minutes SP: Approx. 30 minutes LP: Approx. 60 minutes Viewfinder Electric viewfinder (color) Image device DCR-DVD101: 3.0 mm (1/6 type) CCD (Charge Coupled Device) Number of Pixels Gross: Approx. 680 000 pixels Effective : Approx. 340 000 pixels DCR-DVD201: 3.6 mm (1/5 type) CCD...
Operating Instructions
Page 145
... rechargeable battery .......... 134 Clock set 23 Color slow shutter 46 Continuous still images shooting 41 Counter 31 Data code 59 Date/time display 31, 59 Daylight saving time ...... 24, 116 DEMO 115 Digital effect 54 Digital zoom 33 Disc dubbing 106 Disc title 67 Disc 6 DISPLAY 59 Divide 84, 87 DVD-R 6 DVD-RW 6 E EXP BRKTG 41 EXPOSURE 43 F, G, H FADER 53 Fade in/out 53 Finalize 64 FINE 38 Flash 111 Folder 71 FOCUS 52 Format 74 Full charge...
... rechargeable battery .......... 134 Clock set 23 Color slow shutter 46 Continuous still images shooting 41 Counter 31 Data code 59 Date/time display 31, 59 Daylight saving time ...... 24, 116 DEMO 115 Digital effect 54 Digital zoom 33 Disc dubbing 106 Disc title 67 Disc 6 DISPLAY 59 Divide 84, 87 DVD-R 6 DVD-RW 6 E EXP BRKTG 41 EXPOSURE 43 F, G, H FADER 53 Fade in/out 53 Finalize 64 FINE 38 Flash 111 Folder 71 FOCUS 52 Format 74 Full charge...


