Operating Instructions
Page 2
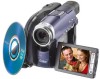
.... You can help preserve our environment by returning your Handycam, you can capture life's precious moments with Part 15 of optical instruments with this device must accept any questions about this Sony Handycam. Notice If static electricity or electromagnetism causes data transfer ...two conditions: (1) This device may cause undesired operation. 2 Congratulations on your purchase of Conformity Trade Name: SONY Model No.: DCR-DVD101 Responsible Party:Sony Electronics Inc. CAUTION The use . For customers in the U.S.A. Welcome! You will increase eye hazard. and...
.... You can help preserve our environment by returning your Handycam, you can capture life's precious moments with Part 15 of optical instruments with this device must accept any questions about this Sony Handycam. Notice If static electricity or electromagnetism causes data transfer ...two conditions: (1) This device may cause undesired operation. 2 Congratulations on your purchase of Conformity Trade Name: SONY Model No.: DCR-DVD101 Responsible Party:Sony Electronics Inc. CAUTION The use . For customers in the U.S.A. Welcome! You will increase eye hazard. and...
Operating Instructions
Page 3
... the equipment in a particular installation. Connect the equipment into an outlet on , the user is no guarantee that to Part 15 of Conformity Trade Name: SONY Model No.: DCR-DVD201 Responsible Party:Sony Electronics Inc. Note: This equipment has been tested and found to comply with the limits for help. Reorient or relocate...
... the equipment in a particular installation. Connect the equipment into an outlet on , the user is no guarantee that to Part 15 of Conformity Trade Name: SONY Model No.: DCR-DVD201 Responsible Party:Sony Electronics Inc. Note: This equipment has been tested and found to comply with the limits for help. Reorient or relocate...
Operating Instructions
Page 11
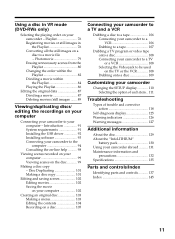
...Warning messages 127 Additional information About the disc 129 About the "InfoLITHIUM" battery pack 130 Using your camcorder abroad .......... 131 Maintenance information and precautions 132 Specifications 135 Parts and controls/Index Identifying parts and controls 137 Index 145 11 Photomovie 79 Erasing unnecessary scenes from the Playlist 80 Changing the ... on your computer Connecting your computer 99 Viewing scenes on your computer - Playlist 76 Registering movies or still images in VR mode (DVD-RWs only) Selecting the playing order on the disc 99 Making a disc copy -
...Warning messages 127 Additional information About the disc 129 About the "InfoLITHIUM" battery pack 130 Using your camcorder abroad .......... 131 Maintenance information and precautions 132 Specifications 135 Parts and controls/Index Identifying parts and controls 137 Index 145 11 Photomovie 79 Erasing unnecessary scenes from the Playlist 80 Changing the ... on your computer Connecting your computer 99 Viewing scenes on your computer - Playlist 76 Registering movies or still images in VR mode (DVD-RWs only) Selecting the playing order on the disc 99 Making a disc copy -
Operating Instructions
Page 16
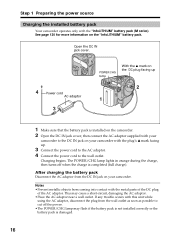
...using the AC adaptor, disconnect the plug from the DC IN jack on the "InfoLITHIUM" battery pack. See page 130 for more information on your camcorder with the "InfoLITHIUM" battery pack (M series). The POWER/CHG lamp lights in orange during the charge, then turns off the power. •...Place the AC adaptor near a wall outlet. Charging begins. If any trouble occurs with the metal parts of the DC plug of the AC adaptor. Step 1 Preparing the power source Charging the installed battery pack Your camcorder operates only with the plug's v mark facing up 2 1 1 Make sure that the battery...
...using the AC adaptor, disconnect the plug from the DC IN jack on the "InfoLITHIUM" battery pack. See page 130 for more information on your camcorder with the "InfoLITHIUM" battery pack (M series). The POWER/CHG lamp lights in orange during the charge, then turns off the power. •...Place the AC adaptor near a wall outlet. Charging begins. If any trouble occurs with the metal parts of the DC plug of the AC adaptor. Step 1 Preparing the power source Charging the installed battery pack Your camcorder operates only with the plug's v mark facing up 2 1 1 Make sure that the battery...
Operating Instructions
Page 134
...connecting section. very humid. - extremely hot or cold. - vibrating. The built-in rechargeable battery is installed in your camcorder, and leave your camcorder with the metal parts of the POWER button. To disconnect the power cord, pull it for a long time. Charging the built-in rechargeable battery... in your camcorder to the video equipment securely. This is not a malfunction. •Do not place the unit in ...
...connecting section. very humid. - extremely hot or cold. - vibrating. The built-in rechargeable battery is installed in your camcorder, and leave your camcorder with the metal parts of the POWER button. To disconnect the power cord, pull it for a long time. Charging the built-in rechargeable battery... in your camcorder to the video equipment securely. This is not a malfunction. •Do not place the unit in ...
Operating Instructions
Page 136
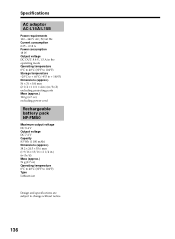
...°F) Storage temperature -20°C to + 60°C (-4°F to + 140°F) Dimensions (approx.) 56 × 31 × 100 mm (2 1/4 × 1 1/4 × 4 in.) (w/h/d) excluding projecting parts Mass (approx.) 190 g (6.7 oz) excluding power cord Rechargeable battery pack NP-FM50 Maximum output voltage DC 8.4 V Output voltage DC 7.2 V Capacity 8.5 Wh (1 180 mAh) Dimensions (approx...
...°F) Storage temperature -20°C to + 60°C (-4°F to + 140°F) Dimensions (approx.) 56 × 31 × 100 mm (2 1/4 × 1 1/4 × 4 in.) (w/h/d) excluding projecting parts Mass (approx.) 190 g (6.7 oz) excluding power cord Rechargeable battery pack NP-FM50 Maximum output voltage DC 8.4 V Output voltage DC 7.2 V Capacity 8.5 Wh (1 180 mAh) Dimensions (approx...
Operating Instructions
Page 137
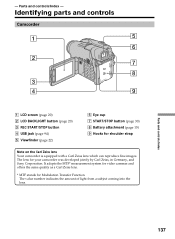
... MTF* measurement system for video cameras and offers the same quality as a Carl Zeiss lens. * MTF stands for your camcorder was developed jointly by Carl Zeiss, in Germany, and Sony Corporation. - Identifying parts and controls Camcorder 1 5 6 2 7 8 3 4 9 1 LCD screen (page 20) 2 LCD BACKLIGHT button (page 20) 3 REC START/STOP button 4 USB jack (page 94) 5 Viewfinder...
... MTF* measurement system for video cameras and offers the same quality as a Carl Zeiss lens. * MTF stands for your camcorder was developed jointly by Carl Zeiss, in Germany, and Sony Corporation. - Identifying parts and controls Camcorder 1 5 6 2 7 8 3 4 9 1 LCD screen (page 20) 2 LCD BACKLIGHT button (page 20) 3 REC START/STOP button 4 USB jack (page 94) 5 Viewfinder...

Operating Instructions
Page 138
Otherwise, you cannot attach the tripod securely, and the screw may damage your camcorder. 138 Mode dial (page 19) qa POWER/CHG lamp (page 16) qs REMOTE jack Use to connect to optional accessories. qd Viewfinder lens adjustment dial (page 22) qf POWER button (page 19) qg BATT (battery) release button (page 15) qh DC IN jack (page 16) qj Lens cap (page 28) qk Tripod receptacle Make sure that the length of the tripod screw is less than 5.5 mm (7/32 inch). Identifying parts and controls q; qh qa qs qj qd qf qg qk q;
Otherwise, you cannot attach the tripod securely, and the screw may damage your camcorder. 138 Mode dial (page 19) qa POWER/CHG lamp (page 16) qs REMOTE jack Use to connect to optional accessories. qd Viewfinder lens adjustment dial (page 22) qf POWER button (page 19) qg BATT (battery) release button (page 15) qh DC IN jack (page 16) qj Lens cap (page 28) qk Tripod receptacle Make sure that the length of the tripod screw is less than 5.5 mm (7/32 inch). Identifying parts and controls q; qh qa qs qj qd qf qg qk q;

Operating Instructions
Page 139
.... •The intelligent accessory shoe is preferred for fixing the installed accessory securely. This jack also accepts a "plug-in-power" microphone. Identifying parts and controls ql wh w; To connect an accessory, press down and push it is linked to the POWER button, allowing you to the end,... an accessory, loosen the screw, and then press down and pull out the accessory. 139 wj wk wa ws wl wd wf wg Parts and controls/Index ql Intelligent accessory shoe w; Refer to the operating instructions of the accessory for further information. •The intelligent accessory shoe...
.... •The intelligent accessory shoe is preferred for fixing the installed accessory securely. This jack also accepts a "plug-in-power" microphone. Identifying parts and controls ql wh w; To connect an accessory, press down and push it is linked to the POWER button, allowing you to the end,... an accessory, loosen the screw, and then press down and pull out the accessory. 139 wj wk wa ws wl wd wf wg Parts and controls/Index ql Intelligent accessory shoe w; Refer to the operating instructions of the accessory for further information. •The intelligent accessory shoe...
Operating Instructions
Page 140
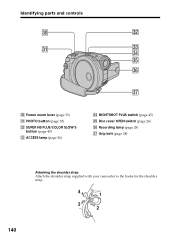
es ea ed ef eg eh ej e; Identifying parts and controls e; Power zoom lever (page 33) ea PHOTO button (page 35) es SUPER NS PLUS/COLOR SLOW S button (page 45) ed ACCESS lamp (page 26) ef NIGHTSHOT PLUS switch (page 45) eg Disc cover OPEN switch (page 26) eh Recording lamp (page 29) ej Grip belt (page 28) Attaching the shoulder strap Attach the shoulder strap supplied with your camcorder to the hooks for the shoulder strap. 4 1 3 2 140
es ea ed ef eg eh ej e; Identifying parts and controls e; Power zoom lever (page 33) ea PHOTO button (page 35) es SUPER NS PLUS/COLOR SLOW S button (page 45) ed ACCESS lamp (page 26) ef NIGHTSHOT PLUS switch (page 45) eg Disc cover OPEN switch (page 26) eh Recording lamp (page 29) ej Grip belt (page 28) Attaching the shoulder strap Attach the shoulder strap supplied with your camcorder to the hooks for the shoulder strap. 4 1 3 2 140
Operating Instructions
Page 142
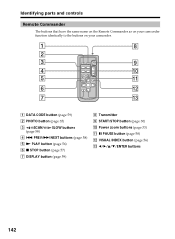
Identifying parts and controls Remote Commander The buttons that have the same name on the Remote Commander as on your camcorder function identically to the buttons on your camcorder. 1 8 2 3 9 4 q; 5 qa 6 qs 7 qd 1 DATA CODE button (page 59) 2 PHOTO button (page 35) 3 SCAN/ (page 58) SLOW buttons 4 . PREV/> NEXT buttons (page 58) 5 N PLAY button (page...
Identifying parts and controls Remote Commander The buttons that have the same name on the Remote Commander as on your camcorder function identically to the buttons on your camcorder. 1 8 2 3 9 4 q; 5 qa 6 qs 7 qd 1 DATA CODE button (page 59) 2 PHOTO button (page 35) 3 SCAN/ (page 58) SLOW buttons 4 . PREV/> NEXT buttons (page 58) 5 N PLAY button (page...

Operating Instructions
Page 143
... overhead lighting. terminals in the DVD 2 Commander mode. Parts and controls/Index 143 Commander modes 1, 2 and 3 are used in fire. Otherwise, the Remote Commander may not function properly. •Your camcorder works in the battery compartment. 1 2 3 WARNING Battery may explode if mistreated. Do not use another Sony DVD player in the DVD 2 Commander mode, it is...
... overhead lighting. terminals in the DVD 2 Commander mode. Parts and controls/Index 143 Commander modes 1, 2 and 3 are used in fire. Otherwise, the Remote Commander may not function properly. •Your camcorder works in the battery compartment. 1 2 3 WARNING Battery may explode if mistreated. Do not use another Sony DVD player in the DVD 2 Commander mode, it is...
Operating Instructions
Page 144
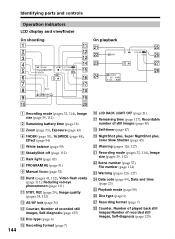
... still images/Number of still images (page 40) qk Self-timer (page 47) ql NightShot plus, Super NightShot plus, Color Slow Shutter (page 45) w; Identifying parts and controls Operation indicators LCD display and viewfinder On shooting On playback wa ws 0001 wd wf AUTO 60 AWB F1.8 9dB N 0:12:34 -R VIDEO...
... still images/Number of still images (page 40) qk Self-timer (page 47) ql NightShot plus, Super NightShot plus, Color Slow Shutter (page 45) w; Identifying parts and controls Operation indicators LCD display and viewfinder On shooting On playback wa ws 0001 wd wf AUTO 60 AWB F1.8 9dB N 0:12:34 -R VIDEO...
Operating Instructions
Page 145
... Daylight saving time ...... 24, 116 DEMO 115 Digital effect 54 Digital zoom 33 Disc dubbing 106 Disc title 67 Disc 6 DISPLAY 59 Divide 84, 87 DVD-R 6 DVD-RW 6 E EXP BRKTG 41 EXPOSURE 43 F, G, H FADER 53 Fade in/out 53 Finalize 64 FINE 38 Flash 111 Folder 71 FOCUS 52 Format 74... Index 56 VR mode 7 W, X, Y, Z Warning indicators 126 Warning messages 127 White balance 50 Wide-angle 33 Wide mode 48 WIPE 53 Zoom 33, 61 Parts and controls/Index 145 See Beep OVERLAP 53 PASTEL 54 PB ZOOM 61 Photomovie 65, 79 Picture effect 54 Playback pause 58 Playing time 17...
... Daylight saving time ...... 24, 116 DEMO 115 Digital effect 54 Digital zoom 33 Disc dubbing 106 Disc title 67 Disc 6 DISPLAY 59 Divide 84, 87 DVD-R 6 DVD-RW 6 E EXP BRKTG 41 EXPOSURE 43 F, G, H FADER 53 Fade in/out 53 Finalize 64 FINE 38 Flash 111 Folder 71 FOCUS 52 Format 74... Index 56 VR mode 7 W, X, Y, Z Warning indicators 126 Warning messages 127 White balance 50 Wide-angle 33 Wide mode 48 WIPE 53 Zoom 33, 61 Parts and controls/Index 145 See Beep OVERLAP 53 PASTEL 54 PB ZOOM 61 Photomovie 65, 79 Picture effect 54 Playback pause 58 Playing time 17...

Operating Instructions
Page 147
147 Parts and controls/Index
147 Parts and controls/Index


