Operating Instructions
Page 7
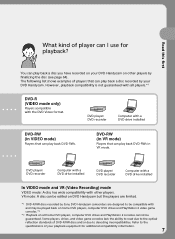
... ability to read due to be compatible with the DVD Video format. DVD player/ DVD recorder Computer with a DVD drive installed DVD player/ DVD recorder Computer with a DVD drive installed In VIDEO mode and VR (Video Recording) mode VIDEO mode: A disc has wide compatibility with other players by Sony DVD Handycam camcorders are limited. *1 DVD-R/RW discs recorded by finalizing the disc (see...
... ability to read due to be compatible with the DVD Video format. DVD player/ DVD recorder Computer with a DVD drive installed DVD player/ DVD recorder Computer with a DVD drive installed In VIDEO mode and VR (Video Recording) mode VIDEO mode: A disc has wide compatibility with other players by Sony DVD Handycam camcorders are limited. *1 DVD-R/RW discs recorded by finalizing the disc (see...

Operating Instructions
Page 8
... overwritten. Because your DVD Handycam Preparing Prepare a new disc. • You can play it back immediately on a single disc. If you finalize the recorded disc after shooting, you can be recorded on DVD players, etc.. Playing back Select a scene to format a DVD-RW before recording. Formatting is also required when using DVD-RW. Continued on DVD players, etc...
... overwritten. Because your DVD Handycam Preparing Prepare a new disc. • You can play it back immediately on a single disc. If you finalize the recorded disc after shooting, you can be recorded on DVD players, etc.. Playing back Select a scene to format a DVD-RW before recording. Formatting is also required when using DVD-RW. Continued on DVD players, etc...

Operating Instructions
Page 9
Read this first Editing Finalizing You can produce an original DVD by connecting your DVD Handycam to record additional material, edit, or format a disc after finalizing it becomes compatible with the supplied software. You may not be erased. 9 Overwrite Edit Format DVD-R (VIDEO mode) DVD-RW (VIDEO mode) DVD-RW (VR mode) No Yes*1 Yes*2 No No Yes*2 No...
Read this first Editing Finalizing You can produce an original DVD by connecting your DVD Handycam to record additional material, edit, or format a disc after finalizing it becomes compatible with the supplied software. You may not be erased. 9 Overwrite Edit Format DVD-R (VIDEO mode) DVD-RW (VIDEO mode) DVD-RW (VR mode) No Yes*1 Yes*2 No No Yes*2 No...
Operating Instructions
Page 10
...images 47 Shooting for backlit subjects - Picture effect/Digital effect ... 54 Checking/Deleting the last scene ....... 55 Checking the last scene - Formatting (DVD-RWs only) ..... 74 Table of the clock using a time difference 25 Step 5 Preparing a disc for other players Finalizing a disc ...the remaining battery time - BATTERY INFO 18 Connecting to prepare and use your camcorder ...... 56 Choosing and viewing a recording - Unfinalizing (VIDEO mode DVD-RWs only 72 Recording again on your DVD Handycam 8 Getting Started Using this first What you can do with special effects 53 ...
...images 47 Shooting for backlit subjects - Picture effect/Digital effect ... 54 Checking/Deleting the last scene ....... 55 Checking the last scene - Formatting (DVD-RWs only) ..... 74 Table of the clock using a time difference 25 Step 5 Preparing a disc for other players Finalizing a disc ...the remaining battery time - BATTERY INFO 18 Connecting to prepare and use your camcorder ...... 56 Choosing and viewing a recording - Unfinalizing (VIDEO mode DVD-RWs only 72 Recording again on your DVD Handycam 8 Getting Started Using this first What you can do with special effects 53 ...
Operating Instructions
Page 26
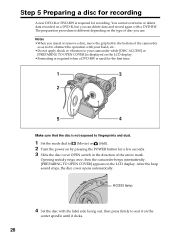
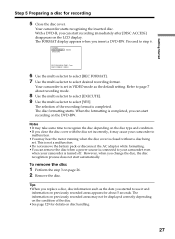
... obstruct the operation with your hand, etc.. •Do not apply shock or vibration to your camcorder while [DISC ACCESS] or [PREPARING TO OPEN COVER] is displayed on the LCD display. •Formatting is required when a DVD-RW is used for the first time. 1 3 2 5 4 Make sure that the disc is not exposed to...
... obstruct the operation with your hand, etc.. •Do not apply shock or vibration to your camcorder while [DISC ACCESS] or [PREPARING TO OPEN COVER] is displayed on the LCD display. •Formatting is required when a DVD-RW is used for the first time. 1 3 2 5 4 Make sure that the disc is not exposed to...
Operating Instructions
Page 27
...When the formatting is completed. Your camcorder starts recognizing the inserted disc. Proceed to select desired recording format. FORMAT REC FORMAT EXECUTE VIDEO EST. Refer to page 7 about 5 seconds. Tips •When you can start automatically. To remove the disc 1 Perform the step 3 on the DVD-RW.... disappears on the condition of the recording format is completed, you started to select [YES]. PROCESS TIME : 7sec REC FORMAT : VIDEO 6 Use the multi-selector to select [REC FORMAT]. 7 Use the multi-selector to step 6. Your camcorder is closed without a disc being set...
...When the formatting is completed. Your camcorder starts recognizing the inserted disc. Proceed to select desired recording format. FORMAT REC FORMAT EXECUTE VIDEO EST. Refer to page 7 about 5 seconds. Tips •When you can start automatically. To remove the disc 1 Perform the step 3 on the DVD-RW.... disappears on the condition of the recording format is completed, you started to select [YES]. PROCESS TIME : 7sec REC FORMAT : VIDEO 6 Use the multi-selector to select [REC FORMAT]. 7 Use the multi-selector to step 6. Your camcorder is closed without a disc being set...
Operating Instructions
Page 31
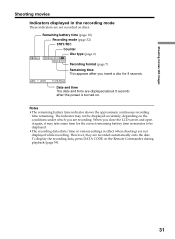
... time for 8 seconds. Remaining battery time (page 18) Recording mode (page 32) STBY/REC Counter Disc type (page 6) 40min REC 0:00:01 -R [30min] VIDEO Recording format (page 7) Remaining time This appears after the power is turned on discs. JAN 1 2004 11:23:45AM Date and time The date and time are...
... time for 8 seconds. Remaining battery time (page 18) Recording mode (page 32) STBY/REC Counter Disc type (page 6) 40min REC 0:00:01 -R [30min] VIDEO Recording format (page 7) Remaining time This appears after the power is turned on discs. JAN 1 2004 11:23:45AM Date and time The date and time are...
Operating Instructions
Page 32
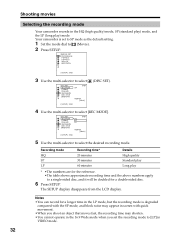
... 30 minutes 60 minutes Details High quality Standard play Long play ) mode. Shooting movies Selecting the recording mode Your camcorder records in VIDEO mode. 32 Your camcorder is degraded compared with the SP mode, and block noise may appear in scenes with quick movement. •When you...Press SETUP. MANUAL SET PROGRAM AE P EFFECT D EFFECT WHT BAL AUTO SHTR [ SETUP ] : END 3 Use the multi-selector to select DISC SET REC MODE FORMAT FINALIZE UNFINALIZE DISC TITLE RETURN STBY SP REMAIN [30min] [ SETUP ] : END (DISC SET). 4 Use the multi-selector to a single-sided disc, and it...
... 30 minutes 60 minutes Details High quality Standard play Long play ) mode. Shooting movies Selecting the recording mode Your camcorder records in VIDEO mode. 32 Your camcorder is degraded compared with the SP mode, and block noise may appear in scenes with quick movement. •When you...Press SETUP. MANUAL SET PROGRAM AE P EFFECT D EFFECT WHT BAL AUTO SHTR [ SETUP ] : END 3 Use the multi-selector to select DISC SET REC MODE FORMAT FINALIZE UNFINALIZE DISC TITLE RETURN STBY SP REMAIN [30min] [ SETUP ] : END (DISC SET). 4 Use the multi-selector to a single-sided disc, and it...
Operating Instructions
Page 40
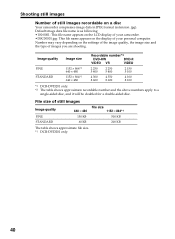
Image quality FINE STANDARD Image size 1152 × 864*1 640 × 480 1152 × 864*1 640 × 480 Recordable number*2 DVD-RW DVD-R VIDEO VR VIDEO 2 250 5 400 2 250 5 400 2 150 5 100 4 300 8 600 4 350 8 600 4 100 8 100 *1 DCR-DVD201 only. *2 The table shows approximate ... a single-sided disc, and it will be doubled for a double-sided disc. File size of your camcorder. •DSC00001.jpg: This file name appears on a disc Your camcorder compresses image data in JPEG format (extension .jpg). Default image data file name is as following: •100-0001: This file name ...
Image quality FINE STANDARD Image size 1152 × 864*1 640 × 480 1152 × 864*1 640 × 480 Recordable number*2 DVD-RW DVD-R VIDEO VR VIDEO 2 250 5 400 2 250 5 400 2 150 5 100 4 300 8 600 4 350 8 600 4 100 8 100 *1 DCR-DVD201 only. *2 The table shows approximate ... a single-sided disc, and it will be doubled for a double-sided disc. File size of your camcorder. •DSC00001.jpg: This file name appears on a disc Your camcorder compresses image data in JPEG format (extension .jpg). Default image data file name is as following: •100-0001: This file name ...

Operating Instructions
Page 65
...selector to 6. 65 Finalizing starts. Converted still images are played back in "Converting all the still images on a disc to a MPEG format. FINALIZE DISC TITLE PHOTOMOVIE EXECUTE RETURN NO YES EST. FINALIZE EXECUTING AVOID ANY VIBRATION 0:06 7 Press FINALIZE when [COMPLETED] appears. ...When still images are included on a disc recorded in VR mode. Finalizing a disc for the playback on DVD players appears temporarily. In VIDEO mode, the menu display for other players Finalizing a disc 4 When still images are recorded in VR mode...
...selector to 6. 65 Finalizing starts. Converted still images are played back in "Converting all the still images on a disc to a MPEG format. FINALIZE DISC TITLE PHOTOMOVIE EXECUTE RETURN NO YES EST. FINALIZE EXECUTING AVOID ANY VIBRATION 0:06 7 Press FINALIZE when [COMPLETED] appears. ...When still images are included on a disc recorded in VR mode. Finalizing a disc for the playback on DVD players appears temporarily. In VIDEO mode, the menu display for other players Finalizing a disc 4 When still images are recorded in VR mode...

Operating Instructions
Page 66
...view the Photomovie on other players. The more still images recorded on your camcorder in some time for finalizing. VIDEO mode: VIDEO - Use the slide show feature to view still images ...on your camcorder (page 62). •If you set [PHOTOMOVIE] to [CREATE] during finalizing, it takes to... also display the FINALIZE display by pressing SETUP and selecting (DISC SET) - [FINALIZE] with your camcorder, the disc format display on the upper-right corner is used to play back still images in sequence on the disc...
...view the Photomovie on other players. The more still images recorded on your camcorder in some time for finalizing. VIDEO mode: VIDEO - Use the slide show feature to view still images ...on your camcorder (page 62). •If you set [PHOTOMOVIE] to [CREATE] during finalizing, it takes to... also display the FINALIZE display by pressing SETUP and selecting (DISC SET) - [FINALIZE] with your camcorder, the disc format display on the upper-right corner is used to play back still images in sequence on the disc...

Operating Instructions
Page 67
... [ SETUP ] : END 67 MANUAL SET PROGRAM AE P EFFECT D EFFECT WHT BAL AUTO SHTR [ SETUP ] : END 2 Use the multi-selector to select DISC SET REC MODE FORMAT FINALIZE UNFINALIZE DISC TITLE RETURN STBY SP REMAIN [30min] [ SETUP ] : END (DISC SET). 3 Use the multi-selector to select the desired character. Up to 20...
... [ SETUP ] : END 67 MANUAL SET PROGRAM AE P EFFECT D EFFECT WHT BAL AUTO SHTR [ SETUP ] : END 2 Use the multi-selector to select DISC SET REC MODE FORMAT FINALIZE UNFINALIZE DISC TITLE RETURN STBY SP REMAIN [30min] [ SETUP ] : END (DISC SET). 3 Use the multi-selector to select the desired character. Up to 20...

Operating Instructions
Page 68
... display. 68 Note When you press SETUP in step 6, the disc title is set and the display returns to select [ESC]. DISC SET REC MODE FORMAT FINALIZE UNFINALIZE DISC TITLE RETURN BEACH [ SETUP ] : END 7 Press SETUP. The disc title is set by other devices, the 21st and subsequent characters are deleted...
... display. 68 Note When you press SETUP in step 6, the disc title is set and the display returns to select [ESC]. DISC SET REC MODE FORMAT FINALIZE UNFINALIZE DISC TITLE RETURN BEACH [ SETUP ] : END 7 Press SETUP. The disc title is set by other devices, the 21st and subsequent characters are deleted...

Operating Instructions
Page 74
... to select [VIDEO] or [VR]. CANNOT EDIT IN CAMCORDER [ SETUP ] : END 5 Use the multi-selector to select [FORMAT]. FORMAT REC FORMAT EXECUTE RETURN NO YES ALL DATA TO BE DELETED EST. Formatting (DVD-RWs only) You can format recorded DVD-RWs and make them new discs. PROCESS TIME : 7sec REC FORMAT : VIDEO [ SETUP ] : END 4 Use the multi-selector to...
... to select [VIDEO] or [VR]. CANNOT EDIT IN CAMCORDER [ SETUP ] : END 5 Use the multi-selector to select [FORMAT]. FORMAT REC FORMAT EXECUTE RETURN NO YES ALL DATA TO BE DELETED EST. Formatting (DVD-RWs only) You can format recorded DVD-RWs and make them new discs. PROCESS TIME : 7sec REC FORMAT : VIDEO [ SETUP ] : END 4 Use the multi-selector to...
Operating Instructions
Page 75
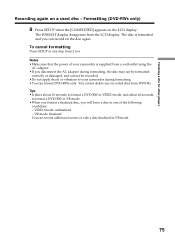
... disc for other players Recording again on the LCD display. Formatting (DVD-RWs only) 8 Press SETUP when the [COMPLETED] appears on a used disc - Notes •Make sure that the power of your camcorder during formatting, the disc may not be formatted correctly or damaged, and can not be recorded. •...Do not apply shock or vibration to 6. To cancel formatting Press SETUP in any recorded data from 2 to your camcorder is formatted and you will have a disc in VR mode. •When you format a finalized disc, you can record on the disc again. VIDEO mode: ...
... disc for other players Recording again on the LCD display. Formatting (DVD-RWs only) 8 Press SETUP when the [COMPLETED] appears on a used disc - Notes •Make sure that the power of your camcorder during formatting, the disc may not be formatted correctly or damaged, and can not be recorded. •...Do not apply shock or vibration to 6. To cancel formatting Press SETUP in any recorded data from 2 to your camcorder is formatted and you will have a disc in VR mode. •When you format a finalized disc, you can record on the disc again. VIDEO mode: ...

Operating Instructions
Page 78
.... To cancel the registration Press EDIT in the Playlist. Tips •You can register only MPEG format movies in any step from 3 to select [EXEC.]. Still images recorded in the movie folder. ... registration is converted and registered as a new movie in JPEG format are shown with . 78 The original still image remains in the JPEG format. •Still images converted to a movie are converted to ...999 scenes in the Playlist. •You can register up to MPEG format when you register them in...
.... To cancel the registration Press EDIT in the Playlist. Tips •You can register only MPEG format movies in any step from 3 to select [EXEC.]. Still images recorded in the movie folder. ... registration is converted and registered as a new movie in JPEG format are shown with . 78 The original still image remains in the JPEG format. •Still images converted to a movie are converted to ...999 scenes in the Playlist. •You can register up to MPEG format when you register them in...
Operating Instructions
Page 81
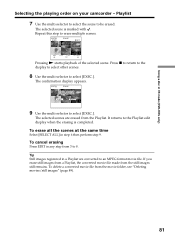
The selected scenes are converted to an MPEG format movie file. Tip Still images registered in any step from the still images still remains. ERASE RET. 003 JAN 1 04 1/2 6:10PM Pressing N starts playback of ... a disc in step 6 then perform step 9. To erase all the scenes at the same time Select [SELECT ALL] in VR mode (DVD-RWs only) Selecting the playing order on your camcorder - RET. 9 Use the multi-selector to be erased. To cancel erasing Press EDIT in a Playlist are erased from the movie folder...
The selected scenes are converted to an MPEG format movie file. Tip Still images registered in any step from the still images still remains. ERASE RET. 003 JAN 1 04 1/2 6:10PM Pressing N starts playback of ... a disc in step 6 then perform step 9. To erase all the scenes at the same time Select [SELECT ALL] in VR mode (DVD-RWs only) Selecting the playing order on your camcorder - RET. 9 Use the multi-selector to be erased. To cancel erasing Press EDIT in a Playlist are erased from the movie folder...
Operating Instructions
Page 90
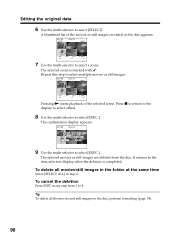
...]. The selected scene is completed. DELETE RET. 001 JAN 1 04 1/2 6:00PM Pressing N starts playback of the movies or still images recorded on the disc, perform formatting (page 74). 90 The confirmation display appears. Editing the original data 6 Use the multi-selector to select [EXEC.]. DEL. The selected movies or still images...
...]. The selected scene is completed. DELETE RET. 001 JAN 1 04 1/2 6:00PM Pressing N starts playback of the movies or still images recorded on the disc, perform formatting (page 74). 90 The confirmation display appears. Editing the original data 6 Use the multi-selector to select [EXEC.]. DEL. The selected movies or still images...
Operating Instructions
Page 101
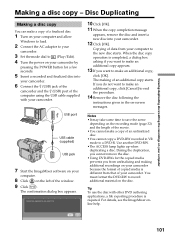
...disc into your computer. 8 Click on the left of an unfinalized disc. •You cannot copy a DVD-RW recorded in the on-screen messages. Copying of data from that of your camcorder because the format of the movie. •You cannot make an additional copy, click [Cancel] to end the procedure. ... mode dial to the new disc starts. If you want to record additional material on your camcorder. 6 Connect the (USB) jack of the camcorder and the (USB) port of an additional copy starts. You must format the DVD-RW to make a copy of the window. 9 Click . USB port USB cable (supplied) USB ...
...disc into your computer. 8 Click on the left of an unfinalized disc. •You cannot copy a DVD-RW recorded in the on-screen messages. Copying of data from that of your camcorder because the format of the movie. •You cannot make an additional copy, click [Cancel] to end the procedure. ... mode dial to the new disc starts. If you want to record additional material on your camcorder. 6 Connect the (USB) jack of the camcorder and the (USB) port of an additional copy starts. You must format the DVD-RW to make a copy of the window. 9 Click . USB port USB cable (supplied) USB ...

Operating Instructions
Page 102
... of saving data in the following cases: - when the file includes both movies and still images. - Saving the movie on the title window. The [Output Format Settings] dialog box appears. 2 Click [OK]. 3 Select the [My Documents] folder as faders are added. When the movie is saved, it . Storyboard When you want...
... of saving data in the following cases: - when the file includes both movies and still images. - Saving the movie on the title window. The [Output Format Settings] dialog box appears. 2 Click [OK]. 3 Select the [My Documents] folder as faders are added. When the movie is saved, it . Storyboard When you want...


