
Operating Instructions
Page 91
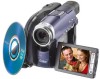
...to your computer - System requirements OS: Microsoft Windows Me, Microsoft Windows 2000 Professional, Microsoft Windows XP Home Edition or Microsoft Windows XP Professional. The above or in the SETUP display. •Depending on your application software, the file size may increase when you connect...on connectors and editing software of your computer. 91 Consult the computer manufacturer for the details on your computer. Tips •Your camcorder is required to connect your camcorder to your computer •Duplicating a disc •Making an original DVD using a computer ...
...to your computer - System requirements OS: Microsoft Windows Me, Microsoft Windows 2000 Professional, Microsoft Windows XP Home Edition or Microsoft Windows XP Professional. The above or in the SETUP display. •Depending on your application software, the file size may increase when you connect...on connectors and editing software of your computer. 91 Consult the computer manufacturer for the details on your computer. Tips •Your camcorder is required to connect your camcorder to your computer •Duplicating a disc •Making an original DVD using a computer ...

Operating Instructions
Page 92
... load. Install the USB driver to control your camcorder from your computer and allow Windows to your computer. Note If you are using Windows 2000 Professional or Windows XP Home Edition/Professional Log on as administrator. 1 Turn on , close all the software. 2 Insert the supplied CD-ROM into the... CD-ROM drive of your computer. Connecting your camcorder to [USB Driver] and click. The ...
... load. Install the USB driver to control your camcorder from your computer and allow Windows to your computer. Note If you are using Windows 2000 Professional or Windows XP Home Edition/Professional Log on as administrator. 1 Turn on , close all the software. 2 Insert the supplied CD-ROM into the... CD-ROM drive of your computer. Connecting your camcorder to [USB Driver] and click. The ...
Operating Instructions
Page 93
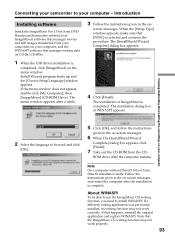
The menu window appears after the installation is completed. The installation dialog box of ImageMixer is complete. Introduction Installing software Install the ImageMixer Ver.1.5 for Sony DVD Handycam (hereinafter referred to as ImageMixer) software that manages movies and still images transferred from the CD...the CD-ROM from your camcorder on your computer, and the WINASPI software that the ImageMixer CD writing function may not work properly. 93 Install Wizard program starts up and the [Choose Setup Language] window appears. Connecting your camcorder to install WINASPI. If ...
The menu window appears after the installation is completed. The installation dialog box of ImageMixer is complete. Introduction Installing software Install the ImageMixer Ver.1.5 for Sony DVD Handycam (hereinafter referred to as ImageMixer) software that manages movies and still images transferred from the CD...the CD-ROM from your camcorder on your computer, and the WINASPI software that the ImageMixer CD writing function may not work properly. 93 Install Wizard program starts up and the [Choose Setup Language] window appears. Connecting your camcorder to install WINASPI. If ...
Operating Instructions
Page 94
... the power on all the recommended environments. 5 Select [Install the software automatically (Recommended)] and click [Next]. If you connect the camcorder to the computer first, you connect your camcorder via a USB hub or to the USB port not equipped with your computer. Click [Sony DVD Handycam] if it is selected as the best match and click...
... the power on all the recommended environments. 5 Select [Install the software automatically (Recommended)] and click [Next]. If you connect the camcorder to the computer first, you connect your camcorder via a USB hub or to the USB port not equipped with your computer. Click [Sony DVD Handycam] if it is selected as the best match and click...

Operating Instructions
Page 98
... computer following procedure to install the USB driver correctly. 1 Disconnect your camcorder from the table of contents. The ImageMixer Help window appears. 2 Find the information you can find detailed operating instructions for ImageMixer software. 1 Click located at the top right of the window. If you cannot install the USB driver The USB driver has...
... computer following procedure to install the USB driver correctly. 1 Disconnect your camcorder from the table of contents. The ImageMixer Help window appears. 2 Find the information you can find detailed operating instructions for ImageMixer software. 1 Click located at the top right of the window. If you cannot install the USB driver The USB driver has...
Operating Instructions
Page 99
...] t [PIXELA ImageMixer Ver.1.5 for Sony DVD Handycam] icon on the Windows desktop. If you are using the USB cable supplied with your computer (page 92, 93). The ImageMixer software starts and the title dialog box appears. 1 Turn on your computer and allow Windows to load. 2 Connect the AC adaptor to your camcorder. 3 Set the mode dial to...
...] t [PIXELA ImageMixer Ver.1.5 for Sony DVD Handycam] icon on the Windows desktop. If you are using the USB cable supplied with your computer (page 92, 93). The ImageMixer software starts and the title dialog box appears. 1 Turn on your computer and allow Windows to load. 2 Connect the AC adaptor to your camcorder. 3 Set the mode dial to...

Operating Instructions
Page 100
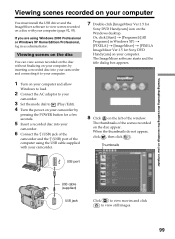
...USB driver installation is complete, the USB driver will not be properly registered. Install the USB driver again following the steps in the preview window. The selected scene is a unit to register and to manage the saved movies and still images saved from the thumbnails. To return to...To view the album 1 Click . 2 Double-click the scene to view from your camcorder during displaying the thumbnails on your computer display. •When anything goes wrong with the operation, close all the software and restart the computer. The selected scene is displayed in "If you cannot install the ...
...USB driver installation is complete, the USB driver will not be properly registered. Install the USB driver again following the steps in the preview window. The selected scene is a unit to register and to manage the saved movies and still images saved from the thumbnails. To return to...To view the album 1 Click . 2 Double-click the scene to view from your camcorder during displaying the thumbnails on your computer display. •When anything goes wrong with the operation, close all the software and restart the computer. The selected scene is displayed in "If you cannot install the ...
Operating Instructions
Page 101
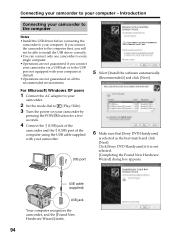
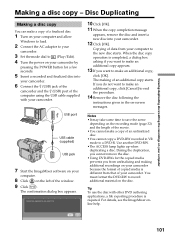
... finalized disc. 1 Turn on your computer and allow Windows to load. 2 Connect the AC adaptor to your camcorder. 6 Connect the (USB) jack of the camcorder and the (USB) port of the computer using the USB cable supplied with other DVD authoring applications, a file exporting procedure is required. For...] to the new disc starts. USB port USB cable (supplied) USB jack 7 Start the ImageMixer software on your camcorder. 12 Click [OK]. During the duplication, you cannot remove the disc. •Using DVD-RWs for a few seconds. 5 Insert a recorded and finalized disc into your computer. 8 Click...
... finalized disc. 1 Turn on your computer and allow Windows to load. 2 Connect the AC adaptor to your camcorder. 6 Connect the (USB) jack of the camcorder and the (USB) port of the computer using the USB cable supplied with other DVD authoring applications, a file exporting procedure is required. For...] to the new disc starts. USB port USB cable (supplied) USB jack 7 Start the ImageMixer software on your camcorder. 12 Click [OK]. During the duplication, you cannot remove the disc. •Using DVD-RWs for a few seconds. 5 Insert a recorded and finalized disc into your computer. 8 Click...


