Operating Instructions
Page 10
... Wide mode 48 Adjusting the white balance manually 50 Shooting techniques to prepare and use your DVD Handycam 8 Getting Started Using this manual 12 Checking the supplied accessories ..... 14 Step 1 Preparing the power source ... 15 Installing/removing the battery pack 15 Charging... Review 55 Deleting the last scene (DVD-RWs only 55 Viewing the recordings Playing a disc on a used disc - PROGRAM AE ... 51 Focusing manually 52 Shooting with your DVD Handycam 4 What is the difference between DVD-R and DVD-RW 6 How to match your camcorder ...... 56 Choosing and viewing a recording...
... Wide mode 48 Adjusting the white balance manually 50 Shooting techniques to prepare and use your DVD Handycam 8 Getting Started Using this manual 12 Checking the supplied accessories ..... 14 Step 1 Preparing the power source ... 15 Installing/removing the battery pack 15 Charging... Review 55 Deleting the last scene (DVD-RWs only 55 Viewing the recordings Playing a disc on a used disc - PROGRAM AE ... 51 Focusing manually 52 Shooting with your DVD Handycam 4 What is the difference between DVD-R and DVD-RW 6 How to match your camcorder ...... 56 Choosing and viewing a recording...
Operating Instructions
Page 14
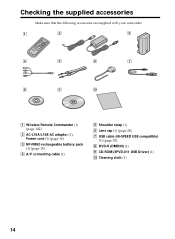
Checking the supplied accessories Make sure that the following accessories are supplied with your camcorder. 1 2 3 4 5 6 7 8 9 0 1 Wireless Remote Commander (1) (page 142) 2 AC-L15A/L15B AC adaptor (1), Power cord (1) (page 16) 3 NP-FM50 rechargeable battery pack (1) (page 15) 4 A/V connecting cable (1) 5 Shoulder strap (1) 6 Lens cap (1) (page 28) 7 USB cable (Hi-SPEED USB compatible) (1) (page 92) 8 DVD-R (DMR30) (1) 9 CD-ROM (SPVD-011 USB Driver) (1) q; Cleaning cloth (1) 14
Checking the supplied accessories Make sure that the following accessories are supplied with your camcorder. 1 2 3 4 5 6 7 8 9 0 1 Wireless Remote Commander (1) (page 142) 2 AC-L15A/L15B AC adaptor (1), Power cord (1) (page 16) 3 NP-FM50 rechargeable battery pack (1) (page 15) 4 A/V connecting cable (1) 5 Shoulder strap (1) 6 Lens cap (1) (page 28) 7 USB cable (Hi-SPEED USB compatible) (1) (page 92) 8 DVD-R (DMR30) (1) 9 CD-ROM (SPVD-011 USB Driver) (1) q; Cleaning cloth (1) 14

Operating Instructions
Page 132
...may cause the outer casing to lose its shape, or cause the camcorder to malfunction. •In locations subject to strong vibration and magnetic fields. •In locations subject to build up by a Sony dealer before operating it any solid object or liquid gets inside the ... whether it is not a malfunction. •While using your camcorder. •Do not wrap your camcorder with your fingers or a sharp-pointed object. •If your camcorder is used in a cold place, a residual image may not use the accessories recommended in these operating instructions. •If any further. ...
...may cause the outer casing to lose its shape, or cause the camcorder to malfunction. •In locations subject to strong vibration and magnetic fields. •In locations subject to build up by a Sony dealer before operating it any solid object or liquid gets inside the ... whether it is not a malfunction. •While using your camcorder. •Do not wrap your camcorder with your fingers or a sharp-pointed object. •If your camcorder is used in a cold place, a residual image may not use the accessories recommended in these operating instructions. •If any further. ...
Operating Instructions
Page 135
...lens cap DCR-DVD201 500 g (11 oz) main unit only 605 g (15 oz) including the battery pack, disc and lens cap Supplied accessories See page 14. Additional information 135 "Dolby" and the double-D symbol are trademarks of Pixels Gross: Approx. 1 070 000 pixels Effective (for ...shot with infrared lighting. Specifications Video camera recorder System Video recording format DVD-Video DVD-VR (DVD-RW only) Audio recording system 2ch Dolby* Digital Video signal NTSC color, EIA standards Usable discs 8 cm DVD-R and DVD-RW Video compression format MPEG2/JPEG (Still images) Recording/playback time ...
...lens cap DCR-DVD201 500 g (11 oz) main unit only 605 g (15 oz) including the battery pack, disc and lens cap Supplied accessories See page 14. Additional information 135 "Dolby" and the double-D symbol are trademarks of Pixels Gross: Approx. 1 070 000 pixels Effective (for ...shot with infrared lighting. Specifications Video camera recorder System Video recording format DVD-Video DVD-VR (DVD-RW only) Audio recording system 2ch Dolby* Digital Video signal NTSC color, EIA standards Usable discs 8 cm DVD-R and DVD-RW Video compression format MPEG2/JPEG (Still images) Recording/playback time ...

Operating Instructions
Page 138
Otherwise, you cannot attach the tripod securely, and the screw may damage your camcorder. 138 Mode dial (page 19) qa POWER/CHG lamp (page 16) qs REMOTE jack Use to connect to optional accessories. qd Viewfinder lens adjustment dial (page 22) qf POWER button (page 19) qg BATT (battery) release button (page 15) qh DC IN jack (page 16) qj Lens cap (page 28) qk Tripod receptacle Make sure that the length of the tripod screw is less than 5.5 mm (7/32 inch). qh qa qs qj qd qf qg qk q; Identifying parts and controls q;
Otherwise, you cannot attach the tripod securely, and the screw may damage your camcorder. 138 Mode dial (page 19) qa POWER/CHG lamp (page 16) qs REMOTE jack Use to connect to optional accessories. qd Viewfinder lens adjustment dial (page 22) qf POWER button (page 19) qg BATT (battery) release button (page 15) qh DC IN jack (page 16) qj Lens cap (page 28) qk Tripod receptacle Make sure that the length of the tripod screw is less than 5.5 mm (7/32 inch). qh qa qs qj qd qf qg qk q; Identifying parts and controls q;

Operating Instructions
Page 139
... down and push it is linked to the POWER button, allowing you to optional accessories such as a microphone. •The intelligent accessory shoe is preferred for fixing the installed accessory securely. wf AUDIO/VIDEO jack (page 63) wg Microphone wh DISPLAY/BATT INFO button (page 18) wj BACK ...INDEX button (page 56) wl Multi-selector (page 23) Notes on the intelligent accessory shoe •When you use the intelligent accessory shoe, extend the viewfinder and detach the shoe cover. •The intelligent accessory shoe supplies power to turn the power supplied by the shoe on and off....
... down and push it is linked to the POWER button, allowing you to optional accessories such as a microphone. •The intelligent accessory shoe is preferred for fixing the installed accessory securely. wf AUDIO/VIDEO jack (page 63) wg Microphone wh DISPLAY/BATT INFO button (page 18) wj BACK ...INDEX button (page 56) wl Multi-selector (page 23) Notes on the intelligent accessory shoe •When you use the intelligent accessory shoe, extend the viewfinder and detach the shoe cover. •The intelligent accessory shoe supplies power to turn the power supplied by the shoe on and off....
Operating Instructions
Page 145
... saving time ...... 24, 116 DEMO 115 Digital effect 54 Digital zoom 33 Disc dubbing 106 Disc title 67 Disc 6 DISPLAY 59 Divide 84, 87 DVD-R 6 DVD-RW 6 E EXP BRKTG 41 EXPOSURE 43 F, G, H FADER 53 Fade in/out 53 Finalize 64 FINE 38 Flash 111 Folder 71 FOCUS 52 ... SOUND 114 HQ 32 I, J, K, L ImageMixer 93, 99 Image quality 38, 112 Image size 39, 112 "InfoLITHIUM" battery ...... 130 Infrared ray emitter 139 Intelligent accessory shoe .... 139 JPEG 40 LANDSCAPE 51 LCD screen 20 LP 32 LUMI. (Luminance key) ........ 54 M, N Manual focus 52 MIC (PLUG IN POWER) jack 139...
... saving time ...... 24, 116 DEMO 115 Digital effect 54 Digital zoom 33 Disc dubbing 106 Disc title 67 Disc 6 DISPLAY 59 Divide 84, 87 DVD-R 6 DVD-RW 6 E EXP BRKTG 41 EXPOSURE 43 F, G, H FADER 53 Fade in/out 53 Finalize 64 FINE 38 Flash 111 Folder 71 FOCUS 52 ... SOUND 114 HQ 32 I, J, K, L ImageMixer 93, 99 Image quality 38, 112 Image size 39, 112 "InfoLITHIUM" battery ...... 130 Infrared ray emitter 139 Intelligent accessory shoe .... 139 JPEG 40 LANDSCAPE 51 LCD screen 20 LP 32 LUMI. (Luminance key) ........ 54 M, N Manual focus 52 MIC (PLUG IN POWER) jack 139...

