
Operating Instructions
Page 91
... OS: Microsoft Windows Me, Microsoft Windows 2000 Professional, Microsoft Windows XP Home Edition or Microsoft Windows XP Professional. Tips •Your camcorder is required to connect your camcorder to [FULL-SPEED] in (SETUP MENU) in a multi-boot environment. Introduction A USB driver and application software...to your computer •Duplicating a disc •Making an original DVD using a computer compatible with Hi-Speed USB. •When you open a still image file. •Communications between your camcorder and your computer may not be that of VRAM, Minimum 800...
... OS: Microsoft Windows Me, Microsoft Windows 2000 Professional, Microsoft Windows XP Home Edition or Microsoft Windows XP Professional. Tips •Your camcorder is required to connect your camcorder to [FULL-SPEED] in (SETUP MENU) in a multi-boot environment. Introduction A USB driver and application software...to your computer •Duplicating a disc •Making an original DVD using a computer compatible with Hi-Speed USB. •When you open a still image file. •Communications between your camcorder and your computer may not be that of VRAM, Minimum 800...

Operating Instructions
Page 92
... computer - Install the USB driver again following operation before USB driver installation is already turned on your computer. Install the USB driver to control your camcorder from your computer and allow Windows to load. If you cannot install the USB driver" (page 98). 92 The USB driver installation is completed. Connecting your camcorder to your computer is complete...
... computer - Install the USB driver again following operation before USB driver installation is already turned on your computer. Install the USB driver to control your camcorder from your computer and allow Windows to load. If you cannot install the USB driver" (page 98). 92 The USB driver installation is completed. Connecting your camcorder to your computer is complete...
Operating Instructions
Page 93
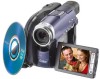
...restart the computer after the installation is completed, click [ImageMixer] on the menu window. The menu window appears after the computer restarts. Introduction Installing software Install the ImageMixer Ver.1.5 for Sony DVD Handycam (hereinafter referred to install WINASPI. Note that the ImageMixer CD writing function may ...computer, and the WINASPI software that manages writing data on CD-Rs/CD-RWs. 1 When the USB driver installation is complete. Connecting your camcorder to your computer 2 Select the language to be able to use the ImageMixer CD writing function, you need...
...restart the computer after the installation is completed, click [ImageMixer] on the menu window. The menu window appears after the computer restarts. Introduction Installing software Install the ImageMixer Ver.1.5 for Sony DVD Handycam (hereinafter referred to install WINASPI. Note that the ImageMixer CD writing function may ...computer, and the WINASPI software that manages writing data on CD-Rs/CD-RWs. 1 When the USB driver installation is complete. Connecting your camcorder to your computer 2 Select the language to be able to use the ImageMixer CD writing function, you need...
Operating Instructions
Page 94
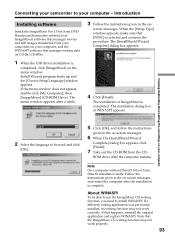
...the USB driver before connecting the camcorder to your computer - Click [Sony DVD Handycam] if it is selected as the best match and click [Next]. USB port 6 Make sure that [Sony DVD Handycam] is not selected. [Completing the Found New Hardware Wizard] dialog box appears. Connecting your camcorder to your... using the USB cable supplied with your camcorder. USB cable (supplied) USB jack Your computer recognizes the camcorder, and the [Found New Hardware Wizard] starts. 94 For Microsoft Windows XP users 1 Connect the AC adaptor to your camcorder. 2 Set the mode dial to the...
...the USB driver before connecting the camcorder to your computer - Click [Sony DVD Handycam] if it is selected as the best match and click [Next]. USB port 6 Make sure that [Sony DVD Handycam] is not selected. [Completing the Found New Hardware Wizard] dialog box appears. Connecting your camcorder to your... using the USB cable supplied with your camcorder. USB cable (supplied) USB jack Your computer recognizes the camcorder, and the [Found New Hardware Wizard] starts. 94 For Microsoft Windows XP users 1 Connect the AC adaptor to your camcorder. 2 Set the mode dial to the...
Operating Instructions
Page 95
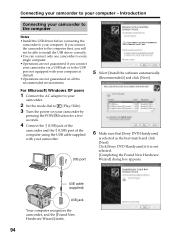
... AC adaptor to your camcorder. 2 Set the mode dial to your camcorder. screen messages. To confirm the USB driver installation 1 Click [Start] t [Control Panel]. 2 Click [Performance and Maintenance] t [System]. [System Properties] window appears. 3 Click [Hardware] tab. 4 Click [Device Manager]. [Device Manager] window appears. 5 Make sure that [SONY DDX-A1010 USB Device] appears in [DVD/CD-ROM drives...
... AC adaptor to your camcorder. 2 Set the mode dial to your camcorder. screen messages. To confirm the USB driver installation 1 Click [Start] t [Control Panel]. 2 Click [Performance and Maintenance] t [System]. [System Properties] window appears. 3 Click [Hardware] tab. 4 Click [Device Manager]. [Device Manager] window appears. 5 Make sure that [SONY DDX-A1010 USB Device] appears in [DVD/CD-ROM drives...
Operating Instructions
Page 96
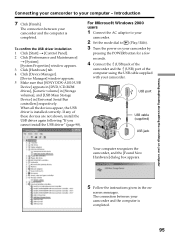
... and restart your camcorder. When all the devices appear, the USB driver is completed. 96 Introduction To confirm the USB driver installation 1 Click [Start] t [Settings] t [Control Panel]. 2 Click [System]. [System Properties] window appears. 3 Click [Hardware] tab. 4 Click [Device Manager]. [Device Manager] window appears. 5 Make sure that [SONY DDX-A1010 USB Device] appears in [DVD/CD-ROM drives...
... and restart your camcorder. When all the devices appear, the USB driver is completed. 96 Introduction To confirm the USB driver installation 1 Click [Start] t [Settings] t [Control Panel]. 2 Click [System]. [System Properties] window appears. 3 Click [Hardware] tab. 4 Click [Device Manager]. [Device Manager] window appears. 5 Make sure that [SONY DDX-A1010 USB Device] appears in [DVD/CD-ROM drives...
Operating Instructions
Page 97
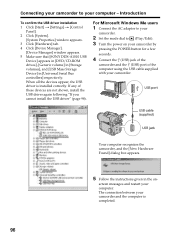
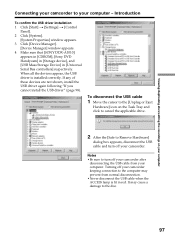
... or Eject Hardware] icon on your computer Connecting your camcorder to your computer - Introduction To confirm the USB driver installation 1 Click [Start] t [Settings] t [Control Panel]. 2 Click [System]. [System Properties] window appears. 3 Click [Device Manager]. [Device Manager] window appears. 4 Make sure that [SONY DDX-A1010] appears in [CDROM], [Sony DVD Handycam] in [Storage device], and [USB Mass Storage Device...
... or Eject Hardware] icon on your computer Connecting your camcorder to your computer - Introduction To confirm the USB driver installation 1 Click [Start] t [Settings] t [Control Panel]. 2 Click [System]. [System Properties] window appears. 3 Click [Device Manager]. [Device Manager] window appears. 4 Make sure that [SONY DDX-A1010] appears in [CDROM], [Sony DVD Handycam] in [Storage device], and [USB Mass Storage Device...

Operating Instructions
Page 98
... Wizard complete" dialog box disappears, restart your computer. 4 Connect your camcorder to the computer following procedure to install the USB driver correctly. 1 Disconnect your camcorder to the operating instructions of the CD-ROM supplied with your camcorder and the computer is a product of the window. For details, refer to the computer" (page 94). The USB...
... Wizard complete" dialog box disappears, restart your computer. 4 Connect your camcorder to the computer following procedure to install the USB driver correctly. 1 Disconnect your camcorder to the operating instructions of the CD-ROM supplied with your camcorder and the computer is a product of the window. For details, refer to the computer" (page 94). The USB...
Operating Instructions
Page 99
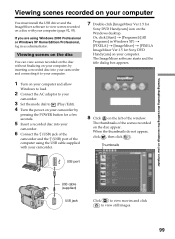
...Sony DVD Handycam] on your camcorder. 8 Click on the left of the computer using Windows 2000 Professional or Windows XP Home Edition/Professional, log in as administrator. Viewing/duplicating discs/editing the recordings on your computer Viewing scenes recorded on your computer You must install the USB driver... for a few seconds. 5 Insert a recorded disc into your camcorder and connecting it to (Play/Edit). 4 Turn the power on your camcorder by pressing the POWER button for Sony DVD Handycam] icon on the Windows desktop. Viewing scenes on the disc You can view scenes recorded on...
...Sony DVD Handycam] on your camcorder. 8 Click on the left of the computer using Windows 2000 Professional or Windows XP Home Edition/Professional, log in as administrator. Viewing/duplicating discs/editing the recordings on your computer Viewing scenes recorded on your computer You must install the USB driver... for a few seconds. 5 Insert a recorded disc into your camcorder and connecting it to (Play/Edit). 4 Turn the power on your camcorder by pressing the POWER button for Sony DVD Handycam] icon on the Windows desktop. Viewing scenes on the disc You can view scenes recorded on...

Operating Instructions
Page 100
... a movie, click and start playback. The selected scene is displayed in "If you cannot install the USB driver" (page 98). •It may take some time to view from your camcorder to a movie are not displayed. 100 To return to the thumbnails list, click below right of the movie...album is displayed. To view the album 1 Click . 2 Double-click the scene to save . 2 Click . Install the USB driver again following the steps in the preview window. Viewing scenes recorded on your computer display. •When anything goes wrong with the operation, close all the software and restart the ...
... a movie, click and start playback. The selected scene is displayed in "If you cannot install the USB driver" (page 98). •It may take some time to view from your camcorder to a movie are not displayed. 100 To return to the thumbnails list, click below right of the movie...album is displayed. To view the album 1 Click . 2 Double-click the scene to save . 2 Click . Install the USB driver again following the steps in the preview window. Viewing scenes recorded on your computer display. •When anything goes wrong with the operation, close all the software and restart the ...


