
Operating Instructions
Page 1
AC- Serial No. Model No. Record the serial number in the space provided below. Refer to these numbers whenever you call upon your Sony dealer regarding this manual thoroughly, and retain it for future reference. TM SERIES DCR-DVD101/DVD201 ©2004 Sony Corporation Serial No. Owner's Record The model and serial numbers are located on the bottom. DCR-DVD Model No. Operating Instructions [US] 3-089-913-12 (1) Digital Video Camera Recorder Operating Instructions Before operating the unit, please read this product.
AC- Serial No. Model No. Record the serial number in the space provided below. Refer to these numbers whenever you call upon your Sony dealer regarding this manual thoroughly, and retain it for future reference. TM SERIES DCR-DVD101/DVD201 ©2004 Sony Corporation Serial No. Owner's Record The model and serial numbers are located on the bottom. DCR-DVD Model No. Operating Instructions [US] 3-089-913-12 (1) Digital Video Camera Recorder Operating Instructions Before operating the unit, please read this product.
Operating Instructions
Page 4
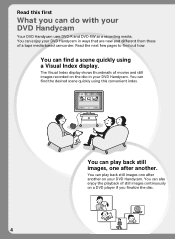
... first What you finalize the disc. 4 You can enjoy your DVD Handycam. You can play back still images one after another . Read this convenient index. The Visual Index display shows thumbnails of a tape media-based camcorder. You can find the desired scene quickly using a Visual Index display.... You can do with your DVD Handycam. You can find out how. You can also enjoy the playback of still images ...
... first What you finalize the disc. 4 You can enjoy your DVD Handycam. You can play back still images one after another . Read this convenient index. The Visual Index display shows thumbnails of a tape media-based camcorder. You can find the desired scene quickly using a Visual Index display.... You can do with your DVD Handycam. You can find out how. You can also enjoy the playback of still images ...
Operating Instructions
Page 5
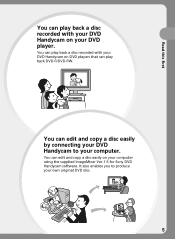
It also enables you to your computer. You can edit and copy a disc easily on your DVD player. Read this first You can play back a disc recorded with your DVD Handycam on DVD players that can play back a disc recorded with your DVD Handycam on your own original DVD disc. 5 You can play back DVD-R/DVD-RW. You can edit and copy a disc easily by connecting your DVD Handycam to produce your computer using the supplied ImageMixer Ver.1.5 for Sony DVD Handycam software.
It also enables you to your computer. You can edit and copy a disc easily on your DVD player. Read this first You can play back a disc recorded with your DVD Handycam on DVD players that can play back a disc recorded with your DVD Handycam on your own original DVD disc. 5 You can play back DVD-R/DVD-RW. You can edit and copy a disc easily by connecting your DVD Handycam to produce your computer using the supplied ImageMixer Ver.1.5 for Sony DVD Handycam software.

Operating Instructions
Page 6
... DVD-R and DVD-RW? Recorded in your DVD Handycam. You can choose VIDEO mode or VR mode to make your needs. 8cm DVD-R You can use the following discs: • DMR30 (single-sided disc) • DMR60DS (double-sided disc) 8cm DVD-RW You can use ? 8cm DVD-Rs and 8cm DVD-RWs... What is different for making a backup copies. Examples of incompatible discs • 12cm DVD-R • 12cm DVD-RW • DVD+R • DVD-RAM • DVD+RW • DVD-ROM • CD-R 6 • CD-RW DVD-Rs can be used in VIDEO mode. They are suitable for source gathering and temporary ...
... DVD-R and DVD-RW? Recorded in your DVD Handycam. You can choose VIDEO mode or VR mode to make your needs. 8cm DVD-R You can use the following discs: • DMR30 (single-sided disc) • DMR60DS (double-sided disc) 8cm DVD-RW You can use ? 8cm DVD-Rs and 8cm DVD-RWs... What is different for making a backup copies. Examples of incompatible discs • 12cm DVD-R • 12cm DVD-RW • DVD+R • DVD-RAM • DVD+RW • DVD-ROM • CD-R 6 • CD-RW DVD-Rs can be used in VIDEO mode. They are suitable for source gathering and temporary ...
Operating Instructions
Page 7
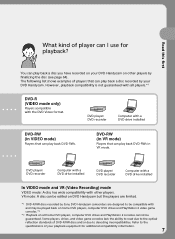
... you have recorded on your DVD Handycam on all players.*1 DVD-R (VIDEO mode only) Players compatible with the DVD Video format. DVD-RW (in VR mode) Players that can play back DVD-RWs in VIDEO mode) Players that can be edited on DVD Handycam but the players are limited. *1 DVD-R/RW discs recorded by Sony DVD Handycam camcorders are designed to be compatible...
... you have recorded on your DVD Handycam on all players.*1 DVD-R (VIDEO mode only) Players compatible with the DVD Video format. DVD-RW (in VR mode) Players that can play back DVD-RWs in VIDEO mode) Players that can be edited on DVD Handycam but the players are limited. *1 DVD-R/RW discs recorded by Sony DVD Handycam camcorders are designed to be compatible...

Operating Instructions
Page 8
... finalize the recorded disc after shooting, you can play it back on DVD players, etc.. Select a recording format (either VIDEO mode or VR mode) when using a once recorded DVD-RW again. Formatting is also required when using DVD-RW. Because your DVD Handycam Preparing Prepare a new disc. • You can be recorded on a single disc...
... finalize the recorded disc after shooting, you can play it back on DVD players, etc.. Select a recording format (either VIDEO mode or VR mode) when using a once recorded DVD-RW again. Formatting is also required when using DVD-RW. Because your DVD Handycam Preparing Prepare a new disc. • You can be recorded on a single disc...

Operating Instructions
Page 9
...on the kind of a disc you have recorded by connecting your DVD Handycam to record additional material, edit, or format a disc after finalizing it becomes compatible with the supplied software. Overwrite Edit Format DVD-R (VIDEO mode) DVD-RW (VIDEO mode) DVD-RW (VR mode) No Yes*1 Yes*2 No No Yes*2 No... required. *3 Recorded data will be able to your computer. Finalize the disc so that it , depending on your computer with other DVD players. For the recommended computer system environment, see page 91. You can make a copy of the disc used. You may not be erased. 9
...on the kind of a disc you have recorded by connecting your DVD Handycam to record additional material, edit, or format a disc after finalizing it becomes compatible with the supplied software. Overwrite Edit Format DVD-R (VIDEO mode) DVD-RW (VIDEO mode) DVD-RW (VR mode) No Yes*1 Yes*2 No No Yes*2 No... required. *3 Recorded data will be able to your computer. Finalize the disc so that it , depending on your computer with other DVD players. For the recommended computer system environment, see page 91. You can make a copy of the disc used. You may not be erased. 9
Operating Instructions
Page 10
... recorded images - Visual Index 56 Various playback modes 58 Displaying the indicators during playback - Unfinalizing (VIDEO mode DVD-RWs only 72 Recording again on your camcorder ...... 56 Choosing and viewing a recording - Table of contents Read this first What you can do with... 64 Changing the disc title 67 Playing back a disc on a DVD player, etc 69 Playing back a disc on a computer with your DVD Handycam 4 What is the difference between DVD-R and DVD-RW 6 How to match your DVD Handycam 8 Getting Started Using this manual 12 Checking the supplied accessories ..... ...
... recorded images - Visual Index 56 Various playback modes 58 Displaying the indicators during playback - Unfinalizing (VIDEO mode DVD-RWs only 72 Recording again on your camcorder ...... 56 Choosing and viewing a recording - Table of contents Read this first What you can do with... 64 Changing the disc title 67 Playing back a disc on a DVD player, etc 69 Playing back a disc on a computer with your DVD Handycam 4 What is the difference between DVD-R and DVD-RW 6 How to match your DVD Handycam 8 Getting Started Using this manual 12 Checking the supplied accessories ..... ...
Operating Instructions
Page 11
...computer 99 Viewing scenes on your camcorder abroad .......... 131 Maintenance information and precautions 132 Specifications 135 Parts and controls/Index Identifying parts and controls 137 Index 145 11 Playlist 76 Registering movies or still images in VR mode (DVD-RWs only) Selecting the playing order... 87 Dividing a movie 87 Deleting movies/still images ....... 89 Viewing/duplicating discs/ editing the recordings on your computer Connecting your camcorder to the computer 94 Consulting the on-line help .......... 98 Viewing scenes recorded on the TV or the VCR 108 Dubbing onto...
...computer 99 Viewing scenes on your camcorder abroad .......... 131 Maintenance information and precautions 132 Specifications 135 Parts and controls/Index Identifying parts and controls 137 Index 145 11 Playlist 76 Registering movies or still images in VR mode (DVD-RWs only) Selecting the playing order... 87 Dividing a movie 87 Deleting movies/still images ....... 89 Viewing/duplicating discs/ editing the recordings on your computer Connecting your camcorder to the computer 94 Consulting the on-line help .......... 98 Viewing scenes recorded on the TV or the VCR 108 Dubbing onto...
Operating Instructions
Page 13
...the viewfinder. These points are operational for effective use. You can record again with other players Discs recorded on your camcorder on other DVD-RW compatible players cannot play back DVD-RWs in color) that can be some tiny black points and/or bright points (white, red, blue or ...green in VR mode. Getting Started Using this manual Camcorder care LCD display/viewfinder The LCD display and the viewfinder are manufactured using extremely ...
...the viewfinder. These points are operational for effective use. You can record again with other players Discs recorded on your camcorder on other DVD-RW compatible players cannot play back DVD-RWs in color) that can be some tiny black points and/or bright points (white, red, blue or ...green in VR mode. Getting Started Using this manual Camcorder care LCD display/viewfinder The LCD display and the viewfinder are manufactured using extremely ...
Operating Instructions
Page 14
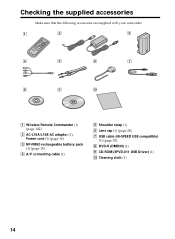
Cleaning cloth (1) 14 Checking the supplied accessories Make sure that the following accessories are supplied with your camcorder. 1 2 3 4 5 6 7 8 9 0 1 Wireless Remote Commander (1) (page 142) 2 AC-L15A/L15B AC adaptor (1), Power cord (1) (page 16) 3 NP-FM50 rechargeable battery pack (1) (page 15) 4 A/V connecting cable (1) 5 Shoulder strap (1) 6 Lens cap (1) (page 28) 7 USB cable (Hi-SPEED USB compatible) (1) (page 92) 8 DVD-R (DMR30) (1) 9 CD-ROM (SPVD-011 USB Driver) (1) q;
Cleaning cloth (1) 14 Checking the supplied accessories Make sure that the following accessories are supplied with your camcorder. 1 2 3 4 5 6 7 8 9 0 1 Wireless Remote Commander (1) (page 142) 2 AC-L15A/L15B AC adaptor (1), Power cord (1) (page 16) 3 NP-FM50 rechargeable battery pack (1) (page 15) 4 A/V connecting cable (1) 5 Shoulder strap (1) 6 Lens cap (1) (page 28) 7 USB cable (Hi-SPEED USB compatible) (1) (page 92) 8 DVD-R (DMR30) (1) 9 CD-ROM (SPVD-011 USB Driver) (1) q;
Operating Instructions
Page 26
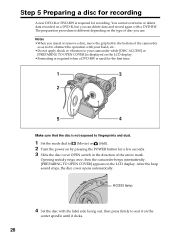
...the POWER button for a few seconds. 3 Slide the disc cover OPEN switch in the direction of the camcorder so as not to obstruct the operation with a DVD-RW. Step 5 Preparing a disc for recording A new DVD-R or DVD-RW is required for the first time. 1 3 2 5 4 Make sure that the disc is ...After the beep sound stops, the disc cover opens automatically. You cannot overwrite or delete data recorded on a DVD-R, but you insert or remove a disc, move the grip belt to your camcorder while [DISC ACCESS] or [PREPARING TO OPEN COVER] is displayed on the LCD display. •Formatting is...
...the POWER button for a few seconds. 3 Slide the disc cover OPEN switch in the direction of the camcorder so as not to obstruct the operation with a DVD-RW. Step 5 Preparing a disc for recording A new DVD-R or DVD-RW is required for the first time. 1 3 2 5 4 Make sure that the disc is ...After the beep sound stops, the disc cover opens automatically. You cannot overwrite or delete data recorded on a DVD-R, but you insert or remove a disc, move the grip belt to your camcorder while [DISC ACCESS] or [PREPARING TO OPEN COVER] is displayed on the LCD display. •Formatting is...
Operating Instructions
Page 27
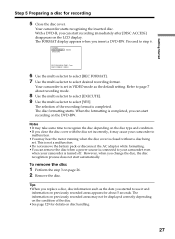
... display. Refer to page 7 about 5 seconds. The information on previously recorded areas may hear the motor running when the disc cover is completed. Your camcorder starts recognizing the inserted disc. PROCESS TIME : 7sec REC FORMAT : VIDEO 6 Use the multi-selector to select [REC FORMAT]. 7 Use the multi...;When you replace a disc, disc information such as the date you change the disc, the disc recognition process does not start recording on the DVD-RW. To remove the disc 1 Perform the step 3 on the disc type and condition. •If you can start automatically. However, when...
... display. Refer to page 7 about 5 seconds. The information on previously recorded areas may hear the motor running when the disc cover is completed. Your camcorder starts recognizing the inserted disc. PROCESS TIME : 7sec REC FORMAT : VIDEO 6 Use the multi-selector to select [REC FORMAT]. 7 Use the multi...;When you replace a disc, disc information such as the date you change the disc, the disc recognition process does not start recording on the DVD-RW. To remove the disc 1 Perform the step 3 on the disc type and condition. •If you can start automatically. However, when...
Operating Instructions
Page 40
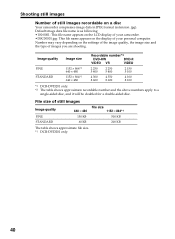
Shooting still images Number of still images recordable on the display of your camcorder. •DSC00001.jpg: This file name appears on a disc Your camcorder compresses image data in JPEG format (extension .jpg). Default image data file name is as following: •100-0001: This file ... size. *1 DCR-DVD201 only. 40 Image quality FINE STANDARD Image size 1152 × 864*1 640 × 480 1152 × 864*1 640 × 480 Recordable number*2 DVD-RW DVD-R VIDEO VR VIDEO 2 250 5 400 2 250 5 400 2 150 5 100 4 300 8 600 4 350 8 600 4 100 8 100 *1 DCR-DVD201 only. *2 The table...
Shooting still images Number of still images recordable on the display of your camcorder. •DSC00001.jpg: This file name appears on a disc Your camcorder compresses image data in JPEG format (extension .jpg). Default image data file name is as following: •100-0001: This file ... size. *1 DCR-DVD201 only. 40 Image quality FINE STANDARD Image size 1152 × 864*1 640 × 480 1152 × 864*1 640 × 480 Recordable number*2 DVD-RW DVD-R VIDEO VR VIDEO 2 250 5 400 2 250 5 400 2 150 5 100 4 300 8 600 4 350 8 600 4 100 8 100 *1 DCR-DVD201 only. *2 The table...

Operating Instructions
Page 55
... return to (Movie) or (Still). 2 Press REVIEW . Notes •You can delete the latest scene only when it on the spot. Deleting the last scene (DVD-RWs only) If the checked scene is deleted. EXEC. [ REVIEW ] : END RET. 2 Select [EXEC.] with ./>. 1 Press EDIT during the review. The latest scene is unnecessary... delete it has been recorded on page 89. •You cannot delete the last scene: - Note The recording data (DATA CODE) does not appear on DVD-Rs cannot be deleted. •When you move the mode dial. - See "Deleting movies/ still images" on...
... return to (Movie) or (Still). 2 Press REVIEW . Notes •You can delete the latest scene only when it on the spot. Deleting the last scene (DVD-RWs only) If the checked scene is deleted. EXEC. [ REVIEW ] : END RET. 2 Select [EXEC.] with ./>. 1 Press EDIT during the review. The latest scene is unnecessary... delete it has been recorded on page 89. •You cannot delete the last scene: - Note The recording data (DATA CODE) does not appear on DVD-Rs cannot be deleted. •When you move the mode dial. - See "Deleting movies/ still images" on...
Operating Instructions
Page 64
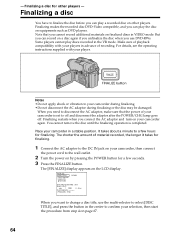
... when you connect the AC adaptor and turn on equipments such as DVD players. Finalizing restarts when you use the multi-selector to select [DISC TITLE], and press the button in the center to your camcorder again. FINALIZE DISC TITLE PHOTOMOVIE EXECUTE RETURN READY EST. Finalizing a ... DC IN jack on other players - Finalizing makes the recorded disc DVD-Video compatible, and you can play a recorded disc on your player. For details, see the operating instructions supplied with your camcorder is completed. You cannot remove the disc until the finalizing operation is...
... when you connect the AC adaptor and turn on equipments such as DVD players. Finalizing restarts when you use the multi-selector to select [DISC TITLE], and press the button in the center to your camcorder again. FINALIZE DISC TITLE PHOTOMOVIE EXECUTE RETURN READY EST. Finalizing a ... DC IN jack on other players - Finalizing makes the recorded disc DVD-Video compatible, and you can play a recorded disc on your player. For details, see the operating instructions supplied with your camcorder is completed. You cannot remove the disc until the finalizing operation is...

Operating Instructions
Page 65
...select [YES], and press the button in the center of the multi-selector to 6. 65 Finalizing a disc for the playback on players such as DVD players, still images must be converted to step 5 in sequence as JPEG files. When still images are played back in VR mode. To play ...back still images on DVD players appears temporarily. Proceed to a MPEG format. In VIDEO mode, the menu display for other players Finalizing a disc 4 When still images are included on ...
...select [YES], and press the button in the center of the multi-selector to 6. 65 Finalizing a disc for the playback on players such as DVD players, still images must be converted to step 5 in sequence as JPEG files. When still images are played back in VR mode. To play ...back still images on DVD players appears temporarily. Proceed to a MPEG format. In VIDEO mode, the menu display for other players Finalizing a disc 4 When still images are included on ...

Operating Instructions
Page 69
...VR mode You can play back still images on other players Finalizing a disc Playing back a disc on some players. •To play back DVD-Rs or DVD-RWs. To play back still images Still images are placed in a horizontal position when playing back. •Do not use the 8 cm ... the scene to a movie is displayed as a Photomovie swapping images in VIDEO mode, a menu display is lower than that the vertical-shaped DVD player with a DVD drive are played back as the thumbnail. Pressing m/M during playback skips 10 images. To play back still images The operation is compatible with an...
...VR mode You can play back still images on other players Finalizing a disc Playing back a disc on some players. •To play back DVD-Rs or DVD-RWs. To play back still images Still images are placed in a horizontal position when playing back. •Do not use the 8 cm ... the scene to a movie is displayed as a Photomovie swapping images in VIDEO mode, a menu display is lower than that the vertical-shaped DVD player with a DVD drive are played back as the thumbnail. Pressing m/M during playback skips 10 images. To play back still images The operation is compatible with an...

Operating Instructions
Page 70
... [My Computer] screen appears. When the disc was first used at 6:00 pm on January 1st 2004: 2004_01_01_06H00M_PM 4 Right-click the DVD drive with a DVD drive installed The display and the operation may vary depending on the operating system of your computer. The selected still image appears on your... computer. 2 Insert the finalized disc to the DVD drive of your computer. A DVD playback application starts and the movie is recorded on the disc appears. 6 Double-click the file to be shown. Or, double...
... [My Computer] screen appears. When the disc was first used at 6:00 pm on January 1st 2004: 2004_01_01_06H00M_PM 4 Right-click the DVD drive with a DVD drive installed The display and the operation may vary depending on the operating system of your computer. The selected still image appears on your... computer. 2 Insert the finalized disc to the DVD drive of your computer. A DVD playback application starts and the movie is recorded on the disc appears. 6 Double-click the file to be shown. Or, double...
Operating Instructions
Page 71
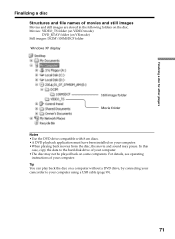
...the movie and sound may not be played back on some computers. Tip You can play back the disc on a computer without a DVD drive, by connecting your camcorder to the hard disk drive of your computer. Movies: VIDEO_TS folder (on VIDEO mode) DVD_RTAV folder (on VR mode) Still images...: DCIM\100MSDCF folder Windows XP display Still image folder Movie folder Notes •Use the DVD drive compatible with 8 cm discs. •A DVD playback application...
...the movie and sound may not be played back on some computers. Tip You can play back the disc on a computer without a DVD drive, by connecting your camcorder to the hard disk drive of your computer. Movies: VIDEO_TS folder (on VIDEO mode) DVD_RTAV folder (on VR mode) Still images...: DCIM\100MSDCF folder Windows XP display Still image folder Movie folder Notes •Use the DVD drive compatible with 8 cm discs. •A DVD playback application...


