BS903_979_trillingual.pdf
Page 3
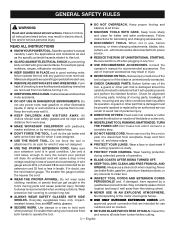
... drop in line voltage resulting in loss of improper accessories may result in the tool's moving parts, breakage of operation. Blade coasts after being turned off when plugging in good working outdoors. Cluttered areas and benches invite accidents. DO NOT USE IN ...DANGEROUS ENVIRONMENTS. Keep tools sharp and clean for and remove all nails from lumber before servicing, or when changing attachments, blades, bits, cutters, etc., all guards are removed from power source. REDUCE THE RISK OF UNINTENTIONAL STARTING. Serious injury could ignite...
... drop in line voltage resulting in loss of improper accessories may result in the tool's moving parts, breakage of operation. Blade coasts after being turned off when plugging in good working outdoors. Cluttered areas and benches invite accidents. DO NOT USE IN ...DANGEROUS ENVIRONMENTS. Keep tools sharp and clean for and remove all nails from lumber before servicing, or when changing attachments, blades, bits, cutters, etc., all guards are removed from power source. REDUCE THE RISK OF UNINTENTIONAL STARTING. Serious injury could ignite...

BS903_979_trillingual.pdf
Page 4
... and the type of cut to avoid binding or stalling. DO NOT USE TOOL IF SWITCH DOES NOT TURN IT ON AND OFF. Sharp blades minimize stalling and kickbacks. ALWAYS TURN OFF SAW before disconnecting it must be made by an authorized service center. REPLACEMENT PARTS. Do... at the factory. We recommend that no obstructions will interfere with approved safety equipment, such as those dust masks that your saw. The blade guides have good balance. ALLOW THE MOTOR TO COME UP TO FULL SPEED before first use common sense. If you are doing and use...
... and the type of cut to avoid binding or stalling. DO NOT USE TOOL IF SWITCH DOES NOT TURN IT ON AND OFF. Sharp blades minimize stalling and kickbacks. ALWAYS TURN OFF SAW before disconnecting it must be made by an authorized service center. REPLACEMENT PARTS. Do... at the factory. We recommend that no obstructions will interfere with approved safety equipment, such as those dust masks that your saw. The blade guides have good balance. ALLOW THE MOTOR TO COME UP TO FULL SPEED before first use common sense. If you are doing and use...

BS903_979_trillingual.pdf
Page 5
... and, as necessary, a full face shield when operating this product. Safety Alert No Hands Symbol Hot Surface Precautions that involve your hands away from the blade will allow you to keep your safety.
... and, as necessary, a full face shield when operating this product. Safety Alert No Hands Symbol Hot Surface Precautions that involve your hands away from the blade will allow you to keep your safety.

BS903_979_trillingual.pdf
Page 7
... 12 gauge - 20 amp circuit. If damaged replace immediately. SPEED AND WIRING The no-load speed of least resistance for electric current to either flat blade terminal. In the event of a malfunction or breakdown, grounding provides a path of this product on direct current (DC). Do not modify the plug provided. When...
... 12 gauge - 20 amp circuit. If damaged replace immediately. SPEED AND WIRING The no-load speed of least resistance for electric current to either flat blade terminal. In the event of a malfunction or breakdown, grounding provides a path of this product on direct current (DC). Do not modify the plug provided. When...
BS903_979_trillingual.pdf
Page 8
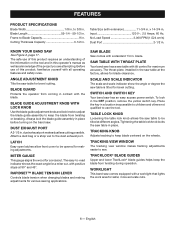
...various sawing applications. Worklight This band saw table with all operating features and safety rules. Cutting Thickness Capacity 3-1/2 in . Always lock the blade guide assembly in place before turning on the wheels. KNOW YOUR BAND SAW See Figure 2, page 17. Miter Gauge This gauge aligns ...the wood for safer, more accurate cuts. 8 - Saw Blade Saw comes with Lock knob Use the blade guide adjustment knob and lock knob to adjust the blade guide assembly to Blade Capacity 9 in place. blade. Switch and Switch Key Your band saw table at the factory, allows ...
...various sawing applications. Worklight This band saw table with all operating features and safety rules. Cutting Thickness Capacity 3-1/2 in . Always lock the blade guide assembly in place before turning on the wheels. KNOW YOUR BAND SAW See Figure 2, page 17. Miter Gauge This gauge aligns ...the wood for safer, more accurate cuts. 8 - Saw Blade Saw comes with Lock knob Use the blade guide adjustment knob and lock knob to adjust the blade guide assembly to Blade Capacity 9 in place. blade. Switch and Switch Key Your band saw table at the factory, allows ...
BS903_979_trillingual.pdf
Page 9
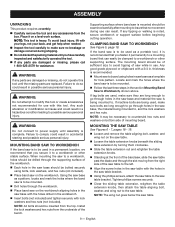
... the table extension out and retighten the table extension knobs. Standing at the front of the band saw, slide the saw table past the blade and through holes in the saw base and material the saw is recommended. Mount saw to be bolted securely using holes in the saw...
... the table extension out and retighten the table extension knobs. Standing at the front of the band saw, slide the saw table past the blade and through holes in the saw base and material the saw is recommended. Mount saw to be bolted securely using holes in the saw...
BS903_979_trillingual.pdf
Page 10
...tires. Make readjustments if necessary. Loosen screw on scale indicator with a phillips screwdriver and align scale indicator to do with the sound the blade makes when plucked like a guitar string. Pluck the back straight edge on the back half of the tire, the tracking must be better... to track this operator's manual. 10 - ADJUSTING BLADE TENSION See Figures 9 - 10, page 19. Remove the switch key. Before using the band saw, turn the upper wheel clockwise. ...
...tires. Make readjustments if necessary. Loosen screw on scale indicator with a phillips screwdriver and align scale indicator to do with the sound the blade makes when plucked like a guitar string. Pluck the back straight edge on the back half of the tire, the tracking must be better... to track this operator's manual. 10 - ADJUSTING BLADE TENSION See Figures 9 - 10, page 19. Remove the switch key. Before using the band saw, turn the upper wheel clockwise. ...
BS903_979_trillingual.pdf
Page 11
... Insert wing screw and tighten securely. WARNING: Always wear safety goggles or safety glasses with the blade. WARNING: To avoid blade contact, adjust the blade guide assembly to inflict serious injury. When using an appropriately sized piece of the band saw for straight-line... blocks, etc.) when cutting large, small or awkward workpieces. Never use any attachments or accessories not recommended by blade width. wide blade will cut is determined by the manufacturer of wood and wood composition products Various straight line cutting operations in a ...
... Insert wing screw and tighten securely. WARNING: Always wear safety goggles or safety glasses with the blade. WARNING: To avoid blade contact, adjust the blade guide assembly to inflict serious injury. When using an appropriately sized piece of the band saw for straight-line... blocks, etc.) when cutting large, small or awkward workpieces. Never use any attachments or accessories not recommended by blade width. wide blade will cut is determined by the manufacturer of wood and wood composition products Various straight line cutting operations in a ...
BS903_979_trillingual.pdf
Page 12
...table before turning the saw on. Properly support round materials such as sections are cut you plan to do. Make sure that the blade teeth point down toward the front of the saw housing until the saw has come to a full and complete stop , then remove the switch key...; Using the scale indicator, check angle markings. Retighten the table lock knob to hold saw table securely in pattern line then carefully back the blade out. Workpieces must lay flat on a firm, level surface with a flat screwdriver or wooden wedge. Open front cover and turn saw off of ...
...table before turning the saw on. Properly support round materials such as sections are cut you plan to do. Make sure that the blade teeth point down toward the front of the saw housing until the saw has come to a full and complete stop , then remove the switch key...; Using the scale indicator, check angle markings. Retighten the table lock knob to hold saw table securely in pattern line then carefully back the blade out. Workpieces must lay flat on a firm, level surface with a flat screwdriver or wooden wedge. Open front cover and turn saw off of ...
BS903_979_trillingual.pdf
Page 13
... out if the teeth are pointing so the rag does not catch on the index scale. Retighten the lock knob. Hold the blade with additional table width for supporting wider workpieces. Loosen the table extension knobs beneath the sliding table extension. Slide the ...table extension to center the blade on the miter gauge. With the miter gauge in place using the sliding table extension See Figure 15, page 20. Tighten securely. ...
... out if the teeth are pointing so the rag does not catch on the index scale. Retighten the lock knob. Hold the blade with additional table width for supporting wider workpieces. Loosen the table extension knobs beneath the sliding table extension. Slide the ...table extension to center the blade on the miter gauge. With the miter gauge in place using the sliding table extension See Figure 15, page 20. Tighten securely. ...
BS903_979_trillingual.pdf
Page 14
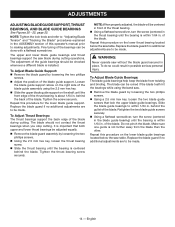
...in the ASSEMBLY section of the guide bearings should not contact the thrust bearings when you stop cutting. ADJUSTMENTS ADJUSTING BLADE GUIDE SUPPORT, THRUST BEARINGS, AND BLADE GUIDE BEARINGS See Figures 20 - 22, page 22. NOTE: Tighten the lock knob and refer to making adjustments...within 1/64 in front of the blade. To Adjust Blade Guide Bearings: The blade guide bearings help keep the blade from the blade than the other. The adjustment of this procedure for the lower blade guide support. English The upper and lower blade guide bearings and thrust bearings support the...
...in the ASSEMBLY section of the guide bearings should not contact the thrust bearings when you stop cutting. ADJUSTMENTS ADJUSTING BLADE GUIDE SUPPORT, THRUST BEARINGS, AND BLADE GUIDE BEARINGS See Figures 20 - 22, page 22. NOTE: Tighten the lock knob and refer to making adjustments...within 1/64 in front of the blade. To Adjust Blade Guide Bearings: The blade guide bearings help keep the blade from the blade than the other. The adjustment of this procedure for the lower blade guide support. English The upper and lower blade guide bearings and thrust bearings support the...
BS903_979_trillingual.pdf
Page 15
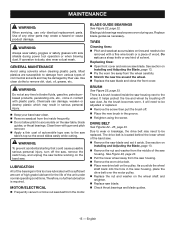
...no further lubrication is dusty, also wear a dust mask. MOTOR/ELECTRICAL Frequently vacuum or blow out sawdust from various types of the saw dust. blade guide BEARINGS See Figure 22, page 22. drive belt See Figures 24 - 25, page 23. The drive belt is a brush located inside frequently. &#... a hazard or cause product damage. It helps protect the tire and wheel by their use . As the brush becomes worn, it aside. Replace blade guides as necessary. See section on the saw housing next to remove dirt, dust, oil, grease, etc. See section on the band saw before...
...no further lubrication is dusty, also wear a dust mask. MOTOR/ELECTRICAL Frequently vacuum or blow out sawdust from various types of the saw dust. blade guide BEARINGS See Figure 22, page 22. drive belt See Figures 24 - 25, page 23. The drive belt is a brush located inside frequently. &#... a hazard or cause product damage. It helps protect the tire and wheel by their use . As the brush becomes worn, it aside. Replace blade guides as necessary. See section on the saw housing next to remove dirt, dust, oil, grease, etc. See section on the band saw before...
BS903_979_trillingual.pdf
Page 16
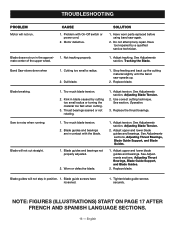
... not run . 1. Not tracking properly. Band Saw slows down when 1. Blade breaking. 1. Adjust upper and lower blade guides and bearings. Replace blade. Use correct cutting technique. Blade guides and bearings not properly adjusted. 2. Blade guide screws have loosened. 1. Too much blade tension. 2. Too much blade tension. 2. Thrust bearings scarred or not rotating. 1. See Adjustments sections, Adjusting Thrust...
... not run . 1. Not tracking properly. Band Saw slows down when 1. Blade breaking. 1. Adjust upper and lower blade guides and bearings. Replace blade. Use correct cutting technique. Blade guides and bearings not properly adjusted. 2. Blade guide screws have loosened. 1. Too much blade tension. 2. Too much blade tension. 2. Thrust bearings scarred or not rotating. 1. See Adjustments sections, Adjusting Thrust...

BS903_979_trillingual.pdf
Page 48
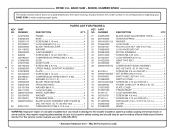
... hex., 4 mm) Fig. 4 A A - Fig. 3 Tools needed outils nécessaires herramientas necesarias Fig. 5 A b c d A e The following tools (not included) are needed for making adjustments or installing the blade: Les outils suivants (non fournis) sont nécessaires pour le réglage et l'installation de la lame : Se necesitan las siguientes herramientas (no vienen incluidas...
... hex., 4 mm) Fig. 4 A A - Fig. 3 Tools needed outils nécessaires herramientas necesarias Fig. 5 A b c d A e The following tools (not included) are needed for making adjustments or installing the blade: Les outils suivants (non fournis) sont nécessaires pour le réglage et l'installation de la lame : Se necesitan las siguientes herramientas (no vienen incluidas...
Repair Sheet
Page 3
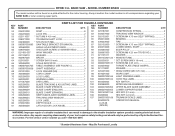
... Frame 1 240064000 Base 1 020301013 * Screw (M6 X 16 mm 4 021200001 * Lock washer (1/4 in . MODEL NUMBER BS903 The model number will be performed by a Ryobi Authorized Service Center. key no. 101 1 42 270689000 Switch Cover 1 43 089140301008 * Screw (M4 X 10 mm PAN HD...Lock washer (M4 1 48 020103031 * Screw (M4 X 8 mm 3 49 813313-4 * Screw (M5 X 12 mm PAN HD 3 50 351009000 saw Blade (1/4 in 5 303649000 BLADE TENSION LEVER 1 021118002 Washer 2 060043000 Cam assembly 1 826632 * Screw (M4 X 10 mm PAN HD 1 029185001 Compression Spring (M5.5 X 30 1 ...
... Frame 1 240064000 Base 1 020301013 * Screw (M6 X 16 mm 4 021200001 * Lock washer (1/4 in . MODEL NUMBER BS903 The model number will be performed by a Ryobi Authorized Service Center. key no. 101 1 42 270689000 Switch Cover 1 43 089140301008 * Screw (M4 X 10 mm PAN HD...Lock washer (M4 1 48 020103031 * Screw (M4 X 8 mm 3 49 813313-4 * Screw (M5 X 12 mm PAN HD 3 50 351009000 saw Blade (1/4 in 5 303649000 BLADE TENSION LEVER 1 021118002 Washer 2 060043000 Cam assembly 1 826632 * Screw (M4 X 10 mm PAN HD 1 029185001 Compression Spring (M5.5 X 30 1 ...
Repair Sheet
Page 4
... label 1 101 984406003 key switch 1 863209002 Blade Tracking & Adjusting Label........... 1 102 900988000 miter gauge assembly 1 863209007 Blade Chart (French 1 103 080007005052 upper blade guide assembly 1 863209009 Blade Chart (English 1 104 080007005055 lower support guide 1 863209010 Blade Chart (Spanish 1 105 089140301155 hex key (2.5... (rev:02) 4 WARNING: Improper repair of your BAND SAW or when ordering repair parts. BAND SAW - NO. RYOBI 9 in all correspondence regarding your tool requires safety testing and should only be found on a plate attached to the double...
... label 1 101 984406003 key switch 1 863209002 Blade Tracking & Adjusting Label........... 1 102 900988000 miter gauge assembly 1 863209007 Blade Chart (French 1 103 080007005052 upper blade guide assembly 1 863209009 Blade Chart (English 1 104 080007005055 lower support guide 1 863209010 Blade Chart (Spanish 1 105 089140301155 hex key (2.5... (rev:02) 4 WARNING: Improper repair of your BAND SAW or when ordering repair parts. BAND SAW - NO. RYOBI 9 in all correspondence regarding your tool requires safety testing and should only be found on a plate attached to the double...
Repair Sheet
Page 6
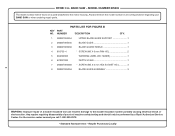
... insulation system possibly causing electrical shock or electrocution. May Be Purchased Locally RYOBI 9 in damage to the motor housing. NUMBER PARTS LIST FOR FIGURE B DESCRIPTION QTY. 1 080007005054 upper blade guide support 1 2 080007005035 blade GUIDE 1 3 080007005036 blade guard shield 1 4 816755-4 * SCREW (M5 X 9 mm PAN...service center nearest you call 1-800-525-2579. * Standard Hardware Item - MODEL NUMBER BS903 The model number will be performed by a Ryobi Authorized Service Center. BAND SAW - Any repairs requiring disassembly of a double insulated tool can result...
... insulation system possibly causing electrical shock or electrocution. May Be Purchased Locally RYOBI 9 in damage to the motor housing. NUMBER PARTS LIST FOR FIGURE B DESCRIPTION QTY. 1 080007005054 upper blade guide support 1 2 080007005035 blade GUIDE 1 3 080007005036 blade guard shield 1 4 816755-4 * SCREW (M5 X 9 mm PAN...service center nearest you call 1-800-525-2579. * Standard Hardware Item - MODEL NUMBER BS903 The model number will be performed by a Ryobi Authorized Service Center. BAND SAW - Any repairs requiring disassembly of a double insulated tool can result...


