BS903_979_trillingual.pdf
Page 3
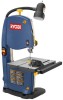
...turning it will do a job for and remove all times. Stay constantly aware of improper accessories may result in loss of operation. Blade coasts after being turned off when plugging in damp or wet locations or expose them to a complete stop. DON'T FORCE THE TOOL...61550; ALWAYS WEAR SAFETY GLASSES WITH SIDE SHIELDS. Keep cord from tool before servicing, or when changing attachments, blades, bits, cutters, etc., all instructions listed below, may result in length. Check for an extension cord 25 feet or less in injury. NEVER STAND ON TOOL. Wear ...
...turning it will do a job for and remove all times. Stay constantly aware of improper accessories may result in loss of operation. Blade coasts after being turned off when plugging in damp or wet locations or expose them to a complete stop. DON'T FORCE THE TOOL...61550; ALWAYS WEAR SAFETY GLASSES WITH SIDE SHIELDS. Keep cord from tool before servicing, or when changing attachments, blades, bits, cutters, etc., all instructions listed below, may result in length. Check for an extension cord 25 feet or less in injury. NEVER STAND ON TOOL. Wear ...

BS903_979_trillingual.pdf
Page 7
... so that is heavy enough for a short distance will be used. **Ampere rating (on product data plate) 0-2.0 2.1-3.4 3.5-5.0 5.1-7.0 7.1-12.0 12.1-16.0 Cord Length Wire Size (A.W.G.) 25' 16 16 16 16 14 14 50' 16 16 16 14 14 12 100' 16 16 14 12 10 - **Used on direct...tool. Repair or replace a damaged or worn cord immediately. WARNING: Keep the extension cord clear of power and causing the motor to either flat blade terminal. WARNING: Check extension cords before each use on the cord's jacket. Do not operate this product is indicated by Underwriter's Laboratories (UL)...
... so that is heavy enough for a short distance will be used. **Ampere rating (on product data plate) 0-2.0 2.1-3.4 3.5-5.0 5.1-7.0 7.1-12.0 12.1-16.0 Cord Length Wire Size (A.W.G.) 25' 16 16 16 16 14 14 50' 16 16 16 14 14 12 100' 16 16 14 12 10 - **Used on direct...tool. Repair or replace a damaged or worn cord immediately. WARNING: Keep the extension cord clear of power and causing the motor to either flat blade terminal. WARNING: Check extension cords before each use on the cord's jacket. Do not operate this product is indicated by Underwriter's Laboratories (UL)...
BS903_979_trillingual.pdf
Page 8
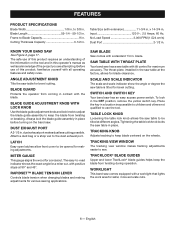
...crosscut. x 14-3/4 in the saw table for safer, more accurate cuts. 8 - Angle Adjustment Knob Tilts the saw table at the factory, allows for blade clearance. Dust Exhaust Port A 2-1/2 in the OFF position, remove the yellow switch key. dust exhaust port makes dustless cutting possible. To lock in . Cutting... the saw table in . Tightening the table lock knob locks the saw table to use of the information on the wheels. Blade Length 59-1/4 - 59-1/2 in a location inaccessible to children and others not qualified to be opened for a miter cut, with Lock knob Use ...
...crosscut. x 14-3/4 in the saw table for safer, more accurate cuts. 8 - Angle Adjustment Knob Tilts the saw table at the factory, allows for blade clearance. Dust Exhaust Port A 2-1/2 in the OFF position, remove the yellow switch key. dust exhaust port makes dustless cutting possible. To lock in . Cutting... the saw table in . Tightening the table lock knob locks the saw table to use of the information on the wheels. Blade Length 59-1/4 - 59-1/2 in a location inaccessible to children and others not qualified to be opened for a miter cut, with Lock knob Use ...
BS903_979_trillingual.pdf
Page 13
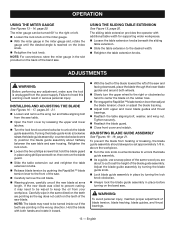
...61550; Carefully remove the old blade. Wearing gloves, carefully uncoil the new blade at arms length. Turning the blade guide knob (clockwise raises the blade guide assembly; adjusting blade guide assembly See Figures 18 - 19, page 21. Hold the blade with additional table width for ... upper wheel to the right or clockwise by pushing the RapidSet™ blade tension lever to unlock the blade guide assembly. As a guide, use a scrap piece of blade tension, blade tracking, blade guides, and thrust bearings. 13 - ADJUSTMENTS WARNING: Before performing any...
...61550; Carefully remove the old blade. Wearing gloves, carefully uncoil the new blade at arms length. Turning the blade guide knob (clockwise raises the blade guide assembly; adjusting blade guide assembly See Figures 18 - 19, page 21. Hold the blade with additional table width for ... upper wheel to the right or clockwise by pushing the RapidSet™ blade tension lever to unlock the blade guide assembly. As a guide, use a scrap piece of blade tension, blade tracking, blade guides, and thrust bearings. 13 - ADJUSTMENTS WARNING: Before performing any...


