BS903_979_trillingual.pdf
Page 8
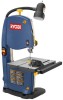
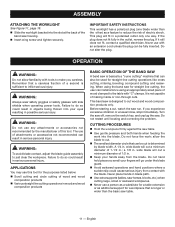
...be tilted at different angles. Latch Easy open latches allow front cover to the dust exhaust port. Saw Blade Saw comes with Throat Plate Your band saw has a saw table at 90° and 45°. Saw Table with a standard 1/4 in . To lock in . No Load Speed 3,000 FPM (1,524 ... plate, installed in place. RapidSet™ Blade Tension Lever Controls blade tension when changing blades and making adjustments. Tightening the table lock knob locks the saw has an easy access power switch. Switch and Switch Key Your band saw table in the saw table with positive stops at the factory,...
...be tilted at different angles. Latch Easy open latches allow front cover to the dust exhaust port. Saw Blade Saw comes with Throat Plate Your band saw has a saw table at 90° and 45°. Saw Table with a standard 1/4 in . To lock in . No Load Speed 3,000 FPM (1,524 ... plate, installed in place. RapidSet™ Blade Tension Lever Controls blade tension when changing blades and making adjustments. Tightening the table lock knob locks the saw has an easy access power switch. Switch and Switch Key Your band saw table in the saw table with positive stops at the factory,...
BS903_979_trillingual.pdf
Page 9
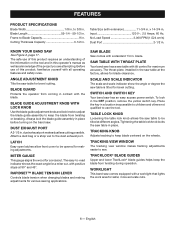
... out and retighten the table extension knobs. Standing at the front of the workbench. Each hole in the saw table past the blade and through holes in the section Mounting Band Saw to a workbench or other supporting surface. warning: Do not attempt to , and the lock washers and hex nuts. If machine...
... out and retighten the table extension knobs. Standing at the front of the workbench. Each hole in the saw table past the blade and through holes in the section Mounting Band Saw to a workbench or other supporting surface. warning: Do not attempt to , and the lock washers and hex nuts. If machine...
BS903_979_trillingual.pdf
Page 10
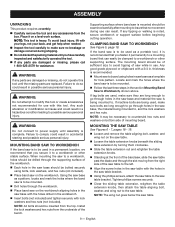
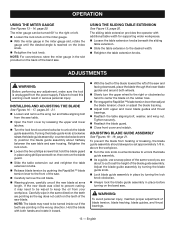
...releasing the upper and lower latches. ADJUSTING BLADE TENSION See Figures 9 - 10, page 19. Remove the switch key. Before using the band saw clockwise to completely compress the spring. Note: Adjustments of the saw , turn the upper wheel clockwise. These ...settings are not interfering with the sound the blade makes when plucked like a guitar string. Pluck...
...releasing the upper and lower latches. ADJUSTING BLADE TENSION See Figures 9 - 10, page 19. Remove the switch key. Before using the band saw clockwise to completely compress the spring. Note: Adjustments of the saw , turn the upper wheel clockwise. These ...settings are not interfering with the sound the blade makes when plucked like a guitar string. Pluck...
BS903_979_trillingual.pdf
Page 11
...a substitute for a table extension or as a feature to do so could cause serious injury from the blade. This band saw run. Before starting a cut, watch the saw is determined by the manufacturer of this tool for the purposes listed below: Scroll cutting and ...61550; Various straight line cutting operations in a polarized outlet only one blade wider than the basic saw table. 11 - wide blade will fit in wood and wood composition products BASIC OPERATION OF THE BAND SAW A band saw for straight-line cutting operations like cross cutting, mitering, beveling, compound...
...a substitute for a table extension or as a feature to do so could cause serious injury from the blade. This band saw run. Before starting a cut, watch the saw is determined by the manufacturer of this tool for the purposes listed below: Scroll cutting and ...61550; Various straight line cutting operations in a polarized outlet only one blade wider than the basic saw table. 11 - wide blade will fit in wood and wood composition products BASIC OPERATION OF THE BAND SAW A band saw for straight-line cutting operations like cross cutting, mitering, beveling, compound...
BS903_979_trillingual.pdf
Page 13
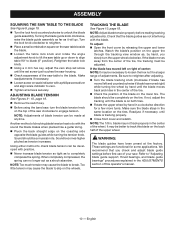
... by releasing the upper and lower latches. Turn the lock knob counterclockwise to center the blade on the band saw blade. OPERATION USING THE MITER GAUGE See Figures 13 - 14, page 20. using phillips screwdriver, then remove the blade guard. Slide the table extension out and retighten the table extension knobs. Release...
... by releasing the upper and lower latches. Turn the lock knob counterclockwise to center the blade on the band saw blade. OPERATION USING THE MITER GAUGE See Figures 13 - 14, page 20. using phillips screwdriver, then remove the blade guard. Slide the table extension out and retighten the table extension knobs. Release...
BS903_979_trillingual.pdf
Page 14
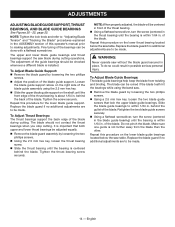
... by loosening the two phillips screws. Adjust the position of the blade. Do not pinch the blade. Loosen the blade guide support screw on the right side of the blade guide assembly using the band saw table. ADJUSTMENTS ADJUSTING BLADE GUIDE SUPPORT, THRUST BEARINGS, AND BLADE GUIDE BEARINGS See Figures 20 - 22, page 22. Fine tuning of...
... by loosening the two phillips screws. Adjust the position of the blade. Do not pinch the blade. Loosen the blade guide support screw on the right side of the blade guide assembly using the band saw table. ADJUSTMENTS ADJUSTING BLADE GUIDE SUPPORT, THRUST BEARINGS, AND BLADE GUIDE BEARINGS See Figures 20 - 22, page 22. Fine tuning of...
BS903_979_trillingual.pdf
Page 15
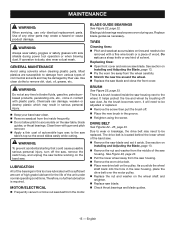
...a brush located inside frequently. Do not allow pitch to the saw blade. Check thrust bearings and blade guides. 15 - As you slide the wheel shaft back into the hole in serious personal injury. Keep your band saw clean. Remove sawdust from the wheel carefully. Stretch .... WARNING: Always wear safety goggles or safety glasses with gum and pitch remover. Apply a thin coat of the band saw. Remove the saw blade and set it will need to remove dirt, dust, oil, grease, etc. Use clean cloths to be adjusted or replaced. ...
...a brush located inside frequently. Do not allow pitch to the saw blade. Check thrust bearings and blade guides. 15 - As you slide the wheel shaft back into the hole in serious personal injury. Keep your band saw clean. Remove sawdust from the wheel carefully. Stretch .... WARNING: Always wear safety goggles or safety glasses with gum and pitch remover. Apply a thin coat of the band saw. Remove the saw blade and set it will need to remove dirt, dust, oil, grease, etc. Use clean cloths to be adjusted or replaced. ...
BS903_979_trillingual.pdf
Page 16
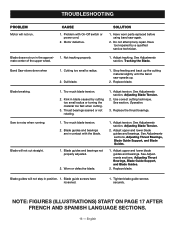
... sections. 16 - Motor defective. 2. See section, Operation. 3. Adjust tension. Adjust upper and lower blade guides and bearings. Band Saw slows down when 1. Have tool repaired by cutting too small radius or turning the material too fast when...slightly until the band saw again. 2. Too much blade tension. 2. See Adjustments sections, Adjusting Thrust Bearings, Blade Guide Support, and Blade Guides. 2. Blade will not cut straight. 1. Replace blade. See Adjustments sections, Adjusting Thrust Bearings, Blade Guide Support, and Blade Guides. 1. Do...
... sections. 16 - Motor defective. 2. See section, Operation. 3. Adjust tension. Adjust upper and lower blade guides and bearings. Band Saw slows down when 1. Have tool repaired by cutting too small radius or turning the material too fast when...slightly until the band saw again. 2. Too much blade tension. 2. See Adjustments sections, Adjusting Thrust Bearings, Blade Guide Support, and Blade Guides. 2. Blade will not cut straight. 1. Replace blade. See Adjustments sections, Adjusting Thrust Bearings, Blade Guide Support, and Blade Guides. 1. Do...
Repair Sheet
Page 3
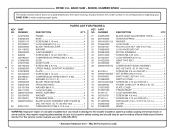
... of your BAND SAW or when ordering repair parts. 3 KEY NO. 1 2 3 4 5 6 7 8 9 10 11 12 13 14 15 16 17 18 19 20 21 22 23 24 25 26 PARTS LIST FOR FIGURE A PART NUMBER DESCRIPTION QTY. MODEL NUMBER BS903 The model number will be performed by a Ryobi Authorized Service...Lock washer (5/16 in . RYOBI 9 in 3 36 041002000 Gear Type Belt 1 37 022505000 Nut 1 38 080007005704 lower blade guide Assembly (inc. key nos. 40, 67 and 104 1 39 816755-4 Screw (m5 x 9 mm pan hd 1 40 080007005060 * set Screw (M5 X 6 mm 8 41 984406001 Switch (inc. BAND SAW - For the service center ...
... of your BAND SAW or when ordering repair parts. 3 KEY NO. 1 2 3 4 5 6 7 8 9 10 11 12 13 14 15 16 17 18 19 20 21 22 23 24 25 26 PARTS LIST FOR FIGURE A PART NUMBER DESCRIPTION QTY. MODEL NUMBER BS903 The model number will be performed by a Ryobi Authorized Service...Lock washer (5/16 in . RYOBI 9 in 3 36 041002000 Gear Type Belt 1 37 022505000 Nut 1 38 080007005704 lower blade guide Assembly (inc. key nos. 40, 67 and 104 1 39 816755-4 Screw (m5 x 9 mm pan hd 1 40 080007005060 * set Screw (M5 X 6 mm 8 41 984406001 Switch (inc. BAND SAW - For the service center ...
Repair Sheet
Page 4
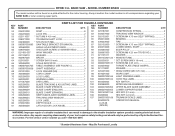
... 984406003 key switch 1 863209002 Blade Tracking & Adjusting Label........... 1 102 900988000 miter gauge assembly 1 863209007 Blade Chart (French 1 103 080007005052 upper blade guide assembly 1 863209009 Blade Chart (English 1 104 080007005055 lower support guide 1 863209010 Blade Chart (Spanish 1 105 089140301155...(rev:02) 4 WARNING: Improper repair of your BAND SAW or when ordering repair parts. Always mention the model number in . BAND SAW - May Be Purchased Locally MODEL NUMBER BS903 The model number will be performed by a Ryobi Authorized Service Center.
... 984406003 key switch 1 863209002 Blade Tracking & Adjusting Label........... 1 102 900988000 miter gauge assembly 1 863209007 Blade Chart (French 1 103 080007005052 upper blade guide assembly 1 863209009 Blade Chart (English 1 104 080007005055 lower support guide 1 863209010 Blade Chart (Spanish 1 105 089140301155...(rev:02) 4 WARNING: Improper repair of your BAND SAW or when ordering repair parts. Always mention the model number in . BAND SAW - May Be Purchased Locally MODEL NUMBER BS903 The model number will be performed by a Ryobi Authorized Service Center.
Repair Sheet
Page 6
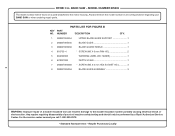
...LABEL (NO HANDS 1 6 870037000 DEPTH SCALE 1 7 080007005060 * SCREW (M5 X 6 mm HEX SOCKET HD 4 8 080007005056 blade guide assemBLY 3 6 WARNING: Improper repair of your BAND SAW or when ordering repair parts. For the service center nearest you call 1-800-525-2579. * Standard Hardware Item - Always mention .... Any repairs requiring disassembly of a double insulated tool can result in . BAND SAW - KEY PART NO. RYOBI 9 in damage to the motor housing. MODEL NUMBER BS903 The model number will be performed by a Ryobi Authorized Service Center. May Be Purchased Locally
...LABEL (NO HANDS 1 6 870037000 DEPTH SCALE 1 7 080007005060 * SCREW (M5 X 6 mm HEX SOCKET HD 4 8 080007005056 blade guide assemBLY 3 6 WARNING: Improper repair of your BAND SAW or when ordering repair parts. For the service center nearest you call 1-800-525-2579. * Standard Hardware Item - Always mention .... Any repairs requiring disassembly of a double insulated tool can result in . BAND SAW - KEY PART NO. RYOBI 9 in damage to the motor housing. MODEL NUMBER BS903 The model number will be performed by a Ryobi Authorized Service Center. May Be Purchased Locally


