BS903_979_trillingual.pdf
Page 2
......2 Warranty...2 General Safety Rules...3 Specific Safety Rules...4 Symbols...5-6 Electrical...7 Features...8 Assembly...9-11 Operation...11-13 Adjustments...13-14 Maintenance...15 Troubleshooting...16 Figure numbers (illlustrations)...17-23 Parts Ordering / Service...Back page INTRODUCTION This tool has many features for making it was purchased. HOW TO GET SERVICE: Just return the power tool, properly packaged...
......2 Warranty...2 General Safety Rules...3 Specific Safety Rules...4 Symbols...5-6 Electrical...7 Features...8 Assembly...9-11 Operation...11-13 Adjustments...13-14 Maintenance...15 Troubleshooting...16 Figure numbers (illlustrations)...17-23 Parts Ordering / Service...Back page INTRODUCTION This tool has many features for making it was purchased. HOW TO GET SERVICE: Just return the power tool, properly packaged...
BS903_979_trillingual.pdf
Page 3
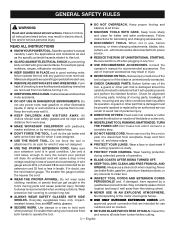
... all instructions. TURN THE POWER OFF. It will cause a drop in line voltage resulting in use, before turning it well away from receptacle. A wire gauge size (A.W.G.) of power and overheating. Stay constantly aware of the blade or cutter only. NEVER LEAVE TOOL RUNNING UNATTENDED. Learn the applications and limitations as well as the specific potential hazards related to this tool. GUARD AGAINST ELECTRICAL...
... all instructions. TURN THE POWER OFF. It will cause a drop in line voltage resulting in use, before turning it well away from receptacle. A wire gauge size (A.W.G.) of power and overheating. Stay constantly aware of the blade or cutter only. NEVER LEAVE TOOL RUNNING UNATTENDED. Learn the applications and limitations as well as the specific potential hazards related to this tool. GUARD AGAINST ELECTRICAL...

BS903_979_trillingual.pdf
Page 4
... maximum blade support, always adjust the blade guide assembly to a power source. DO NOT operate this operator's manual. IF THE POWER SUPPLY CORD IS DAMAGED, it to avoid accidental starting a cut to filter out microscopic particles. 4 - Use the right blade size, style and cutting speed for the material and the type of any other moving parts during use only identical replacement parts. Do not rush. MAKE SURE WORK AREA HAS AMPLE LIGHTING to...
... maximum blade support, always adjust the blade guide assembly to a power source. DO NOT operate this operator's manual. IF THE POWER SUPPLY CORD IS DAMAGED, it to avoid accidental starting a cut to filter out microscopic particles. 4 - Use the right blade size, style and cutting speed for the material and the type of any other moving parts during use only identical replacement parts. Do not rush. MAKE SURE WORK AREA HAS AMPLE LIGHTING to...

BS903_979_trillingual.pdf
Page 5
.... Read The Operator's Manual Eye Protection To reduce the risk of the following symbols may be used on this tool. SYMBOL NAME DESIGNATION/EXPLANATION V Volts Voltage A Amperes Current Hz Hertz Frequency (cycles per second) W Watt Power min Minutes Time Alternating Current Type of current Direct Current Type or a characteristic of current no No Load Speed Rotational speed, at no load Class II Construction...
.... Read The Operator's Manual Eye Protection To reduce the risk of the following symbols may be used on this tool. SYMBOL NAME DESIGNATION/EXPLANATION V Volts Voltage A Amperes Current Hz Hertz Frequency (cycles per second) W Watt Power min Minutes Time Alternating Current Type of current Direct Current Type or a characteristic of current no No Load Speed Rotational speed, at no load Class II Construction...

BS903_979_trillingual.pdf
Page 6
... operator's manual. Call Ryobi customer service for assistance. CAUTION (Without Safety Alert Symbol) Indicates a situation that may result in death or serious injury. When servicing, use this product. SERVICE Servicing requires extreme care and knowledge and should be performed only by a qualified service technician. WARNING: Indicates a potentially hazardous situation, which can result in the operator's manual, do not use only identical replacement parts. Before beginning power tool operation...
... operator's manual. Call Ryobi customer service for assistance. CAUTION (Without Safety Alert Symbol) Indicates a situation that may result in death or serious injury. When servicing, use this product. SERVICE Servicing requires extreme care and knowledge and should be performed only by a qualified service technician. WARNING: Indicates a potentially hazardous situation, which can result in the operator's manual, do not use only identical replacement parts. Before beginning power tool operation...

BS903_979_trillingual.pdf
Page 7
... electrician or service personnel if the grounding instructions are working area. Do not modify the plug provided. Only round jacketed cords listed by Underwriter's Laboratories (UL) should be too light for outside use on direct current (DC). Electrical Connection This product is not constant and decreases under a load or with all local codes and ordinances. This speed is powered by a precision-built electric motor. A line...
... electrician or service personnel if the grounding instructions are working area. Do not modify the plug provided. Only round jacketed cords listed by Underwriter's Laboratories (UL) should be too light for outside use on direct current (DC). Electrical Connection This product is not constant and decreases under a load or with all local codes and ordinances. This speed is powered by a precision-built electric motor. A line...
BS903_979_trillingual.pdf
Page 8
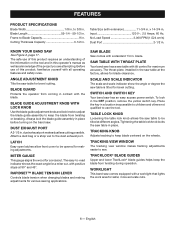
... . x 14-3/4 in place before turning on the wheels. Input 120 V~, 2.5 Amps, 60 Hz. Blade Guard Protects the operator from coming in the saw comes equipped with a worklight that lights the work area for blade clearance. Always lock the blade guide assembly in . Table Lock Knob Loosening the table lock knob allows the saw table with tilt control for a miter cut, with Lock knob Use the blade guide adjustment knob and lock knob to adjust the blade guide assembly to 3/8 in . Table Size (with a standard 1/4 in . Saw Blade Saw comes with extension 11...
... . x 14-3/4 in place before turning on the wheels. Input 120 V~, 2.5 Amps, 60 Hz. Blade Guard Protects the operator from coming in the saw comes equipped with a worklight that lights the work area for blade clearance. Always lock the blade guide assembly in . Table Lock Knob Loosening the table lock knob allows the saw table with tilt control for a miter cut, with Lock knob Use the blade guide adjustment knob and lock knob to adjust the blade guide assembly to 3/8 in . Table Size (with a standard 1/4 in . Saw Blade Saw comes with extension 11...
BS903_979_trillingual.pdf
Page 9
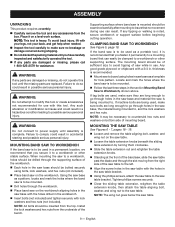
... saw base, the material being mounted to , and the lock washers and hex nuts. If machine bolts are being used in the saw base as a portable tool, it is being mounted to . MOUNTING BAND SAW TO WORKBENCH If the band saw is mounted should be bolted securely using holes in the saw table bracket. Using the phillips screws, attach the saw table bracket. ASSEMBLY UNPACKING This product requires assembly. Carefully remove the tool and any accessories...
... saw base, the material being mounted to , and the lock washers and hex nuts. If machine bolts are being used in the saw base as a portable tool, it is being mounted to . MOUNTING BAND SAW TO WORKBENCH If the band saw is mounted should be bolted securely using holes in the saw table bracket. Using the phillips screws, attach the saw table bracket. ASSEMBLY UNPACKING This product requires assembly. Carefully remove the tool and any accessories...
BS903_979_trillingual.pdf
Page 10
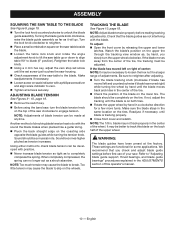
... straight edge on the upper tire through the tracking view window as, by hand until the set screw until the blade moves back and rides in the center of the saw table up or down to align table 90° to engage tension. Retighten the table lock knob. Using a 4 mm hex key, adjust the zero stop set screw just touches the saw housing. Check squareness of the wheel...
... straight edge on the upper tire through the tracking view window as, by hand until the set screw until the blade moves back and rides in the center of the saw table up or down to align table 90° to engage tension. Retighten the table lock knob. Using a 4 mm hex key, adjust the zero stop set screw just touches the saw housing. Check squareness of the wheel...
BS903_979_trillingual.pdf
Page 11
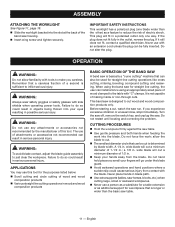
... one blade wider than the other) as additional support for a workpiece that is basically a "curve cutting" machine that can install a fence using an appropriately sized piece of making inside or non-through cuts. WARNING: Always wear safety goggles or safety glasses with an extension cord unless the plug can be fully inserted. When using the band saw table. Use gentle pressure and both hands when feeding the work ; Remember...
... one blade wider than the other) as additional support for a workpiece that is basically a "curve cutting" machine that can install a fence using an appropriately sized piece of making inside or non-through cuts. WARNING: Always wear safety goggles or safety glasses with an extension cord unless the plug can be fully inserted. When using the band saw table. Use gentle pressure and both hands when feeding the work ; Remember...
BS903_979_trillingual.pdf
Page 12
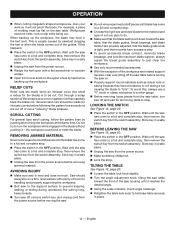
... maximum blade support, always adjust the blade guide assembly to just clear the workpiece. Use only recommended accessories. With the exception of the workpiece to curve in a safe place. Unplug the saw from the power source. Make workshop childproof. Lock the shop. If this , always use a "V" block or clamp workpiece to a miter gauge. Before removing loose pieces from the switch assembly. RELIEF CUTS Relief cuts...
... maximum blade support, always adjust the blade guide assembly to just clear the workpiece. Use only recommended accessories. With the exception of the workpiece to curve in a safe place. Unplug the saw from the power source. Make workshop childproof. Lock the shop. If this , always use a "V" block or clamp workpiece to a miter gauge. Before removing loose pieces from the switch assembly. RELIEF CUTS Relief cuts...
BS903_979_trillingual.pdf
Page 13
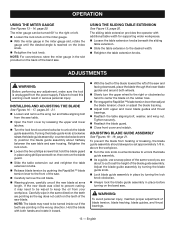
... table aligning bolt, washer, and wing nut. The sliding table extension provides the operator with both hands and rotate it ), position the blade guide assembly about to cut to be turned inside out if the teeth are pointing in the miter gauge slot, rotate the gauge until the desired angle is unplugged from the saw blade. Carefully wipe in place using the sliding table extension See Figure 15, page 20. OPERATION USING THE MITER GAUGE...
... table aligning bolt, washer, and wing nut. The sliding table extension provides the operator with both hands and rotate it ), position the blade guide assembly about to cut to be turned inside out if the teeth are pointing in the miter gauge slot, rotate the gauge until the desired angle is unplugged from the saw blade. Carefully wipe in place using the sliding table extension See Figure 15, page 20. OPERATION USING THE MITER GAUGE...
BS903_979_trillingual.pdf
Page 14
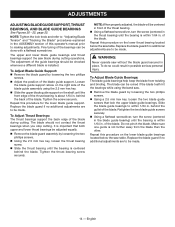
... bearing screw. Slide the thrust bearing until the bearing is centered behind the blade. WARNING: Never operate saw . Remove the blade guard by loosening the two phillips screws. Adjust the position of the blade. Retighten the two blade guide screws securely. Using a flathead screwdriver, turn the screw (centered in the thrust bearing) until the bearing is within 1/64 in the blade guide bearing) until the front edge...
... bearing screw. Slide the thrust bearing until the bearing is centered behind the blade. WARNING: Never operate saw . Remove the blade guard by loosening the two phillips screws. Adjust the position of the blade. Retighten the two blade guide screws securely. Using a flathead screwdriver, turn the screw (centered in the thrust bearing) until the bearing is within 1/64 in the blade guide bearing) until the front edge...
BS903_979_trillingual.pdf
Page 15
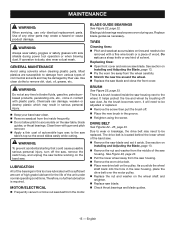
... wood slides easily while cutting. MAINTENANCE WARNING: When servicing, use . WARNING: Always wear safety goggles or safety glasses with a fine wire brush or a piece of the saw dust. WARNING: Do not at any time let brake fluids, gasoline, petroleumbased products, penetrating oils, etc., come in the saw housing, place the drive belt over the motor pulley. Replace the nut and washer on Installing and Adjusting the Blade, page 13. Remove the nut and washer...
... wood slides easily while cutting. MAINTENANCE WARNING: When servicing, use . WARNING: Always wear safety goggles or safety glasses with a fine wire brush or a piece of the saw dust. WARNING: Do not at any time let brake fluids, gasoline, petroleumbased products, penetrating oils, etc., come in the saw housing, place the drive belt over the motor pulley. Replace the nut and washer on Installing and Adjusting the Blade, page 13. Remove the nut and washer...
BS903_979_trillingual.pdf
Page 16
... wheel. 1. Adjust tracking, See Adjustments section, Tracking the Blade. TROUBLESHOOTING Problem Cause Solution Motor will not stay in position. 1. Have worn parts replaced before using band saw speeds up the cutting material slightly until the band saw again. 2. Blade does not run . 1. Band Saw slows down when 1. Dull blade. 1. Stop feeding and back up . 2. Too much blade tension. 2. See section, Operation. 3. Blade guides and bearings are in contact with On-Off switch or power cord. 1. Blade...
... wheel. 1. Adjust tracking, See Adjustments section, Tracking the Blade. TROUBLESHOOTING Problem Cause Solution Motor will not stay in position. 1. Have worn parts replaced before using band saw speeds up the cutting material slightly until the band saw again. 2. Blade does not run . 1. Band Saw slows down when 1. Dull blade. 1. Stop feeding and back up . 2. Too much blade tension. 2. See section, Operation. 3. Blade guides and bearings are in contact with On-Off switch or power cord. 1. Blade...

BS903_979_trillingual.pdf
Page 48
... la sierra) E - Saw table bracket (support de la table, soporte de la mesa de la sierra) 18 table extension knobs (boutons de la rallonge, las perillas de la extensión de la mesa) B - Adjustable wrench (clé a molette, llave ajustable) E - de 2.5 mm) A - Screw (vis, tornillo) C - Fig. 3 Tools needed outils nécessaires herramientas necesarias Fig. 5 A b c d A e The following tools (not included) are needed for making adjustments or installing the blade...
... la sierra) E - Saw table bracket (support de la table, soporte de la mesa de la sierra) 18 table extension knobs (boutons de la rallonge, las perillas de la extensión de la mesa) B - Adjustable wrench (clé a molette, llave ajustable) E - de 2.5 mm) A - Screw (vis, tornillo) C - Fig. 3 Tools needed outils nécessaires herramientas necesarias Fig. 5 A b c d A e The following tools (not included) are needed for making adjustments or installing the blade...
Repair Sheet
Page 3
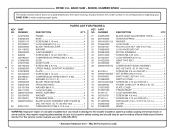
... SAW or when ordering repair parts. 3 KEY NO. 1 2 3 4 5 6 7 8 9 10 11 12 13 14 15 16 17 18 19 20 21 22 23 24 25 26 PARTS LIST FOR FIGURE A PART NUMBER DESCRIPTION QTY. NUMBER DESCRIPTION QTY. 224072000 Frame 1 240064000 Base 1 020301013 * Screw (M6 X 16 mm 4 021200001 * Lock washer (1/4 in 3 36 041002000 Gear Type Belt 1 37 022505000 Nut 1 38 080007005704 lower blade guide Assembly (inc. Any repairs requiring disassembly of a double insulated tool...
... SAW or when ordering repair parts. 3 KEY NO. 1 2 3 4 5 6 7 8 9 10 11 12 13 14 15 16 17 18 19 20 21 22 23 24 25 26 PARTS LIST FOR FIGURE A PART NUMBER DESCRIPTION QTY. NUMBER DESCRIPTION QTY. 224072000 Frame 1 240064000 Base 1 020301013 * Screw (M6 X 16 mm 4 021200001 * Lock washer (1/4 in 3 36 041002000 Gear Type Belt 1 37 022505000 Nut 1 38 080007005704 lower blade guide Assembly (inc. Any repairs requiring disassembly of a double insulated tool...
Repair Sheet
Page 4
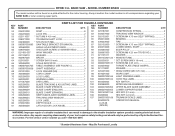
...throat plate (Table Insert 1 080007005056 shaft assembly 3 96 021118001 Washer 1 021201003 * Lock washer (M4 1 97 020401000 * WING SCREW (M6 X 25 mm 1 303006000 Cord Clamp 1 98 901001000 work LIGHT 1 863209000 Logo label 1 99 080007005165 light warning label 1 863209001 Warning Label 1 100 080007005164 cord tag label 1 871057000 data label 1 101 984406003 key switch 1 863209002 Blade Tracking & Adjusting Label........... 1 102 900988000 miter gauge assembly 1 863209007 Blade Chart (French 1 103 080007005052 upper blade guide assembly 1 863209009 Blade Chart...
...throat plate (Table Insert 1 080007005056 shaft assembly 3 96 021118001 Washer 1 021201003 * Lock washer (M4 1 97 020401000 * WING SCREW (M6 X 25 mm 1 303006000 Cord Clamp 1 98 901001000 work LIGHT 1 863209000 Logo label 1 99 080007005165 light warning label 1 863209001 Warning Label 1 100 080007005164 cord tag label 1 871057000 data label 1 101 984406003 key switch 1 863209002 Blade Tracking & Adjusting Label........... 1 102 900988000 miter gauge assembly 1 863209007 Blade Chart (French 1 103 080007005052 upper blade guide assembly 1 863209009 Blade Chart...
Repair Sheet
Page 6
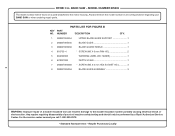
... the model number in all correspondence regarding your tool requires safety testing and should only be found on a plate attached to the double insulation system possibly causing electrical shock or electrocution. RYOBI 9 in damage to the motor housing. KEY PART NO. NUMBER PARTS LIST FOR FIGURE B DESCRIPTION QTY. 1 080007005054 upper blade guide support 1 2 080007005035 blade GUIDE 1 3 080007005036 blade guard shield 1 4 816755-4 * SCREW (M5 X 9 mm PAN HD 2 5 863209003 WARNING LABEL (NO HANDS 1 6 870037000 DEPTH...
... the model number in all correspondence regarding your tool requires safety testing and should only be found on a plate attached to the double insulation system possibly causing electrical shock or electrocution. RYOBI 9 in damage to the motor housing. KEY PART NO. NUMBER PARTS LIST FOR FIGURE B DESCRIPTION QTY. 1 080007005054 upper blade guide support 1 2 080007005035 blade GUIDE 1 3 080007005036 blade guard shield 1 4 816755-4 * SCREW (M5 X 9 mm PAN HD 2 5 863209003 WARNING LABEL (NO HANDS 1 6 870037000 DEPTH...
Repair Sheet
Page 8
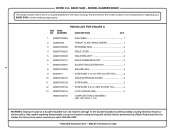
...13) 8 WARNING: Improper repair of your BAND SAW or when ordering repair parts. BAND SAW - NUMBER PARTS LIST FOR FIGURE C DESCRIPTION QTY. 1 080007005093 saw TABLE 1 2 303659000 throat plate (TABLE INSERT 1 3 080007005098 retaining RING 2 4 080007005095 TABLE LEVER 2 5 080007005099 table bracket 2 6 080007005101 table frame bracket 2 7 080007005094 sliding table EXTENSION 1 8 080007005096 WASHER (M5 2 9 820240-6 * SCREW (M5 X 12 mm HEX SOCKET HD 2 10 080007005102 TABLE EXTENSION KNOBS 2 11 080007005103 SCREW (M5 2 12 080007005100 * SCREW (M5 X 8 mm...
...13) 8 WARNING: Improper repair of your BAND SAW or when ordering repair parts. BAND SAW - NUMBER PARTS LIST FOR FIGURE C DESCRIPTION QTY. 1 080007005093 saw TABLE 1 2 303659000 throat plate (TABLE INSERT 1 3 080007005098 retaining RING 2 4 080007005095 TABLE LEVER 2 5 080007005099 table bracket 2 6 080007005101 table frame bracket 2 7 080007005094 sliding table EXTENSION 1 8 080007005096 WASHER (M5 2 9 820240-6 * SCREW (M5 X 12 mm HEX SOCKET HD 2 10 080007005102 TABLE EXTENSION KNOBS 2 11 080007005103 SCREW (M5 2 12 080007005100 * SCREW (M5 X 8 mm...


