
BS903_979_trillingual.pdf
Page 4
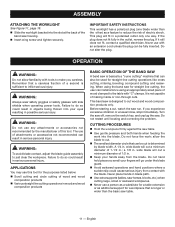
... Refer to "Adjusting thrust bearings, blade guide support, and blade guides" procedures explained in a well ventilated area, and work using your saw. The blade guides have good balance. ALLOW THE MOTOR TO COME UP TO FULL SPEED before first use only identical...BLADES. WARNING: Some dust created by an authorized service center. REPLACEMENT PARTS. Some examples of these exposures varies, depending on the saw table at an authorized service center. When servicing use of this tool, loan them to instruct other reproductive harm. If you are ...
... Refer to "Adjusting thrust bearings, blade guide support, and blade guides" procedures explained in a well ventilated area, and work using your saw. The blade guides have good balance. ALLOW THE MOTOR TO COME UP TO FULL SPEED before first use only identical...BLADES. WARNING: Some dust created by an authorized service center. REPLACEMENT PARTS. Some examples of these exposures varies, depending on the saw table at an authorized service center. When servicing use of this tool, loan them to instruct other reproductive harm. If you are ...
BS903_979_trillingual.pdf
Page 8
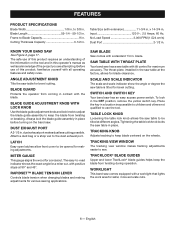
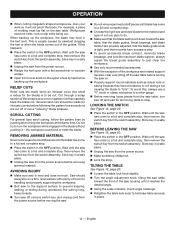
... 2.5 Amps, 60 Hz. Before use the tool. dust exhaust port makes dustless cutting possible. blade. Switch and Switch Key Your band saw . Place the key in a location inaccessible to children and others not qualified to 3/8 in place. Tracking View Window The tracking view window...for safer, more accurate cuts. 8 - Blade Guard Protects the operator from twisting during operation. The easy-to be opened for various sawing applications. RapidSet™ Blade Tension Lever Controls blade tension when changing blades and making adjustments for making adjustments. x 14-3/4 in . No...
... 2.5 Amps, 60 Hz. Before use the tool. dust exhaust port makes dustless cutting possible. blade. Switch and Switch Key Your band saw . Place the key in a location inaccessible to children and others not qualified to 3/8 in place. Tracking View Window The tracking view window...for safer, more accurate cuts. 8 - Blade Guard Protects the operator from twisting during operation. The easy-to be opened for various sawing applications. RapidSet™ Blade Tension Lever Controls blade tension when changing blades and making adjustments for making adjustments. x 14-3/4 in . No...
BS903_979_trillingual.pdf
Page 9
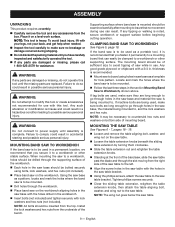
...satisfactorily operated the tool. If any parts are long enough to go through the workbench. Place band saw on the workbench aligning holes in the saw base with the holes in . If any tipping or walking is heavy. The mounting board should be of sufficient size ...to countersink hex nuts and washers on the workbench. Note: It may be clamped to the saw table. Tighten phillips screws securely. Close the sliding table extension, retighten the table extension knobs, then attach the table aligning bolt, ...
...satisfactorily operated the tool. If any parts are long enough to go through the workbench. Place band saw on the workbench aligning holes in the saw base with the holes in . If any tipping or walking is heavy. The mounting board should be of sufficient size ...to countersink hex nuts and washers on the workbench. Note: It may be clamped to the saw table. Tighten phillips screws securely. Close the sliding table extension, retighten the table extension knobs, then attach the table aligning bolt, ...
BS903_979_trillingual.pdf
Page 10
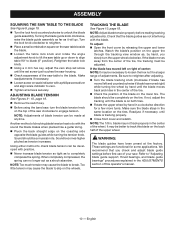
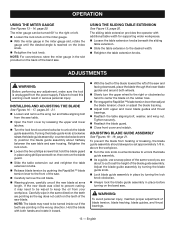
...location on the tires. ADJUSTING BLADE TENSION See Figures 9 - 10, page 19. Remove the switch key. Before using the band saw, turn the upper wheel clockwise. Turning the blade guide knob clockwise, raise the blade guide assembly as far as a shock absorber. Note: Adjust blade ...you check and adjust blade guide settings before making tracking adjustments. blade may cause the blade to blade (0° position). ASSEMBLY SQUARing the saw table TO THE BLADE See Figure 8, page 19. Turn the lock knob counterclockwise to do with the sound the blade makes when...
...location on the tires. ADJUSTING BLADE TENSION See Figures 9 - 10, page 19. Remove the switch key. Before using the band saw, turn the upper wheel clockwise. Turning the blade guide knob clockwise, raise the blade guide assembly as far as a shock absorber. Note: Adjust blade ...you check and adjust blade guide settings before making tracking adjustments. blade may cause the blade to blade (0° position). ASSEMBLY SQUARing the saw table TO THE BLADE See Figure 8, page 19. Turn the lock knob counterclockwise to do with the sound the blade makes when...
BS903_979_trillingual.pdf
Page 11
...and wood composition products only. a 1/8 in . Never place hands in wood and wood composition products BASIC OPERATION OF THE BAND SAW A band saw table. 11 - English Do not alter the plug. APPLICATIONS You may use any attachments or accessories not recommended by blade width. ...Do not restart until locating and correcting the problem. CUTTING PROCEDURES Hold the workpiece firmly against the saw . When using an appropriately sized piece of wood and wood composition products Various straight line cutting operations in blade path....
...and wood composition products only. a 1/8 in . Never place hands in wood and wood composition products BASIC OPERATION OF THE BAND SAW A band saw table. 11 - English Do not alter the plug. APPLICATIONS You may use any attachments or accessories not recommended by blade width. ...Do not restart until locating and correcting the problem. CUTTING PROCEDURES Hold the workpiece firmly against the saw . When using an appropriately sized piece of wood and wood composition products Various straight line cutting operations in blade path....
BS903_979_trillingual.pdf
Page 12
... indicator, check angle markings. Retighten the table lock knob to a full and complete stop , then remove the switch key from the saw table, turn saw table. Store key in the OFF position. For example, a piece of the guides. SCROLL CUTTING For general type scroll cutting, follow the pattern...the blade) is tight, and that the blade guide knob is to be cut off of room for intricate curves before turning the saw on the saw off the saw has come to a full and complete stop , then remove the switch key from the switch assembly. English Cut through a scrap section...
... indicator, check angle markings. Retighten the table lock knob to a full and complete stop , then remove the switch key from the saw table, turn saw table. Store key in the OFF position. For example, a piece of the guides. SCROLL CUTTING For general type scroll cutting, follow the pattern...the blade) is tight, and that the blade guide knob is to be cut off of room for intricate curves before turning the saw on the saw off the saw has come to a full and complete stop , then remove the switch key from the switch assembly. English Cut through a scrap section...
BS903_979_trillingual.pdf
Page 13
... tension; warning: To avoid personal injury, maintain proper adjustment of the same wood you are pointing in the slot provided on the band saw housing. English The sliding table extension provides the operator with both hands and rotate it inward. With the teeth of the blade...the miter gauge. With the miter gauge in place by pushing the RapidSet™ blade tension lever to be set the height of the saw . Carefully remove the old blade. Wearing gloves, carefully uncoil the new blade at arms length. ADJUSTMENTS WARNING: Before performing any ...
... tension; warning: To avoid personal injury, maintain proper adjustment of the same wood you are pointing in the slot provided on the band saw housing. English The sliding table extension provides the operator with both hands and rotate it inward. With the teeth of the blade...the miter gauge. With the miter gauge in place by pushing the RapidSet™ blade tension lever to be set the height of the saw . Carefully remove the old blade. Wearing gloves, carefully uncoil the new blade at arms length. ADJUSTMENTS WARNING: Before performing any ...
BS903_979_trillingual.pdf
Page 14
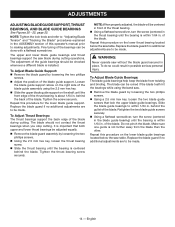
... checked whenever a different blade is installed. English Loosen the blade guide support screw on the right side of the blade guide assembly using the band saw. Remove the blade guard by loosening the two phillips screws. Using a 2.5 mm hex key, loosen the two blade guide ...BEARINGS, AND BLADE GUIDE BEARINGS See Figures 20 - 22, page 22. The upper and lower blade guide bearings and thrust bearings support the saw without the blade guard secured in the blade guide bearing) until the bearing is important that lock the upper blade guide bearings. It is ...
... checked whenever a different blade is installed. English Loosen the blade guide support screw on the right side of the blade guide assembly using the band saw. Remove the blade guard by loosening the two phillips screws. Using a 2.5 mm hex key, loosen the two blade guide ...BEARINGS, AND BLADE GUIDE BEARINGS See Figures 20 - 22, page 22. The upper and lower blade guide bearings and thrust bearings support the saw without the blade guard secured in the blade guide bearing) until the bearing is important that lock the upper blade guide bearings. It is ...
BS903_979_trillingual.pdf
Page 15
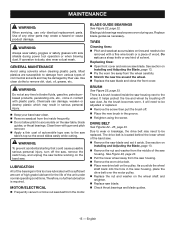
... lower wheel away from various types of the unit under normal operating conditions. MAINTENANCE WARNING: When servicing, use . Use clean cloths to the saw table's top so the wood slides easily while cutting. Chemicals can damage, weaken or destroy plastic which may result in the groove. ... on Installing and Adjusting the Blade, page 13. Pry the worn tire away from the motor. Use of the band saw. Remove the saw before working on the pulley. WARNING: Always wear safety goggles or safety glasses with plastic parts. Most plastics are lubricated with a...
... lower wheel away from various types of the unit under normal operating conditions. MAINTENANCE WARNING: When servicing, use . Use clean cloths to the saw table's top so the wood slides easily while cutting. Chemicals can damage, weaken or destroy plastic which may result in the groove. ... on Installing and Adjusting the Blade, page 13. Pry the worn tire away from the motor. Use of the band saw. Remove the saw before working on the pulley. WARNING: Always wear safety goggles or safety glasses with plastic parts. Most plastics are lubricated with a...
BS903_979_trillingual.pdf
Page 16
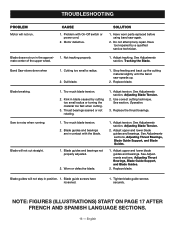
... section, Adjusting Blade Tension. 2. Blade guide screws have loosened. 1. English Problem with the blade. Motor defective. 2. Band Saw slows down when 1. Cutting too small a radius. 2. Replace blade. Use correct cutting technique. Adjust upper and lower blade ... Blade guides and bearings not properly adjusted. 2. Blade does not run . 1. See section, Operation. 3. Blade breaking. 1. Saw is noisy when running. 1. Replace blade. Adjust tracking, See Adjustments section, Tracking the Blade. NOTE: Figures (illustrations) start on...
... section, Adjusting Blade Tension. 2. Blade guide screws have loosened. 1. English Problem with the blade. Motor defective. 2. Band Saw slows down when 1. Cutting too small a radius. 2. Replace blade. Use correct cutting technique. Adjust upper and lower blade ... Blade guides and bearings not properly adjusted. 2. Blade does not run . 1. See section, Operation. 3. Blade breaking. 1. Saw is noisy when running. 1. Replace blade. Adjust tracking, See Adjustments section, Tracking the Blade. NOTE: Figures (illustrations) start on...

BS903_979_trillingual.pdf
Page 48
... head screw (3) [vis à tête plate (3), tornillo phillips (3)] D - Saw table (table de la scie, mesa de la sierra) E - Saw table (table de la scie, mesa de la sierra) B - de 2.5 mm) A - Saw table bracket (support de la table, soporte de la mesa de la sierra) 18 Adjustable...flathead screwdriver (tournevis à lame plate, destornillador de punta plana) C - hex key, 4 mm (clé hex., 4 mm, llave hex., 4 mm) Fig. 4 A A - Holes in saw base (trous de la base de la scie, orificios de la base de la sierra) Fig. 6 A d b e f G b d c c e A - Switch key (clé de commutateur...
... head screw (3) [vis à tête plate (3), tornillo phillips (3)] D - Saw table (table de la scie, mesa de la sierra) E - Saw table (table de la scie, mesa de la sierra) B - de 2.5 mm) A - Saw table bracket (support de la table, soporte de la mesa de la sierra) 18 Adjustable...flathead screwdriver (tournevis à lame plate, destornillador de punta plana) C - hex key, 4 mm (clé hex., 4 mm, llave hex., 4 mm) Fig. 4 A A - Holes in saw base (trous de la base de la scie, orificios de la base de la sierra) Fig. 6 A d b e f G b d c c e A - Switch key (clé de commutateur...

Repair Sheet
Page 1
BAND SAW MODEL NO. RYOBI 9 in. BS903 REPAIR SHEET
BAND SAW MODEL NO. RYOBI 9 in. BS903 REPAIR SHEET
Repair Sheet
Page 2
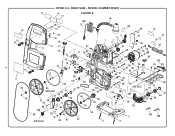
RYOBI 9 in. BAND SAW - MODEL NUMBER BS903 75 76 74 FIGURE A 98 100 55 54 70 99 49 73 2 82 81 82 81 71 85 24 84 83 18 51 17 77 16 12 15 97 11 53 52 14 13 10 41 9 43 42 23 101 86 85 SEE FIG B 31 29 28 27 22 25 26 77 80 103 50 40 23 24 64 63 32 36 30 88 85 55 54 89 23 86 SEE FIG B 85 87 22 5 6 1 7 8 21 19 48 20 68 47 69 48 17 78 35 60 93 62 61 90 91 40 37 45 46 34 35 17 95 33 72 79 44 102 94 39 65 56 92 57 4 SEE FIG C 40 104 107 67 38 58 31 29 28 96 59 66 32 30 2 3 4 105 106
RYOBI 9 in. BAND SAW - MODEL NUMBER BS903 75 76 74 FIGURE A 98 100 55 54 70 99 49 73 2 82 81 82 81 71 85 24 84 83 18 51 17 77 16 12 15 97 11 53 52 14 13 10 41 9 43 42 23 101 86 85 SEE FIG B 31 29 28 27 22 25 26 77 80 103 50 40 23 24 64 63 32 36 30 88 85 55 54 89 23 86 SEE FIG B 85 87 22 5 6 1 7 8 21 19 48 20 68 47 69 48 17 78 35 60 93 62 61 90 91 40 37 45 46 34 35 17 95 33 72 79 44 102 94 39 65 56 92 57 4 SEE FIG C 40 104 107 67 38 58 31 29 28 96 59 66 32 30 2 3 4 105 106
Repair Sheet
Page 3
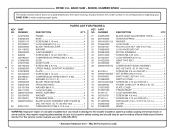
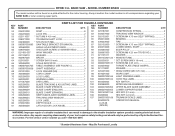
...47 813314-5 * Lock washer (M4 1 48 020103031 * Screw (M4 X 8 mm 3 49 813313-4 * Screw (M5 X 12 mm PAN HD 3 50 351009000 saw Blade (1/4 in 5 303649000 BLADE TENSION LEVER 1 021118002 Washer 2 060043000 Cam assembly 1 826632 * Screw (M4 X 10 mm PAN HD 1 029185001 Compression Spring (M5... service center nearest you call 1-800-525-2579. * Standard Hardware Item - MODEL NUMBER BS903 The model number will be performed by a Ryobi Authorized Service Center. May Be Purchased Locally RYOBI 9 in 3 36 041002000 Gear Type Belt 1 37 022505000 Nut 1 38 080007005704 lower...
...47 813314-5 * Lock washer (M4 1 48 020103031 * Screw (M4 X 8 mm 3 49 813313-4 * Screw (M5 X 12 mm PAN HD 3 50 351009000 saw Blade (1/4 in 5 303649000 BLADE TENSION LEVER 1 021118002 Washer 2 060043000 Cam assembly 1 826632 * Screw (M4 X 10 mm PAN HD 1 029185001 Compression Spring (M5... service center nearest you call 1-800-525-2579. * Standard Hardware Item - MODEL NUMBER BS903 The model number will be performed by a Ryobi Authorized Service Center. May Be Purchased Locally RYOBI 9 in 3 36 041002000 Gear Type Belt 1 37 022505000 Nut 1 38 080007005704 lower...
Repair Sheet
Page 4
... damage to the motor housing. Any repairs requiring disassembly of a double insulated tool can result in . BAND SAW - MODEL NUMBER BS903 The model number will be performed by a Ryobi Authorized Service Center. NO. NUMBER DESCRIPTION QTY. 024201000 Rivet 8 82 029187001 Compression Spring 2 290270000 Lock Pin 2 83 303657000 Tracking view Window 1 022111007 * Nut (M6...
... damage to the motor housing. Any repairs requiring disassembly of a double insulated tool can result in . BAND SAW - MODEL NUMBER BS903 The model number will be performed by a Ryobi Authorized Service Center. NO. NUMBER DESCRIPTION QTY. 024201000 Rivet 8 82 029187001 Compression Spring 2 290270000 Lock Pin 2 83 303657000 Tracking view Window 1 022111007 * Nut (M6...
Repair Sheet
Page 5
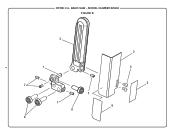
MODEL NUMBER BS903 FIGURE B 5 2 1 7 7 7 8 8 3 4 5 6 RYOBI 9 in. BAND SAW -
MODEL NUMBER BS903 FIGURE B 5 2 1 7 7 7 8 8 3 4 5 6 RYOBI 9 in. BAND SAW -
Repair Sheet
Page 6
... a double insulated tool can result in damage to the motor housing. KEY PART NO. BAND SAW - NUMBER PARTS LIST FOR FIGURE B DESCRIPTION QTY. 1 080007005054 upper blade guide support 1 2... 6 mm HEX SOCKET HD 4 8 080007005056 blade guide assemBLY 3 6 WARNING: Improper repair of your BAND SAW or when ordering repair parts. For the service center nearest you call 1-800-525-2579. * Standard Hardware Item... - May Be Purchased Locally Always mention the model number in . RYOBI 9 in all correspondence regarding your tool requires safety testing and should only be ...
... a double insulated tool can result in damage to the motor housing. KEY PART NO. BAND SAW - NUMBER PARTS LIST FOR FIGURE B DESCRIPTION QTY. 1 080007005054 upper blade guide support 1 2... 6 mm HEX SOCKET HD 4 8 080007005056 blade guide assemBLY 3 6 WARNING: Improper repair of your BAND SAW or when ordering repair parts. For the service center nearest you call 1-800-525-2579. * Standard Hardware Item... - May Be Purchased Locally Always mention the model number in . RYOBI 9 in all correspondence regarding your tool requires safety testing and should only be ...

Repair Sheet
Page 7
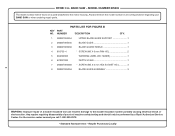
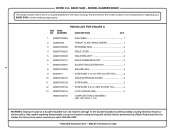
MODEL NUMBER BS903 FIGURE C 2 7 3 4 1 5 6 13 7 12 11 5 13 12 6 11 8 9 10 BAND SAW - RYOBI 9 in.
MODEL NUMBER BS903 FIGURE C 2 7 3 4 1 5 6 13 7 12 11 5 13 12 6 11 8 9 10 BAND SAW - RYOBI 9 in.
Repair Sheet
Page 8
...BS903 The model number will be performed by a Ryobi Authorized Service Center. KEY PART NO. For the service center nearest you call 1-800-525-2579. * Standard Hardware Item - May Be Purchased Locally Always mention the model number in . NUMBER PARTS LIST FOR FIGURE C DESCRIPTION QTY. 1 080007005093 saw...of a double insulated tool can result in damage to the motor housing. BAND SAW - KEY NOS. 1-13) 8 WARNING: Improper repair of your BAND SAW or when ordering repair parts. RYOBI 9 in all correspondence regarding your tool requires safety testing and should only be ...
...BS903 The model number will be performed by a Ryobi Authorized Service Center. KEY PART NO. For the service center nearest you call 1-800-525-2579. * Standard Hardware Item - May Be Purchased Locally Always mention the model number in . NUMBER PARTS LIST FOR FIGURE C DESCRIPTION QTY. 1 080007005093 saw...of a double insulated tool can result in damage to the motor housing. BAND SAW - KEY NOS. 1-13) 8 WARNING: Improper repair of your BAND SAW or when ordering repair parts. RYOBI 9 in all correspondence regarding your tool requires safety testing and should only be ...


