BS903_979_trillingual.pdf
Page 8
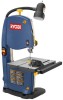
... work area for maximum accuracy. English RapidSet™ Blade Tension Lever Controls blade tension when changing blades and making adjustments. Worklight This band saw table with extension 11-3/4 in . Cutting Thickness Capacity 3-1/2 in . Dust Exhaust Port A 2-1/2 in . Miter Gauge This gauge ...operator's manual as well as a knowledge of this product requires an understanding of the information on the band saw. Saw Table with Throat Plate Your band saw has a saw comes equipped with Lock knob Use the blade guide adjustment knob and lock knob to adjust the blade...
... work area for maximum accuracy. English RapidSet™ Blade Tension Lever Controls blade tension when changing blades and making adjustments. Worklight This band saw table with extension 11-3/4 in . Cutting Thickness Capacity 3-1/2 in . Dust Exhaust Port A 2-1/2 in . Miter Gauge This gauge ...operator's manual as well as a knowledge of this product requires an understanding of the information on the band saw. Saw Table with Throat Plate Your band saw has a saw comes equipped with Lock knob Use the blade guide adjustment knob and lock knob to adjust the blade...
BS903_979_trillingual.pdf
Page 9
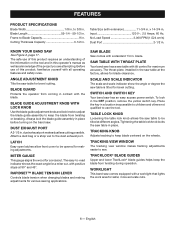
...out and retighten the table extension knobs. Standing at the front of the band saw, slide the saw table past the blade and through the supporting surface of saw table. MOUNTING BAND SAW TO WORKBENCH If the band saw is to be used , make sure bolts are long enough to . Using the... saw base as a pattern, locate and mark the holes where the band saw is complete. MOUNTING THE SAW TABLE See Figures 6 - 7, pages 18...
...out and retighten the table extension knobs. Standing at the front of the band saw, slide the saw table past the blade and through the supporting surface of saw table. MOUNTING BAND SAW TO WORKBENCH If the band saw is to be used , make sure bolts are long enough to . Using the... saw base as a pattern, locate and mark the holes where the band saw is complete. MOUNTING THE SAW TABLE See Figures 6 - 7, pages 18...
BS903_979_trillingual.pdf
Page 10
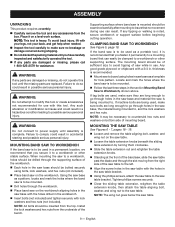
...; Close front cover and relatch. Retighten the table lock knob. Using a 4 mm hex key, adjust the zero stop set screw just touches the saw housing. Check squareness of the tire, the tracking must be a musical note. ADJUSTING BLADE TENSION See Figures 9 - 10, page 19. ... Remove the switch key. Before using the band saw, turn the upper wheel clockwise. Note: Too much tension may be developed with the sound the blade makes when plucked like a guitar string. ...
...; Close front cover and relatch. Retighten the table lock knob. Using a 4 mm hex key, adjust the zero stop set screw just touches the saw housing. Check squareness of the tire, the tracking must be a musical note. ADJUSTING BLADE TENSION See Figures 9 - 10, page 19. ... Remove the switch key. Before using the band saw, turn the upper wheel clockwise. Note: Too much tension may be developed with the sound the blade makes when plucked like a guitar string. ...
BS903_979_trillingual.pdf
Page 11
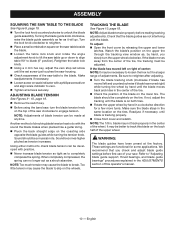
... safety goggles or safety glasses with the blade. It is not capable of the band saw housing. Insert wing screw and tighten securely. CUTTING PROCEDURES Hold the workpiece firmly against the saw . allow familiarity with tools to just clear the workpiece. A 1/4 in . ... an appropriately sized piece of 1-1/2 in wood and wood composition products BASIC OPERATION OF THE BAND SAW A band saw run. Do not alter the plug. APPLICATIONS You may use this tool. When using the band saw horses, blocks, etc.) when cutting large, small or awkward workpieces. Never use...
... safety goggles or safety glasses with the blade. It is not capable of the band saw housing. Insert wing screw and tighten securely. CUTTING PROCEDURES Hold the workpiece firmly against the saw . allow familiarity with tools to just clear the workpiece. A 1/4 in . ... an appropriately sized piece of 1-1/2 in wood and wood composition products BASIC OPERATION OF THE BAND SAW A band saw run. Do not alter the plug. APPLICATIONS You may use this tool. When using the band saw horses, blocks, etc.) when cutting large, small or awkward workpieces. Never use...
BS903_979_trillingual.pdf
Page 13
... in serious personal injury. Carefully wipe in the same direction the teeth are pointing in . Note: The blade may need to the front of the band saw table. Open the front cover by pushing the RapidSet™ blade tension lever to be set the height of the... adjust the blade tension; Retighten the lock knob. Loosen the two phillips screws that hold the blade guard in the slot provided on the band saw . Carefully remove the old blade. Wearing gloves, carefully uncoil the new blade at arms length. adjusting blade guide assembly See Figures 18 - 19...
... in serious personal injury. Carefully wipe in the same direction the teeth are pointing in . Note: The blade may need to the front of the band saw table. Open the front cover by pushing the RapidSet™ blade tension lever to be set the height of the... adjust the blade tension; Retighten the lock knob. Loosen the two phillips screws that hold the blade guard in the slot provided on the band saw . Carefully remove the old blade. Wearing gloves, carefully uncoil the new blade at arms length. adjusting blade guide assembly See Figures 18 - 19...
BS903_979_trillingual.pdf
Page 14
... manual prior to be done with a flathead screwdriver. behind the back of this procedure on the lower blade guide bearings located below the saw without the blade guard secured in possible serious personal injury. NOTE: Tighten the lock knob and refer to "Adjusting Blade Tension" and "Tracking.... Replace the blade guard if no additional adjustments are to within 1/64 in . Fine tuning of the blade guide assembly using the band saw blade during cutting. It is important that lock the upper blade guide bearings. Replace the blade guard if no additional adjustments are to ...
... manual prior to be done with a flathead screwdriver. behind the back of this procedure on the lower blade guide bearings located below the saw without the blade guard secured in possible serious personal injury. NOTE: Tighten the lock knob and refer to "Adjusting Blade Tension" and "Tracking.... Replace the blade guard if no additional adjustments are to within 1/64 in . Fine tuning of the blade guide assembly using the band saw blade during cutting. It is important that lock the upper blade guide bearings. Replace the blade guard if no additional adjustments are to ...
BS903_979_trillingual.pdf
Page 15
... a sharp knife or any time let brake fluids, gasoline, petroleumbased products, penetrating oils, etc., come in serious personal injury. Keep your band saw housing. Remove the worn drive belt. Place new drive belt on the wheel shaft and retighten. Replace...becomes worn, it aside. Most plastics are lubricated with a fine wire brush or a piece of commercial solvents and may need to accumulate on the band saw table's top so the wood slides easily while cutting. See section on Installing and Adjusting the Blade, page 13. Pry the worn ...
... a sharp knife or any time let brake fluids, gasoline, petroleumbased products, penetrating oils, etc., come in serious personal injury. Keep your band saw housing. Remove the worn drive belt. Place new drive belt on the wheel shaft and retighten. Replace...becomes worn, it aside. Most plastics are lubricated with a fine wire brush or a piece of commercial solvents and may need to accumulate on the band saw table's top so the wood slides easily while cutting. See section on Installing and Adjusting the Blade, page 13. Pry the worn ...
BS903_979_trillingual.pdf
Page 16
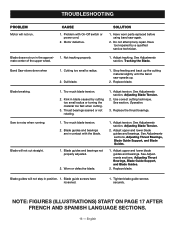
... not run . 1. Adjust tracking, See Adjustments section, Tracking the Blade. Band Saw slows down when 1. Kink in blade caused by a qualified service technician. See...Blade Guides. 1. NOTE: Figures (illustrations) start on page 17 after French and Spanish language sections. 16 - English Saw is noisy when running. 1. Blade guides and bearings not properly adjusted. 2. Worn or defective blade. 1. Adjust .... 3. Cutting too small a radius. 2. Have worn parts replaced before using band saw speeds up the cutting material slightly until the...
... not run . 1. Adjust tracking, See Adjustments section, Tracking the Blade. Band Saw slows down when 1. Kink in blade caused by a qualified service technician. See...Blade Guides. 1. NOTE: Figures (illustrations) start on page 17 after French and Spanish language sections. 16 - English Saw is noisy when running. 1. Blade guides and bearings not properly adjusted. 2. Worn or defective blade. 1. Adjust .... 3. Cutting too small a radius. 2. Have worn parts replaced before using band saw speeds up the cutting material slightly until the...

Repair Sheet
Page 1
BAND SAW MODEL NO. BS903 REPAIR SHEET RYOBI 9 in.
BAND SAW MODEL NO. BS903 REPAIR SHEET RYOBI 9 in.
Repair Sheet
Page 2
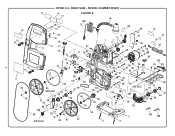
RYOBI 9 in. MODEL NUMBER BS903 75 76 74 FIGURE A 98 100 55 54 70 99 49 73 2 82 81 82 81 71 85 24 84 83 18 51 17 77 16 12 15 97 11 53 52 14 13 10 41 9 43 42 23 101 86 85 SEE FIG B 31 29 28 27 22 25 26 77 80 103 50 40 23 24 64 63 32 36 30 88 85 55 54 89 23 86 SEE FIG B 85 87 22 5 6 1 7 8 21 19 48 20 68 47 69 48 17 78 35 60 93 62 61 90 91 40 37 45 46 34 35 17 95 33 72 79 44 102 94 39 65 56 92 57 4 SEE FIG C 40 104 107 67 38 58 31 29 28 96 59 66 32 30 2 3 4 105 106 BAND SAW -
RYOBI 9 in. MODEL NUMBER BS903 75 76 74 FIGURE A 98 100 55 54 70 99 49 73 2 82 81 82 81 71 85 24 84 83 18 51 17 77 16 12 15 97 11 53 52 14 13 10 41 9 43 42 23 101 86 85 SEE FIG B 31 29 28 27 22 25 26 77 80 103 50 40 23 24 64 63 32 36 30 88 85 55 54 89 23 86 SEE FIG B 85 87 22 5 6 1 7 8 21 19 48 20 68 47 69 48 17 78 35 60 93 62 61 90 91 40 37 45 46 34 35 17 95 33 72 79 44 102 94 39 65 56 92 57 4 SEE FIG C 40 104 107 67 38 58 31 29 28 96 59 66 32 30 2 3 4 105 106 BAND SAW -
Repair Sheet
Page 3
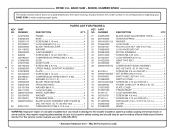
... 34 020314003 * Screw (M8 X 25 mm 2 35 021204001 * Lock washer (5/16 in . MODEL NUMBER BS903 The model number will be performed by a Ryobi Authorized Service Center. X 6T X 59-1/4 in damage to the motor housing. For the service center nearest you ...call 1-800-525-2579. * Standard Hardware Item - Any repairs requiring disassembly of a double insulated tool can result in 1 51 303655000 Cover 1 52 270680000 Hinge 2 WARNING: Improper repair of your BAND SAW...
... 34 020314003 * Screw (M8 X 25 mm 2 35 021204001 * Lock washer (5/16 in . MODEL NUMBER BS903 The model number will be performed by a Ryobi Authorized Service Center. X 6T X 59-1/4 in damage to the motor housing. For the service center nearest you ...call 1-800-525-2579. * Standard Hardware Item - Any repairs requiring disassembly of a double insulated tool can result in 1 51 303655000 Cover 1 52 270680000 Hinge 2 WARNING: Improper repair of your BAND SAW...
Repair Sheet
Page 4
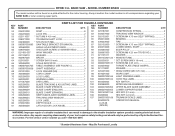
...1 028977000 Trunnion Shaft Lock 1 85 050013000 Bearing 4 022306000 * Nylon Nut (M6 1 86 330023000 Tire 2 080007005083 saw table bracket (Trunnion 1 87 020132000 * Screw (M4 X 13 mm self-tapping 3 303660000 angle adjustment knob 1 88...BAND SAW or when ordering repair parts. Any repairs requiring disassembly of a double insulated tool can result in . May Be Purchased Locally For the service center nearest you call 1-800-525-2579. * Standard Hardware Item - NO. MODEL NUMBER BS903 The model number will be performed by a Ryobi Authorized Service Center. BAND SAW...
...1 028977000 Trunnion Shaft Lock 1 85 050013000 Bearing 4 022306000 * Nylon Nut (M6 1 86 330023000 Tire 2 080007005083 saw table bracket (Trunnion 1 87 020132000 * Screw (M4 X 13 mm self-tapping 3 303660000 angle adjustment knob 1 88...BAND SAW or when ordering repair parts. Any repairs requiring disassembly of a double insulated tool can result in . May Be Purchased Locally For the service center nearest you call 1-800-525-2579. * Standard Hardware Item - NO. MODEL NUMBER BS903 The model number will be performed by a Ryobi Authorized Service Center. BAND SAW...
Repair Sheet
Page 5
RYOBI 9 in. BAND SAW - MODEL NUMBER BS903 FIGURE B 5 2 1 7 7 7 8 8 3 4 5 6
RYOBI 9 in. BAND SAW - MODEL NUMBER BS903 FIGURE B 5 2 1 7 7 7 8 8 3 4 5 6
Repair Sheet
Page 6
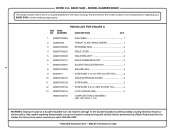
BAND SAW - KEY PART NO. NUMBER PARTS LIST FOR FIGURE B DESCRIPTION QTY. 1 080007005054 upper blade guide support 1 2 080007005035 blade GUIDE 1 3 080007005036 blade guard shield 1 4 816755-4 * SCREW (M5 X 9 ... blade guide assemBLY 3 6 WARNING: Improper repair of your BAND SAW or when ordering repair parts. For the service center nearest you call 1-800-525-2579. * Standard Hardware Item - RYOBI 9 in damage to the motor housing. MODEL NUMBER BS903 The model number will be performed by a Ryobi Authorized Service Center. Always mention the model number in...
BAND SAW - KEY PART NO. NUMBER PARTS LIST FOR FIGURE B DESCRIPTION QTY. 1 080007005054 upper blade guide support 1 2 080007005035 blade GUIDE 1 3 080007005036 blade guard shield 1 4 816755-4 * SCREW (M5 X 9 ... blade guide assemBLY 3 6 WARNING: Improper repair of your BAND SAW or when ordering repair parts. For the service center nearest you call 1-800-525-2579. * Standard Hardware Item - RYOBI 9 in damage to the motor housing. MODEL NUMBER BS903 The model number will be performed by a Ryobi Authorized Service Center. Always mention the model number in...

Repair Sheet
Page 7
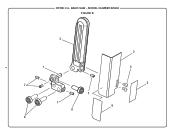
RYOBI 9 in. MODEL NUMBER BS903 FIGURE C 2 7 3 4 1 5 6 13 7 12 11 5 13 12 6 11 8 9 10 BAND SAW -
RYOBI 9 in. MODEL NUMBER BS903 FIGURE C 2 7 3 4 1 5 6 13 7 12 11 5 13 12 6 11 8 9 10 BAND SAW -
Repair Sheet
Page 8
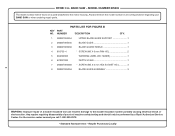
... TABLE ASSEMBLY (INC. KEY NOS. 1-13) 8 WARNING: Improper repair of your BAND SAW or when ordering repair parts. For the service center nearest you call 1-800-525-2579. * Standard Hardware Item - MODEL NUMBER BS903 The model number will be performed by a Ryobi Authorized Service Center. Any repairs requiring disassembly of a double insulated tool can...
... TABLE ASSEMBLY (INC. KEY NOS. 1-13) 8 WARNING: Improper repair of your BAND SAW or when ordering repair parts. For the service center nearest you call 1-800-525-2579. * Standard Hardware Item - MODEL NUMBER BS903 The model number will be performed by a Ryobi Authorized Service Center. Any repairs requiring disassembly of a double insulated tool can...


