BS903_979_trillingual.pdf
Page 8
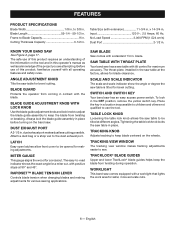
... 59-1/4 - 59-1/2 in a location inaccessible to children and others not qualified to keep the blade from twisting during operation. KNOW YOUR BAND SAW See Figure 2, page 17. Blade Guide ADJUSTMENT Knob with tilt control for bevel cutting. Miter Gauge This gauge aligns the wood for safer.... RapidSet™ Blade Tension Lever Controls blade tension when changing blades and making adjustments. Saw Blade Saw comes with all operating features and safety rules. Saw Table with Throat Plate Your band saw has a saw table in the OFF position, remove the yellow switch key. To lock in place....
... 59-1/4 - 59-1/2 in a location inaccessible to children and others not qualified to keep the blade from twisting during operation. KNOW YOUR BAND SAW See Figure 2, page 17. Blade Guide ADJUSTMENT Knob with tilt control for bevel cutting. Miter Gauge This gauge aligns the wood for safer.... RapidSet™ Blade Tension Lever Controls blade tension when changing blades and making adjustments. Saw Blade Saw comes with all operating features and safety rules. Saw Table with Throat Plate Your band saw has a saw table in the OFF position, remove the yellow switch key. To lock in place....
BS903_979_trillingual.pdf
Page 9
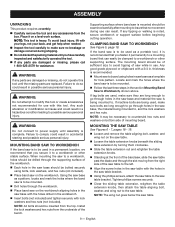
... , make sure they are damaged or missing, please call 1-800-525-2579 for assistance. Failure to comply could result in the section Mounting Band Saw to be mounted. Follow the last three steps in accidental starting and possible serious personal injury. Tighten phillips screws securely. ... If any parts are long enough to be clamped to board using bolts, lock washers, and hex nuts (not included). Place band saw table with this tool or create accessories not recommended for hole pattern. If machine bolts are being mounted to avoid tipping of the bench. ...
... , make sure they are damaged or missing, please call 1-800-525-2579 for assistance. Failure to comply could result in the section Mounting Band Saw to be mounted. Follow the last three steps in accidental starting and possible serious personal injury. Tighten phillips screws securely. ... If any parts are long enough to be clamped to board using bolts, lock washers, and hex nuts (not included). Place band saw table with this tool or create accessories not recommended for hole pattern. If machine bolts are being mounted to avoid tipping of the bench. ...
BS903_979_trillingual.pdf
Page 10
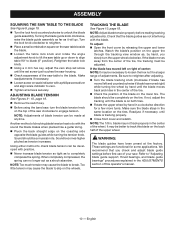
...this blade on the lower tire. ADJUSTING BLADE TENSION See Figures 9 - 10, page 19. Remove the switch key. Before using the band saw . Sound becomes higher pitched as a shock absorber. Note: Too much tension may cause the blade to zero. Tighten all screws securely. Check that...interfering with the sound the blade makes when plucked like a guitar string. Pluck the back straight edge on the tires. ASSEMBLY SQUARing the saw table up or down to align table 90° to blade (0° position). Turn the lock knob clockwise to retighten. Place a ...
...this blade on the lower tire. ADJUSTING BLADE TENSION See Figures 9 - 10, page 19. Remove the switch key. Before using the band saw . Sound becomes higher pitched as a shock absorber. Note: Too much tension may cause the blade to zero. Tighten all screws securely. Check that...interfering with the sound the blade makes when plucked like a guitar string. Pluck the back straight edge on the tires. ASSEMBLY SQUARing the saw table up or down to align table 90° to blade (0° position). Turn the lock knob clockwise to retighten. Place a ...
BS903_979_trillingual.pdf
Page 11
...additional support for straight line cutting, the user can install a fence using an appropriately sized piece of wood clamped to inflict serious injury. This band saw horses, blocks, etc.) when cutting large, small or awkward workpieces. Never use a person as a substitute for a table extension or...or safety glasses with an extension cord unless the plug can result in wood and wood composition products BASIC OPERATION OF THE BAND SAW A band saw housing. Insert wing screw and tighten securely. APPLICATIONS You may use with side shields when operating power tools. ...
...additional support for straight line cutting, the user can install a fence using an appropriately sized piece of wood clamped to inflict serious injury. This band saw horses, blocks, etc.) when cutting large, small or awkward workpieces. Never use a person as a substitute for a table extension or...or safety glasses with an extension cord unless the plug can result in wood and wood composition products BASIC OPERATION OF THE BAND SAW A band saw housing. Insert wing screw and tighten securely. APPLICATIONS You may use with side shields when operating power tools. ...
BS903_979_trillingual.pdf
Page 13
...; Loosen the two phillips screws that hold the blade guard in the slot provided on the teeth of the band saw and facing downward, place the blade through the lower blade guides and around both upper and lower blade guides ...table extension knobs beneath the sliding table extension. Slide the table extension to the right or left of the saw . warning: To avoid personal injury, maintain proper adjustment of the blade guide assembly. Carefully wipe in the wrong direction... WARNING: Before performing any adjustment, make sure the tool is reached on the band saw housing.
...; Loosen the two phillips screws that hold the blade guard in the slot provided on the teeth of the band saw and facing downward, place the blade through the lower blade guides and around both upper and lower blade guides ...table extension knobs beneath the sliding table extension. Slide the table extension to the right or left of the saw . warning: To avoid personal injury, maintain proper adjustment of the blade guide assembly. Carefully wipe in the wrong direction... WARNING: Before performing any adjustment, make sure the tool is reached on the band saw housing.
BS903_979_trillingual.pdf
Page 14
...Slide the blade guide bearings to making adjustments. Do not pinch the blade. Repeat this procedure on the lower blade guide bearings located below the saw table. English ADJUSTMENTS ADJUSTING BLADE GUIDE SUPPORT, THRUST BEARINGS, AND BLADE GUIDE BEARINGS See Figures 20 - 22, page 22. It is important...using the 2.5 mm hex key. Slide the upper blade guide support on the right side of the blade guide assembly using the band saw without the blade guard secured in the blade guide bearing) until the front edge of the bearings can be adjusted equally. Remove ...
...Slide the blade guide bearings to making adjustments. Do not pinch the blade. Repeat this procedure on the lower blade guide bearings located below the saw table. English ADJUSTMENTS ADJUSTING BLADE GUIDE SUPPORT, THRUST BEARINGS, AND BLADE GUIDE BEARINGS See Figures 20 - 22, page 22. It is important...using the 2.5 mm hex key. Slide the upper blade guide support on the right side of the blade guide assembly using the band saw without the blade guard secured in the blade guide bearing) until the front edge of the bearings can be adjusted equally. Remove ...
BS903_979_trillingual.pdf
Page 15
... accidental starting that could cause possible serious personal injury, turn off . Place the new brush in serious personal injury. Keep your band saw clean. Remove sawdust from various types of the unit under normal operating conditions. Therefore, no further lubrication is dusty, also wear a dust... place the drive belt over the motor pulley. Replace the nut and washer on the pulley. Use of the band saw. Remove the saw blade and set it will need to be replaced. Blade guide bearings may need to be adjusted or replaced. ...
... accidental starting that could cause possible serious personal injury, turn off . Place the new brush in serious personal injury. Keep your band saw clean. Remove sawdust from various types of the unit under normal operating conditions. Therefore, no further lubrication is dusty, also wear a dust... place the drive belt over the motor pulley. Replace the nut and washer on the pulley. Use of the band saw. Remove the saw blade and set it will need to be replaced. Blade guide bearings may need to be adjusted or replaced. ...
BS903_979_trillingual.pdf
Page 16
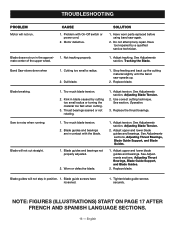
... in position. 1. See Adjustments sections, Adjusting Thrust Bearings, Blade Guide Support, and Blade Guides. 2. Not tracking properly. Band Saw slows down when 1. Kink in blade caused by a qualified service technician. Adjust tension. Use correct cutting technique. Replace the... thrust bearings. Blade guides and bearings not properly adjusted. 2. Have worn parts replaced before using band saw speeds up the cutting material slightly until the band saw again. 2. Dull blade. 1. Blade guides and bearings are in contact with On-Off switch ...
... in position. 1. See Adjustments sections, Adjusting Thrust Bearings, Blade Guide Support, and Blade Guides. 2. Not tracking properly. Band Saw slows down when 1. Kink in blade caused by a qualified service technician. Adjust tension. Use correct cutting technique. Replace the... thrust bearings. Blade guides and bearings not properly adjusted. 2. Have worn parts replaced before using band saw speeds up the cutting material slightly until the band saw again. 2. Dull blade. 1. Blade guides and bearings are in contact with On-Off switch ...

Repair Sheet
Page 1
BAND SAW MODEL NO. BS903 REPAIR SHEET RYOBI 9 in.
BAND SAW MODEL NO. BS903 REPAIR SHEET RYOBI 9 in.
Repair Sheet
Page 2
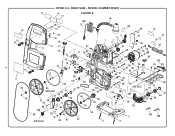
BAND SAW - RYOBI 9 in. MODEL NUMBER BS903 75 76 74 FIGURE A 98 100 55 54 70 99 49 73 2 82 81 82 81 71 85 24 84 83 18 51 17 77 16 12 15 97 11 53 52 14 13 10 41 9 43 42 23 101 86 85 SEE FIG B 31 29 28 27 22 25 26 77 80 103 50 40 23 24 64 63 32 36 30 88 85 55 54 89 23 86 SEE FIG B 85 87 22 5 6 1 7 8 21 19 48 20 68 47 69 48 17 78 35 60 93 62 61 90 91 40 37 45 46 34 35 17 95 33 72 79 44 102 94 39 65 56 92 57 4 SEE FIG C 40 104 107 67 38 58 31 29 28 96 59 66 32 30 2 3 4 105 106
BAND SAW - RYOBI 9 in. MODEL NUMBER BS903 75 76 74 FIGURE A 98 100 55 54 70 99 49 73 2 82 81 82 81 71 85 24 84 83 18 51 17 77 16 12 15 97 11 53 52 14 13 10 41 9 43 42 23 101 86 85 SEE FIG B 31 29 28 27 22 25 26 77 80 103 50 40 23 24 64 63 32 36 30 88 85 55 54 89 23 86 SEE FIG B 85 87 22 5 6 1 7 8 21 19 48 20 68 47 69 48 17 78 35 60 93 62 61 90 91 40 37 45 46 34 35 17 95 33 72 79 44 102 94 39 65 56 92 57 4 SEE FIG C 40 104 107 67 38 58 31 29 28 96 59 66 32 30 2 3 4 105 106
Repair Sheet
Page 3
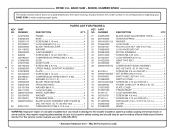
...* Screw (M8 X 25 mm 2 35 021204001 * Lock washer (5/16 in . May Be Purchased Locally MODEL NUMBER BS903 The model number will be performed by a Ryobi Authorized Service Center. Always mention the model number in . key nos. 40, 67 and 104 1 39 816755-4 Screw ...(m5 x 9 mm pan hd 1 40 080007005060 * set Screw (M5 X 6 mm 8 41 984406001 Switch (inc. X 6T X 59-1/4 in 1 51 303655000 Cover 1 52 270680000 Hinge 2 WARNING: Improper repair of your BAND SAW...
...* Screw (M8 X 25 mm 2 35 021204001 * Lock washer (5/16 in . May Be Purchased Locally MODEL NUMBER BS903 The model number will be performed by a Ryobi Authorized Service Center. Always mention the model number in . key nos. 40, 67 and 104 1 39 816755-4 Screw ...(m5 x 9 mm pan hd 1 40 080007005060 * set Screw (M5 X 6 mm 8 41 984406001 Switch (inc. X 6T X 59-1/4 in 1 51 303655000 Cover 1 52 270680000 Hinge 2 WARNING: Improper repair of your BAND SAW...
Repair Sheet
Page 4
... SCALE LABEL 1 863209005 Lock Label 1 983000979 OPERATOR'S MANUAL 870037000 Depth Scale 1 9-25-08 303656000 latch (Door Lock Knob 2 (rev:02) 4 WARNING: Improper repair of your BAND SAW or when ordering repair parts. For the service center nearest you call 1-800-525-2579. * Standard Hardware Item - KEY NO. 53 54 55 56 57... the double insulation system possibly causing electrical shock or electrocution. May Be Purchased Locally Always mention the model number in damage to the motor housing. RYOBI 9 in. MODEL NUMBER BS903 The model number will be performed by...
... SCALE LABEL 1 863209005 Lock Label 1 983000979 OPERATOR'S MANUAL 870037000 Depth Scale 1 9-25-08 303656000 latch (Door Lock Knob 2 (rev:02) 4 WARNING: Improper repair of your BAND SAW or when ordering repair parts. For the service center nearest you call 1-800-525-2579. * Standard Hardware Item - KEY NO. 53 54 55 56 57... the double insulation system possibly causing electrical shock or electrocution. May Be Purchased Locally Always mention the model number in damage to the motor housing. RYOBI 9 in. MODEL NUMBER BS903 The model number will be performed by...
Repair Sheet
Page 5
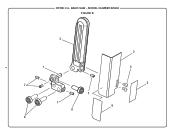
BAND SAW - MODEL NUMBER BS903 FIGURE B 5 2 1 7 7 7 8 8 3 4 5 6 RYOBI 9 in.
BAND SAW - MODEL NUMBER BS903 FIGURE B 5 2 1 7 7 7 8 8 3 4 5 6 RYOBI 9 in.
Repair Sheet
Page 6
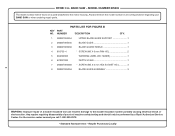
... SCALE 1 7 080007005060 * SCREW (M5 X 6 mm HEX SOCKET HD 4 8 080007005056 blade guide assemBLY 3 6 WARNING: Improper repair of your BAND SAW or when ordering repair parts. For the service center nearest you call 1-800-525-2579. * Standard Hardware Item - KEY PART NO. May Be Purchased... BS903 The model number will be performed by a Ryobi Authorized Service Center. RYOBI 9 in all correspondence regarding your tool requires safety testing and should only be found on a plate attached to the double insulation system possibly causing electrical shock or electrocution. BAND SAW ...
... SCALE 1 7 080007005060 * SCREW (M5 X 6 mm HEX SOCKET HD 4 8 080007005056 blade guide assemBLY 3 6 WARNING: Improper repair of your BAND SAW or when ordering repair parts. For the service center nearest you call 1-800-525-2579. * Standard Hardware Item - KEY PART NO. May Be Purchased... BS903 The model number will be performed by a Ryobi Authorized Service Center. RYOBI 9 in all correspondence regarding your tool requires safety testing and should only be found on a plate attached to the double insulation system possibly causing electrical shock or electrocution. BAND SAW ...

Repair Sheet
Page 7
BAND SAW - MODEL NUMBER BS903 FIGURE C 2 7 3 4 1 5 6 13 7 12 11 5 13 12 6 11 8 9 10 RYOBI 9 in.
BAND SAW - MODEL NUMBER BS903 FIGURE C 2 7 3 4 1 5 6 13 7 12 11 5 13 12 6 11 8 9 10 RYOBI 9 in.
Repair Sheet
Page 8
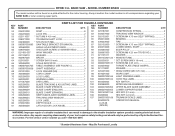
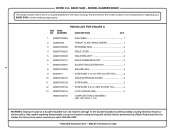
...BAND SAW or when ordering repair parts. RYOBI 9 in damage to the motor housing. For the service center nearest you call 1-800-525-2579. * Standard Hardware Item - MODEL NUMBER BS903 The model number will be performed by a Ryobi... a double insulated tool can result in . May Be Purchased Locally NUMBER PARTS LIST FOR FIGURE C DESCRIPTION QTY. 1 080007005093 saw TABLE 1 2 303659000 throat plate (TABLE INSERT 1 3 080007005098 retaining RING 2 4 080007005095 TABLE LEVER 2 5 080007005099 table ... LOCK WASHER (M5 4 080007005705 COMPLETE TABLE ASSEMBLY (INC. BAND SAW -
...BAND SAW or when ordering repair parts. RYOBI 9 in damage to the motor housing. For the service center nearest you call 1-800-525-2579. * Standard Hardware Item - MODEL NUMBER BS903 The model number will be performed by a Ryobi... a double insulated tool can result in . May Be Purchased Locally NUMBER PARTS LIST FOR FIGURE C DESCRIPTION QTY. 1 080007005093 saw TABLE 1 2 303659000 throat plate (TABLE INSERT 1 3 080007005098 retaining RING 2 4 080007005095 TABLE LEVER 2 5 080007005099 table ... LOCK WASHER (M5 4 080007005705 COMPLETE TABLE ASSEMBLY (INC. BAND SAW -


