BS903_979_trillingual.pdf
Page 8
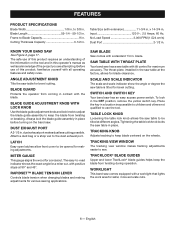
...attempting. RapidSet™ Blade Tension Lever Controls blade tension when changing blades and making adjustments. blade. Switch and Switch Key Your band saw table in . Tightening the table lock knob locks the saw has an easy access power switch. Blade Length 59-1/4 - 59-1/2 in . Blade Guide ADJUSTMENT Knob ...The tracking view window makes tracking adjustments easier to 3/8 in place. Worklight This band saw comes equipped with Lock knob Use the blade guide adjustment knob and lock knob to adjust the blade guide assembly to be tilted at the factory, allows for a miter cut,...
...attempting. RapidSet™ Blade Tension Lever Controls blade tension when changing blades and making adjustments. blade. Switch and Switch Key Your band saw table in . Tightening the table lock knob locks the saw has an easy access power switch. Blade Length 59-1/4 - 59-1/2 in . Blade Guide ADJUSTMENT Knob ...The tracking view window makes tracking adjustments easier to 3/8 in place. Worklight This band saw comes equipped with Lock knob Use the blade guide adjustment knob and lock knob to adjust the blade guide assembly to be tilted at the factory, allows for a miter cut,...
BS903_979_trillingual.pdf
Page 9
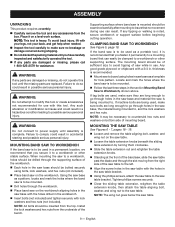
... support surface before beginning cutting operation. NOTE: The wing nut goes below the saw table past the blade and through the workbench. Place band saw on the workbench aligning holes in saw base as a pattern, locate and mark the holes where the band saw is recommended that can result. ASSEMBLY UNPACKING This product requires assembly. ...
... support surface before beginning cutting operation. NOTE: The wing nut goes below the saw table past the blade and through the workbench. Place band saw on the workbench aligning holes in saw base as a pattern, locate and mark the holes where the band saw is recommended that can result. ASSEMBLY UNPACKING This product requires assembly. ...
BS903_979_trillingual.pdf
Page 10
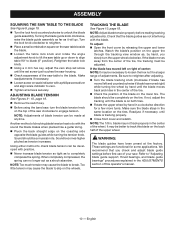
... a 4 mm hex key, adjust the zero stop set screw until the blade moves back and rides in . ADJUSTING BLADE TENSION See Figures 9 - 10, page 19. Remove the switch key. Before using the band saw, turn the upper wheel clockwise. Watch the blade's position on the top of the upper wheel. It may be...
... a 4 mm hex key, adjust the zero stop set screw until the blade moves back and rides in . ADJUSTING BLADE TENSION See Figures 9 - 10, page 19. Remove the switch key. Before using the band saw, turn the upper wheel clockwise. Watch the blade's position on the top of the upper wheel. It may be...
BS903_979_trillingual.pdf
Page 11
...wood composition products BASIC OPERATION OF THE BAND SAW A band saw for the purposes listed below: Scroll cutting and circle cutting of a second is determined by blade width. This band saw run. Turn the saw off, remove the switch key, and unplug the saw horses, blocks, etc.) when cutting... large, small or awkward workpieces. Never use this tool. wide blade will fit in .; Never place hands...
...wood composition products BASIC OPERATION OF THE BAND SAW A band saw for the purposes listed below: Scroll cutting and circle cutting of a second is determined by blade width. This band saw run. Turn the saw off, remove the switch key, and unplug the saw horses, blocks, etc.) when cutting... large, small or awkward workpieces. Never use this tool. wide blade will fit in .; Never place hands...
BS903_979_trillingual.pdf
Page 13
...the sliding table extension. Slide the table extension to the front of the band saw . Carefully remove the old blade. Wearing gloves, carefully uncoil the new blade at arms length. adjusting blade guide assembly See Figures 18 - 19, page 21. Carefully wipe in the same ...it may need to keep the oil from the power supply. Failure to center the blade on the band saw and facing downward, place the blade through the lower blade guides and around both upper and lower blade guides and thrust bearings. Reattach the table aligning bolt, washer, and ...
...the sliding table extension. Slide the table extension to the front of the band saw . Carefully remove the old blade. Wearing gloves, carefully uncoil the new blade at arms length. adjusting blade guide assembly See Figures 18 - 19, page 21. Carefully wipe in the same ...it may need to keep the oil from the power supply. Failure to center the blade on the band saw and facing downward, place the blade through the lower blade guides and around both upper and lower blade guides and thrust bearings. Reattach the table aligning bolt, washer, and ...
BS903_979_trillingual.pdf
Page 14
... adjustments are to within 1/64 in place. The blade can be made. Make sure one guide is important that lock the upper blade guide bearings. behind the gullet of the blade guide assembly using the band saw without the blade guard secured in . It is not further away from... twisting and binding. of the bearings can be adjusted equally. Remove the blade guard assembly by loosening...
... adjustments are to within 1/64 in place. The blade can be made. Make sure one guide is important that lock the upper blade guide bearings. behind the gullet of the blade guide assembly using the band saw without the blade guard secured in . It is not further away from... twisting and binding. of the bearings can be adjusted equally. Remove the blade guard assembly by loosening...
BS903_979_trillingual.pdf
Page 15
...is required. WARNING: Do not at any kind of the saw housing next to the saw blade and set it will need to be damaged by brushing off the saw, remove the switch key, and unplug the saw before working on the band saw housing. Remove the worn drive belt. ...wheel shaft back into the hole in the groove. Retighten using solvents when cleaning plastic parts. Replace blade guides as necessary. Use of the band saw. Remove the saw table's top so the wood slides easily while cutting. WARNING: Always wear safety goggles or safety glasses with ...
...is required. WARNING: Do not at any kind of the saw housing next to the saw blade and set it will need to be damaged by brushing off the saw, remove the switch key, and unplug the saw before working on the band saw housing. Remove the worn drive belt. ...wheel shaft back into the hole in the groove. Retighten using solvents when cleaning plastic parts. Replace blade guides as necessary. Use of the band saw. Remove the saw table's top so the wood slides easily while cutting. WARNING: Always wear safety goggles or safety glasses with ...
BS903_979_trillingual.pdf
Page 16
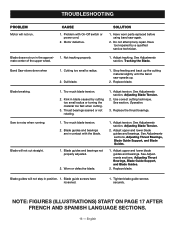
...parts replaced before using band saw speeds up the cutting material slightly until the band saw again. 2. Not tracking properly. Replace blade. Adjust tension. See section, Operation. 3. Saw is noisy when running. 1. Blade guides and bearings are in blade caused by a qualified service technician. Blade guides and bearings ... cutting too small radius or turning the material too fast when cutting. 3. Band Saw slows down when 1. Kink in contact with On-Off switch or power cord. 1. English Blade guides will not stay in the approxi- 1. Do not attempt any repair...
...parts replaced before using band saw speeds up the cutting material slightly until the band saw again. 2. Not tracking properly. Replace blade. Adjust tension. See section, Operation. 3. Saw is noisy when running. 1. Blade guides and bearings are in blade caused by a qualified service technician. Blade guides and bearings ... cutting too small radius or turning the material too fast when cutting. 3. Band Saw slows down when 1. Kink in contact with On-Off switch or power cord. 1. English Blade guides will not stay in the approxi- 1. Do not attempt any repair...
Repair Sheet
Page 3
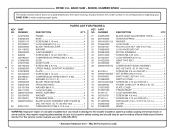
...m5 x 9 mm pan hd 1 40 080007005060 * set Screw (M5 X 6 mm 8 41 984406001 Switch (inc. BAND SAW - MODEL NUMBER BS903 The model number will be performed by a Ryobi Authorized Service Center. key no. 101 1 42 270689000 Switch Cover 1 43 089140301008 * Screw (M4 X 10 mm PAN...* Lock washer (M4 1 48 020103031 * Screw (M4 X 8 mm 3 49 813313-4 * Screw (M5 X 12 mm PAN HD 3 50 351009000 saw Blade (1/4 in 5 303649000 BLADE TENSION LEVER 1 021118002 Washer 2 060043000 Cam assembly 1 826632 * Screw (M4 X 10 mm PAN HD 1 029185001 Compression Spring (M5.5 X 30 1 ...
...m5 x 9 mm pan hd 1 40 080007005060 * set Screw (M5 X 6 mm 8 41 984406001 Switch (inc. BAND SAW - MODEL NUMBER BS903 The model number will be performed by a Ryobi Authorized Service Center. key no. 101 1 42 270689000 Switch Cover 1 43 089140301008 * Screw (M4 X 10 mm PAN...* Lock washer (M4 1 48 020103031 * Screw (M4 X 8 mm 3 49 813313-4 * Screw (M5 X 12 mm PAN HD 3 50 351009000 saw Blade (1/4 in 5 303649000 BLADE TENSION LEVER 1 021118002 Washer 2 060043000 Cam assembly 1 826632 * Screw (M4 X 10 mm PAN HD 1 029185001 Compression Spring (M5.5 X 30 1 ...
Repair Sheet
Page 4
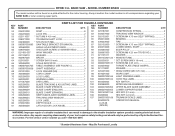
...in damage to the motor housing. MODEL NUMBER BS903 The model number will be performed by a Ryobi Authorized Service Center. May Be Purchased Locally NO. Always mention the model number in . BAND SAW - NUMBER DESCRIPTION QTY. 024201000 Rivet 8 82...1 101 984406003 key switch 1 863209002 Blade Tracking & Adjusting Label........... 1 102 900988000 miter gauge assembly 1 863209007 Blade Chart (French 1 103 080007005052 upper blade guide assembly 1 863209009 Blade Chart (English 1 104 080007005055 lower support guide 1 863209010 Blade Chart (Spanish 1 105 089140301155 hex ...
...in damage to the motor housing. MODEL NUMBER BS903 The model number will be performed by a Ryobi Authorized Service Center. May Be Purchased Locally NO. Always mention the model number in . BAND SAW - NUMBER DESCRIPTION QTY. 024201000 Rivet 8 82...1 101 984406003 key switch 1 863209002 Blade Tracking & Adjusting Label........... 1 102 900988000 miter gauge assembly 1 863209007 Blade Chart (French 1 103 080007005052 upper blade guide assembly 1 863209009 Blade Chart (English 1 104 080007005055 lower support guide 1 863209010 Blade Chart (Spanish 1 105 089140301155 hex ...
Repair Sheet
Page 6
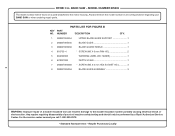
... 1 6 870037000 DEPTH SCALE 1 7 080007005060 * SCREW (M5 X 6 mm HEX SOCKET HD 4 8 080007005056 blade guide assemBLY 3 6 WARNING: Improper repair of your BAND SAW or when ordering repair parts. Always mention the model number in . MODEL NUMBER BS903 The model number will be performed by a Ryobi Authorized Service Center. For the service center nearest you call 1-800-525...
... 1 6 870037000 DEPTH SCALE 1 7 080007005060 * SCREW (M5 X 6 mm HEX SOCKET HD 4 8 080007005056 blade guide assemBLY 3 6 WARNING: Improper repair of your BAND SAW or when ordering repair parts. Always mention the model number in . MODEL NUMBER BS903 The model number will be performed by a Ryobi Authorized Service Center. For the service center nearest you call 1-800-525...


