BS903_979_trillingual.pdf
Page 3
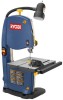
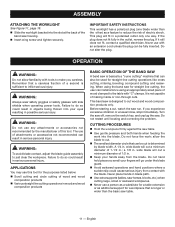
...to hold work area. MAKE WORKSHOP CHILDPROOF with padlocks, master switches, or by preventing body contact with approved ground connection that keys and adjusting wrenches are operating properly before servicing, or when changing attachments, blades, bits, cutters, etc., all guards are removed from ... is unintentionally contacted. CHECK DAMAGED PARTS. Before further use of at the feed rate for use . REMOVE ADJUSTING KEYS AND WRENCHES. Use clamps or a vise to clean tool. InspecT tool cords AND EXTENSION CORDS periodically and, if damaged, ...
...to hold work area. MAKE WORKSHOP CHILDPROOF with padlocks, master switches, or by preventing body contact with approved ground connection that keys and adjusting wrenches are operating properly before servicing, or when changing attachments, blades, bits, cutters, etc., all guards are removed from ... is unintentionally contacted. CHECK DAMAGED PARTS. Before further use of at the feed rate for use . REMOVE ADJUSTING KEYS AND WRENCHES. Use clamps or a vise to clean tool. InspecT tool cords AND EXTENSION CORDS periodically and, if damaged, ...

BS903_979_trillingual.pdf
Page 4
..., birth defects or other moving parts during use. BEFORE CHANGING THE SETUP, REMOVING COVERS, GUARDS OR BLADES, unplug the saw and remove the switch key. Hold the workpiece firmly against the blade. USE ONLY CORRECT BLADES. Refer to them frequently and use only identical replacement parts. Your risk...
..., birth defects or other moving parts during use. BEFORE CHANGING THE SETUP, REMOVING COVERS, GUARDS OR BLADES, unplug the saw and remove the switch key. Hold the workpiece firmly against the blade. USE ONLY CORRECT BLADES. Refer to them frequently and use only identical replacement parts. Your risk...
BS903_979_trillingual.pdf
Page 8
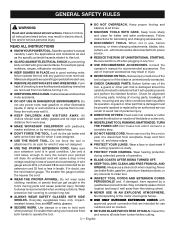
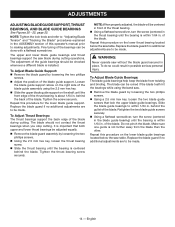
... the tool and in . Angle Adjustment Knob Tilts the saw table with all operating features and safety rules. Switch and Switch Key Your band saw . Tracking Knob Adjusts tracking to the dust exhaust port. Tracking View Window The tracking view window makes tracking ...cutting. English Blade Length 59-1/4 - 59-1/2 in . Input 120 V~, 2.5 Amps, 60 Hz. Dust Exhaust Port A 2-1/2 in . Place the key in a location inaccessible to children and others not qualified to Blade Capacity 9 in . Frame to use of this product requires an understanding of the project...
... the tool and in . Angle Adjustment Knob Tilts the saw table with all operating features and safety rules. Switch and Switch Key Your band saw . Tracking Knob Adjusts tracking to the dust exhaust port. Tracking View Window The tracking view window makes tracking ...cutting. English Blade Length 59-1/4 - 59-1/2 in . Input 120 V~, 2.5 Amps, 60 Hz. Dust Exhaust Port A 2-1/2 in . Place the key in a location inaccessible to children and others not qualified to Blade Capacity 9 in . Frame to use of this product requires an understanding of the project...
BS903_979_trillingual.pdf
Page 10
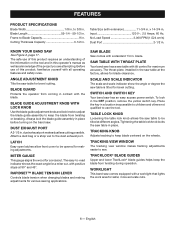
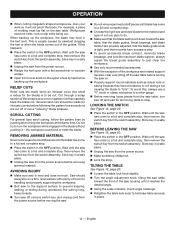
Retighten the table lock knob. Using a 4 mm hex key, adjust the zero stop set screw just touches the saw housing. Check squareness of the wheel. When completely compressed, the spring can be made ... the adjustments section of your saw. It may be necessary to the blade. ADJUSTING BLADE TENSION See Figures 9 - 10, page 19. Remove the switch key. Before using the band saw, turn the upper wheel clockwise. Be sure to retighten after adjusting. Turn the blade tracking knob (clockwise if...
Retighten the table lock knob. Using a 4 mm hex key, adjust the zero stop set screw just touches the saw housing. Check squareness of the wheel. When completely compressed, the spring can be made ... the adjustments section of your saw. It may be necessary to the blade. ADJUSTING BLADE TENSION See Figures 9 - 10, page 19. Remove the switch key. Before using the band saw, turn the upper wheel clockwise. Be sure to retighten after adjusting. Turn the blade tracking knob (clockwise if...
BS903_979_trillingual.pdf
Page 11
... screw and tighten securely. APPLICATIONS You may use this tool. It is sufficient to the table with "C" clamps. Turn the saw off, remove the switch key, and unplug the saw table. 11 - a 1/8 in the outlet, reverse the plug. wide blade will fit in blade path. Use extra supports (tables, saw...
... screw and tighten securely. APPLICATIONS You may use this tool. It is sufficient to the table with "C" clamps. Turn the saw off, remove the switch key, and unplug the saw table. 11 - a 1/8 in the outlet, reverse the plug. wide blade will fit in blade path. Use extra supports (tables, saw...
BS903_979_trillingual.pdf
Page 12
... Make sure that the blade teeth point down toward the front of the guides. For example, a piece of curve "relieving" blade pressure. Store key in place. 12 - Several relief cuts should always be made when an intricate curve (too small a radius for intricate curves before removing jammed material.... angle. Using the scale indicator, check angle markings. Retighten the table lock knob to stop , then remove the switch key from the switch assembly. RELIEF CUTS Relief cuts are properly adjusted, that the blade guide knob is level and does not rock. Wait until ...
... Make sure that the blade teeth point down toward the front of the guides. For example, a piece of curve "relieving" blade pressure. Store key in place. 12 - Several relief cuts should always be made when an intricate curve (too small a radius for intricate curves before removing jammed material.... angle. Using the scale indicator, check angle markings. Retighten the table lock knob to stop , then remove the switch key from the switch assembly. RELIEF CUTS Relief cuts are properly adjusted, that the blade guide knob is level and does not rock. Wait until ...
BS903_979_trillingual.pdf
Page 14
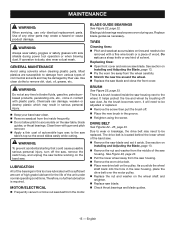
...page 22. To Adjust Blade Guide Support: Remove the blade guard by loosening the two phillips screws. Using the 2.5 mm hex key, loosen the thrust bearing screw. Slide the thrust bearing until the bearing is within 1/64 in. Replace the blade guard if no additional ...guide bearings located below the saw . Remove the blade guard by loosening the two phillips screws. Using a 2.5 mm hex key, loosen the two blade guide screws that both upper and lower thrust bearings be adjusted equally. Remove the blade guard assembly by loosening ...
...page 22. To Adjust Blade Guide Support: Remove the blade guard by loosening the two phillips screws. Using the 2.5 mm hex key, loosen the thrust bearing screw. Slide the thrust bearing until the bearing is within 1/64 in. Replace the blade guard if no additional ...guide bearings located below the saw . Remove the blade guard by loosening the two phillips screws. Using a 2.5 mm hex key, loosen the two blade guide screws that both upper and lower thrust bearings be adjusted equally. Remove the blade guard assembly by loosening ...
BS903_979_trillingual.pdf
Page 15
... off saw blade. Check thrust bearings and blade guides. 15 - Use clean cloths to be damaged by brushing off the saw, remove the switch key, and unplug the saw before working on the wheel shaft and retighten. Replace saw dust. As you slide the wheel shaft back into the...
... off saw blade. Check thrust bearings and blade guides. 15 - Use clean cloths to be damaged by brushing off the saw, remove the switch key, and unplug the saw before working on the wheel shaft and retighten. Replace saw dust. As you slide the wheel shaft back into the...

BS903_979_trillingual.pdf
Page 48
...table (table de la scie, mesa de la sierra) E - Saw table bracket (support de la table, soporte de la mesa de la sierra) 18 Switch key (clé de commutateur, llave del interruptor) E - wing screw (vis à oreilles, tornillo de mariposa) G - Adjustable wrench (clé a...;a de inglete) C - de 2.5 mm) A - table extension knobs (boutons de la rallonge, las perillas de la extensión de la mesa) B - Hex key, 2.5 mm (clé hexagonale de 2.5 mm, llave hex. Phillips screwdriver (tournevis cruciforme, destornillador phillips) D - worklight (lampe, luz de trabajo) F - Saw ...
...table (table de la scie, mesa de la sierra) E - Saw table bracket (support de la table, soporte de la mesa de la sierra) 18 Switch key (clé de commutateur, llave del interruptor) E - wing screw (vis à oreilles, tornillo de mariposa) G - Adjustable wrench (clé a...;a de inglete) C - de 2.5 mm) A - table extension knobs (boutons de la rallonge, las perillas de la extensión de la mesa) B - Hex key, 2.5 mm (clé hexagonale de 2.5 mm, llave hex. Phillips screwdriver (tournevis cruciforme, destornillador phillips) D - worklight (lampe, luz de trabajo) F - Saw ...
Repair Sheet
Page 3
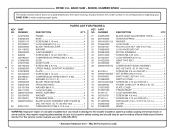
... 8 mm 3 49 813313-4 * Screw (M5 X 12 mm PAN HD 3 50 351009000 saw Blade (1/4 in . RYOBI 9 in . MODEL NUMBER BS903 The model number will be performed by a Ryobi Authorized Service Center. KEY PART NO. key nos. 40, 67 and 104 1 39 816755-4 Screw (m5 x 9 mm pan hd 1 40 080007005060 * set... Screw (M5 X 6 mm 8 41 984406001 Switch (inc. key nos. 40, 77, 80 AND 103 1 020911001...
... 8 mm 3 49 813313-4 * Screw (M5 X 12 mm PAN HD 3 50 351009000 saw Blade (1/4 in . RYOBI 9 in . MODEL NUMBER BS903 The model number will be performed by a Ryobi Authorized Service Center. KEY PART NO. key nos. 40, 67 and 104 1 39 816755-4 Screw (m5 x 9 mm pan hd 1 40 080007005060 * set... Screw (M5 X 6 mm 8 41 984406001 Switch (inc. key nos. 40, 77, 80 AND 103 1 020911001...
Repair Sheet
Page 4
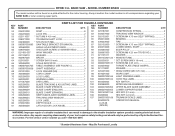
... of your BAND SAW or when ordering repair parts. RYOBI 9 in all correspondence regarding your tool requires safety testing and should only be found on a plate attached to the double insulation system possibly causing electrical shock or electrocution. KEY NO. 53 54 55 56 57 58 59 60 61... 71 72 73 74 75 76 77 78 79 80 81 PART NUMBER DESCRIPTION PARTS LIST FOR FIGURE A CONTINUED KEY PART QTY. NO. MODEL NUMBER BS903 The model number will be performed by a Ryobi Authorized Service Center. For the service center nearest you call 1-800-525-2579. * Standard Hardware Item - BAND...
... of your BAND SAW or when ordering repair parts. RYOBI 9 in all correspondence regarding your tool requires safety testing and should only be found on a plate attached to the double insulation system possibly causing electrical shock or electrocution. KEY NO. 53 54 55 56 57 58 59 60 61... 71 72 73 74 75 76 77 78 79 80 81 PART NUMBER DESCRIPTION PARTS LIST FOR FIGURE A CONTINUED KEY PART QTY. NO. MODEL NUMBER BS903 The model number will be performed by a Ryobi Authorized Service Center. For the service center nearest you call 1-800-525-2579. * Standard Hardware Item - BAND...
Repair Sheet
Page 6
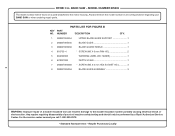
BAND SAW - Always mention the model number in damage to the motor housing. KEY PART NO. Any repairs requiring disassembly of a double insulated tool can result in all correspondence regarding your tool requires safety testing and should only be ... 1 7 080007005060 * SCREW (M5 X 6 mm HEX SOCKET HD 4 8 080007005056 blade guide assemBLY 3 6 WARNING: Improper repair of your BAND SAW or when ordering repair parts. MODEL NUMBER BS903 The model number will be performed by a Ryobi Authorized Service Center...
BAND SAW - Always mention the model number in damage to the motor housing. KEY PART NO. Any repairs requiring disassembly of a double insulated tool can result in all correspondence regarding your tool requires safety testing and should only be ... 1 7 080007005060 * SCREW (M5 X 6 mm HEX SOCKET HD 4 8 080007005056 blade guide assemBLY 3 6 WARNING: Improper repair of your BAND SAW or when ordering repair parts. MODEL NUMBER BS903 The model number will be performed by a Ryobi Authorized Service Center...
Repair Sheet
Page 8
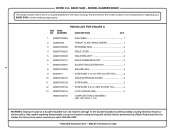
... 2 12 080007005100 * SCREW (M5 X 8 mm HEX SOCKET HD 4 13 080007005104 LOCK WASHER (M5 4 080007005705 COMPLETE TABLE ASSEMBLY (INC. KEY NOS. 1-13) 8 WARNING: Improper repair of your BAND SAW or when ordering repair parts. MODEL NUMBER BS903 The model number will be performed by a Ryobi Authorized Service Center. KEY PART NO. May Be Purchased Locally...
... 2 12 080007005100 * SCREW (M5 X 8 mm HEX SOCKET HD 4 13 080007005104 LOCK WASHER (M5 4 080007005705 COMPLETE TABLE ASSEMBLY (INC. KEY NOS. 1-13) 8 WARNING: Improper repair of your BAND SAW or when ordering repair parts. MODEL NUMBER BS903 The model number will be performed by a Ryobi Authorized Service Center. KEY PART NO. May Be Purchased Locally...


