Ryobi P516 Support and Manuals
Get Help and Manuals for this Ryobi item

Popular Ryobi P516 Manual Pages
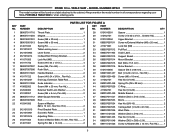
User Manual 4 - Page 1

TABLE SAW MODEL NUMBER RTS21
REPAIR SHEET RYOBI 10 in.
User Manual 4 - Page 3
... Screw 2
34 089037011903 Scale Label 1
8 0121010214 Outfeed Rod Primary Bracket 2
35 089037007013 Support Board 1
9 411071003
Lock Nut (M5 2
36 089037007014 Mount Bracket 1
10 410171706
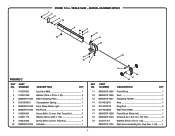
Screw... TABLE SAW - KEY PART
NO. MODEL NUMBER RTS21
The model number will be found on a label attached to the cabinet. NUMBER
DESCRIPTION
PARTS LIST FOR FIGURE A
KEY PART
QTY
NO. RYOBI 10 ...
User Manual 4 - Page 4

... Table 1 Saw Table 1 Outfeed Support Bracket 2 Rip Fence Assembly (See Figure C 1 Front Blade Guard Warning Label (Left 1 Front Blade Guard Warning Label (Right)......... 1 No Hands Warning Label 2 Guard Warning Label (Left 1 Guard Warning Label (Right 1 Warning Label (Upper Barrier 1
Dado Throat Plate (Optional 1 Operator's Manual (089037011908)
4 Always mention the model number in...
User Manual 4 - Page 6

...model number in all correspondence regarding your 10 in . PORTABLE TABLE SAW or when ordering parts. PARTS LIST FOR FIGURE B
KEY PART...16-18 x 1-1/2 in 1 Knob Ring 1 Blade Wrench 1 Blade Wrench 1 Wing Nut 1 Cabinet Assembly (Inc ...1 Handwheel Knob Screw 1
6 TABLE SAW - MODEL NUMBER RTS21
The model number will be found on a label attached to the cabinet.
RYOBI 10 in. x D16 x 1t 1...
User Manual 4 - Page 7
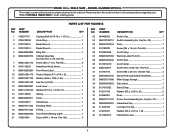
Key Nos. 1-18)........ 1
7 NUMBER
DESCRIPTION
QTY
KEY PART
NO. RYOBI 10 in. NUMBER
DESCRIPTION
QTY
1 411071001
Lock Nut (M6 1
11 089037011035 Front Block 1
2 412011030
...
19 412011712
Washer (D1/4 x D13 x 1.5t 1
10 089037011034 Indicator 1 089037011704 Rip Fence Assembly (Inc. MODEL NUMBER RTS21
1 2 3
4 19
6 7 2 9
16
10
11
12 17
18 5
8
FIGURE C
13
14 15
KEY...
User Manual 5 - Page 3

MODEL NUMBER RTS21G
The model number will be found on a label attached to the cabinet. PORTABLE TABLE SAW or when ordering parts. KEY PART
NO.
...0121010903 Lever Screw 2
34 089040003901 Scale Label 1
8 0121010214 Outfeed Rod Primary Bracket 2
35 089037007013 Support Board 1
9 411071003
Lock Nut (M5 2
36 089037007014 Mount Bracket 1
10 410171706
Screw (#10...RYOBI 10 in.
User Manual 5 - Page 4

... Spring 1 Lever Assembly 1 Blade Guard Assembly (Inc. MODEL NUMBER RTS21G
The model number will be found on a label attached to the cabinet. Key Nos. 95-100 1 Anti-Kickback Pawls Assembly 1 Rear Support 1 Rear Rod 2 Extension Table 1 Saw Table 1 Outfeed Support Bracket 2 Rip Fence Assembly (See Figure C 1 Front Blade Guard Warning Label (Left 1 Front Blade Guard Warning Label (Right...
User Manual 5 - Page 6
...-18 x 1-1/2 in 1 Knob Ring 1 Blade Wrench 1 Blade Wrench 1 Wing Nut 1 Cabinet Assembly (Inc...41 42
PART
NUMBER
...model number in all correspondence regarding your 10 in . Key No. 27 1 Handwheel Cap 1 Lock Nut (1/4-20 1 Washer (D6.5 x D13 x 1.5t 1 Handwheel Lever 1
6 MODEL NUMBER RTS21G
The model number will be found on a label attached to the cabinet. TABLE SAW -
RYOBI...
User Manual - Page 4

..., have the proper outlet installed by an authorized service center.
USE ONLY CORRECT BLADES. Make sure blade is 10 in this manual, so your saw blade. Size and shape can pull your hands. Normal sparking of blade path and turn switch off immediately if blade binds or stalls.
USE RIP FENCE.
If repair or replacement of personal injury. When...
User Manual - Page 5

... and guide the work . English SPECIFIC SAFETY RULES
WHEN MAKING NON-THROUGH RIP CUTS, always use a push stick, push block, and/or featherboard so your hands do this tool, loan them frequently
and use to the saw blade. c) Keeping riving knife, anti-kickback pawls, and blade guard in this manual or addendums. Use of the saw blade...
User Manual - Page 10

... saw blade.
Located on the right side of the project you are attempting.
ANTI-KICKBACK PAWLS -
HEIGHT/BEVEL ADJUSTING HANDWHEEL -
OUTFEED SUPPORT -
RIVING KNIFE - English BEVEL SCALE - Bevel angles are available for a cross cut . Failure to use this operator's manual as well as ripping. This lever, placed just under the saw table. A sturdy metal fence guides...
User Manual - Page 30

... possible serious injury.
Remove the rip fence. Set the blade to the correct depth for the cut work . Turn the saw on. Position the workpiece flat on the workpiece. When the cut is installed and working properly to follow these instructions could result in the appropriate position for the workpiece...
User Manual - Page 31

... THE FRONT, BELOW THE TABLE SAW
WARNING:
Make sure the blade guard assembly is installed and working properly to avoid serious personal injury.
Fig. 41
Unlock the bevel locking lever. Adjust the bevel angle to the desired setting. Lock the bevel locking lever. Set the blade to full speed before turning
on...
User Manual - Page 32

... to the rip fence to guide it. MAKING A COMPOUND (BEVEL) MITER CUT
See Figure 43. WARNING:
Make sure the blade guard assembly is made , turn the saw off .
OPERATION
When ripping a long workpiece, place a support the same height as the table surface behind the saw for the workpiece. Set the miter gauge to the...
User Manual - Page 34

... the table saw is covered by the workpiece during most of 1/2 in proper location when reinstalling standard blade. WARNING:
Always use push blocks, push sticks, and/or featherboards when making dado cuts to width of the cut.
All blades and dado sets must not be rated less than the speed of this manual and check...
Ryobi P516 Reviews
We have not received any reviews for Ryobi yet.