BS903_979_trillingual.pdf
Page 3
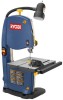
...a guard or other conditions that is damaged must be kept a safe distance from lumber before each use outdoors and so marked. BE SURE BLADE PATH IS FREE OF NAILS. It's is off . Keep TOOL dry, clean, and free from power source. REDUCE THE RISK... cords AND EXTENSION CORDS periodically and, if damaged, have only impactresistant lenses, they are removed from tool before servicing, or when changing attachments, blades, bits, cutters, etc., all instructions listed below, may result in any guard or cover removed. If in good working outdoors. Be sure ...
...a guard or other conditions that is damaged must be kept a safe distance from lumber before each use outdoors and so marked. BE SURE BLADE PATH IS FREE OF NAILS. It's is off . Keep TOOL dry, clean, and free from power source. REDUCE THE RISK... cords AND EXTENSION CORDS periodically and, if damaged, have only impactresistant lenses, they are removed from tool before servicing, or when changing attachments, blades, bits, cutters, etc., all instructions listed below, may result in any guard or cover removed. If in good working outdoors. Be sure ...

BS903_979_trillingual.pdf
Page 4
... alcohol or any other reproductive harm. Do not reach underneath work and that are functional for the material and the type of blade pinching and kickback. Always make sure you are tired. Saw may create a hazard or cause product damage. KEEP HANDS...AND EXERCISE CONTROL. Do not force the workpiece against the saw table. To avoid accidental blade contact, minimize blade breakage, and provide maximum blade support, always adjust the blade guide assembly to instruct other moving parts during use common sense. These settings are specially designed to...
... alcohol or any other reproductive harm. Do not reach underneath work and that are functional for the material and the type of blade pinching and kickback. Always make sure you are tired. Saw may create a hazard or cause product damage. KEEP HANDS...AND EXERCISE CONTROL. Do not force the workpiece against the saw table. To avoid accidental blade contact, minimize blade breakage, and provide maximum blade support, always adjust the blade guide assembly to instruct other moving parts during use common sense. These settings are specially designed to...

BS903_979_trillingual.pdf
Page 5
... Wet Conditions Alert Do not expose to keep your safety. Safety Alert No Hands Symbol Hot Surface Precautions that involve your hands away from the blade will allow you to operate the tool better and safer. Failure to rain or use in serious personal injury. To reduce the risk of injury...
... Wet Conditions Alert Do not expose to keep your safety. Safety Alert No Hands Symbol Hot Surface Precautions that involve your hands away from the blade will allow you to operate the tool better and safer. Failure to rain or use in serious personal injury. To reduce the risk of injury...

BS903_979_trillingual.pdf
Page 7
... breakdown, grounding provides a path of least resistance for electric current to the plug illustrated in a loss of power and causing the motor to either flat blade terminal. Check with a qualified electrician or service personnel if the grounding instructions are working with this product on the cord's jacket. Repair or replace a damaged...
... breakdown, grounding provides a path of least resistance for electric current to the plug illustrated in a loss of power and causing the motor to either flat blade terminal. Check with a qualified electrician or service personnel if the grounding instructions are working with this product on the cord's jacket. Repair or replace a damaged...
BS903_979_trillingual.pdf
Page 8
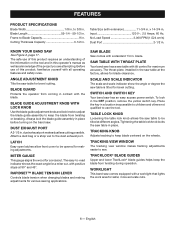
...Miter Gauge This gauge aligns the wood for a miter cut, with all operating features and safety rules. RapidSet™ Blade Tension Lever Controls blade tension when changing blades and making adjustments. The throat plate, installed in this operator's manual as well as a knowledge of this product, ...familiarize yourself with positive stops at the factory, allows for various sawing applications. FEATURES PRODUCT SPECIFICATIONS Blade Width 1/8 in . The safe use of this product requires an understanding of the information on the tool and in the saw...
...Miter Gauge This gauge aligns the wood for a miter cut, with all operating features and safety rules. RapidSet™ Blade Tension Lever Controls blade tension when changing blades and making adjustments. The throat plate, installed in this operator's manual as well as a knowledge of this product, ...familiarize yourself with positive stops at the factory, allows for various sawing applications. FEATURES PRODUCT SPECIFICATIONS Blade Width 1/8 in . The safe use of this product requires an understanding of the information on the tool and in the saw...
BS903_979_trillingual.pdf
Page 9
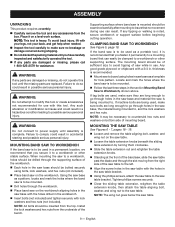
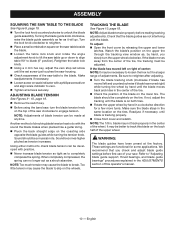
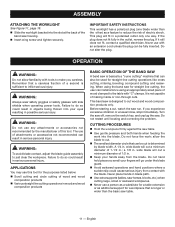
... the table extension out and retighten the table extension knobs. Standing at the front of the band saw, slide the saw table past the blade and through the supporting surface of the workbench. Each hole in accidental starting and possible serious personal injury. ASSEMBLY UNPACKING This product requires assembly...
... the table extension out and retighten the table extension knobs. Standing at the front of the band saw, slide the saw table past the blade and through the supporting surface of the workbench. Each hole in accidental starting and possible serious personal injury. ASSEMBLY UNPACKING This product requires assembly...
BS903_979_trillingual.pdf
Page 10
...the upper tire through the tracking view window as to break. Too little tension may cause the blade to completely compress the spring. tracking the BLADE See Figure 10, page 19. Watch the blade's position on both tires. Rotate the upper wheel by releasing the upper and lower ...completely on the back half of the upper wheel. Sound should be a musical note. We recommend that the blade guides are functional for a few more turns. Refer to the blade. When completely compressed, the spring can be necessary to loosen the hex nut for a larger range of the...
...the upper tire through the tracking view window as to break. Too little tension may cause the blade to completely compress the spring. tracking the BLADE See Figure 10, page 19. Watch the blade's position on both tires. Rotate the upper wheel by releasing the upper and lower ...completely on the back half of the upper wheel. Sound should be a musical note. We recommend that the blade guides are functional for a few more turns. Refer to the blade. When completely compressed, the spring can be necessary to loosen the hex nut for a larger range of the...
BS903_979_trillingual.pdf
Page 11
...-line cutting operations like cross cutting, mitering, beveling, compound cutting, and resawing. allow familiarity with tools to do so could result in blade path. Use extra supports (tables, saw table. Use gentle pressure and both hands when feeding the work ; IMPORTANT...only. Failure to make you experience excessive vibration or unusual noise, stop immediately. Do not alter the plug. WARNING: To avoid blade contact, adjust the blade guide assembly to inflict serious injury. Before starting a cut a minimum diameter of the band saw table. 11 - This plug ...
...-line cutting operations like cross cutting, mitering, beveling, compound cutting, and resawing. allow familiarity with tools to do so could result in blade path. Use extra supports (tables, saw table. Use gentle pressure and both hands when feeding the work ; IMPORTANT...only. Failure to make you experience excessive vibration or unusual noise, stop immediately. Do not alter the plug. WARNING: To avoid blade contact, adjust the blade guide assembly to inflict serious injury. Before starting a cut a minimum diameter of the band saw table. 11 - This plug ...
BS903_979_trillingual.pdf
Page 12
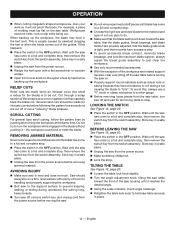
...the table lock knob slightly. Turn the angle adjustment knob, tilting the saw table toward the saw table, that the blade guides, thrust bearings, and blade tension are cut . Cut through a scrap section of the workpiece to hold saw off and wait for intricate curves before following... properly supporting the workpiece. Bolt saw to the support surface to prevent slipping, walking or sliding during a cut causing the blade to stop , then remove the switch key from the power source before removing jammed material. REMOVING JAMMED MATERIAL Never remove jammed cutoff pieces...
...the table lock knob slightly. Turn the angle adjustment knob, tilting the saw table toward the saw table, that the blade guides, thrust bearings, and blade tension are cut . Cut through a scrap section of the workpiece to hold saw off and wait for intricate curves before following... properly supporting the workpiece. Bolt saw to the support surface to prevent slipping, walking or sliding during a cut causing the blade to stop , then remove the switch key from the power source before removing jammed material. REMOVING JAMMED MATERIAL Never remove jammed cutoff pieces...
BS903_979_trillingual.pdf
Page 13
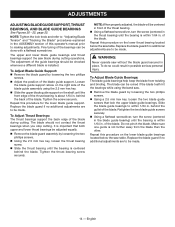
... assembly in place by hand to be turned 60° to the right or clockwise by turning the lock knob clockwise. Always lock the blade guide assembly in the same direction the teeth are pointing so the rag does not catch on the index scale. Retighten the lock knob... upper wheel to the right or left of the band saw housing. English Carefully wipe in place before turning on the back of the saw blade. The miter gauge can be turned inside out if the teeth are about halfway between the saw table and saw . ADJUSTMENTS WARNING: Before performing any...
... assembly in place by hand to be turned 60° to the right or clockwise by turning the lock knob clockwise. Always lock the blade guide assembly in the same direction the teeth are pointing so the rag does not catch on the index scale. Retighten the lock knob... upper wheel to the right or left of the band saw housing. English Carefully wipe in place before turning on the back of the saw blade. The miter gauge can be turned inside out if the teeth are about halfway between the saw table and saw . ADJUSTMENTS WARNING: Before performing any...
BS903_979_trillingual.pdf
Page 14
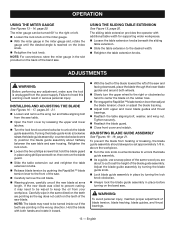
...the thrust bearing) until the bearing is important that lock the upper blade guide bearings. Repeat this procedure for the lower blade guide support. To Adjust Blade Guide Bearings: The blade guide bearings help keep the blade from the blade than the other. Fine tuning of the thrust bearing. ...to be done with a flathead screwdriver. The upper and lower blade guide bearings and thrust bearings support the saw table. of the blade. behind the back of the blade guide support. of the blade. Slide the blade guide bearings to within 1/64 in . English Repeat this ...
...the thrust bearing) until the bearing is important that lock the upper blade guide bearings. Repeat this procedure for the lower blade guide support. To Adjust Blade Guide Bearings: The blade guide bearings help keep the blade from the blade than the other. Fine tuning of the thrust bearing. ...to be done with a flathead screwdriver. The upper and lower blade guide bearings and thrust bearings support the saw table. of the blade. behind the back of the blade guide support. of the blade. Slide the blade guide bearings to within 1/64 in . English Repeat this ...
BS903_979_trillingual.pdf
Page 15
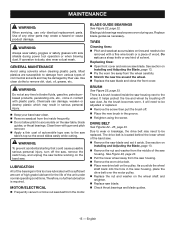
... is required. English WARNING: Always wear safety goggles or safety glasses with gum and pitch remover. Apply a thin coat of the saw blade and close the front cover. WARNING: To prevent accidental starting that could cause possible serious personal injury, turn off saw . Replacing tires: ...brush in the saw housing, place the drive belt over the motor pulley. Replace the nut and washer on Installing and Adjusting the Blade, page 13. Remove the nut and washer from the middle of automobile type wax to damage from the wheel carefully. ...
... is required. English WARNING: Always wear safety goggles or safety glasses with gum and pitch remover. Apply a thin coat of the saw blade and close the front cover. WARNING: To prevent accidental starting that could cause possible serious personal injury, turn off saw . Replacing tires: ...brush in the saw housing, place the drive belt over the motor pulley. Replace the nut and washer on Installing and Adjusting the Blade, page 13. Remove the nut and washer from the middle of automobile type wax to damage from the wheel carefully. ...
BS903_979_trillingual.pdf
Page 16
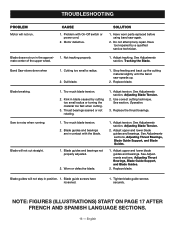
...thrust bearings. Blade guides and bearings are in blade caused by a qualified service technician. Problem with the blade. See section, Operation. 3. Too much blade tension. 2. See Adjustments sections, Adjusting Thrust Bearings, Blade Guide Support, and Blade Guides. 2. English Dull blade. 1. Replace blade. Have ... again. 2. mate center of the upper wheel. 1. Cutting too small a radius. 2. Replace blade. Blade breaking. 1. Kink in contact with On-Off switch or power cord. 1. Thrust bearings scarred or not rotating. 1. ...
...thrust bearings. Blade guides and bearings are in blade caused by a qualified service technician. Problem with the blade. See section, Operation. 3. Too much blade tension. 2. See Adjustments sections, Adjusting Thrust Bearings, Blade Guide Support, and Blade Guides. 2. English Dull blade. 1. Replace blade. Have ... again. 2. mate center of the upper wheel. 1. Cutting too small a radius. 2. Replace blade. Blade breaking. 1. Kink in contact with On-Off switch or power cord. 1. Thrust bearings scarred or not rotating. 1. ...

BS903_979_trillingual.pdf
Page 48
... interruptor) E - de 2.5 mm) A - Fig. 3 Tools needed outils nécessaires herramientas necesarias Fig. 5 A b c d A e The following tools (not included) are needed for making adjustments or installing the blade: Les outils suivants (non fournis) sont nécessaires pour le réglage et l'installation de la lame : Se necesitan las siguientes herramientas (no vienen incluidas...
... interruptor) E - de 2.5 mm) A - Fig. 3 Tools needed outils nécessaires herramientas necesarias Fig. 5 A b c d A e The following tools (not included) are needed for making adjustments or installing the blade: Les outils suivants (non fournis) sont nécessaires pour le réglage et l'installation de la lame : Se necesitan las siguientes herramientas (no vienen incluidas...
Repair Sheet
Page 3
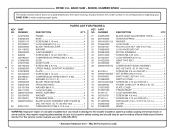
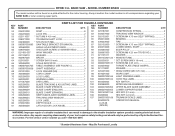
...only be found on a plate attached to the double insulation system possibly causing electrical shock or electrocution. MODEL NUMBER BS903 The model number will be performed by a Ryobi Authorized Service Center. KEY PART NO. key nos. 40, 67 and 104 1 39 816755-4 Screw (m5 ...* Lock washer (M4 1 48 020103031 * Screw (M4 X 8 mm 3 49 813313-4 * Screw (M5 X 12 mm PAN HD 3 50 351009000 saw Blade (1/4 in 5 303649000 BLADE TENSION LEVER 1 021118002 Washer 2 060043000 Cam assembly 1 826632 * Screw (M4 X 10 mm PAN HD 1 029185001 Compression Spring (M5.5 X 30 1 270683000 ...
...only be found on a plate attached to the double insulation system possibly causing electrical shock or electrocution. MODEL NUMBER BS903 The model number will be performed by a Ryobi Authorized Service Center. KEY PART NO. key nos. 40, 67 and 104 1 39 816755-4 Screw (m5 ...* Lock washer (M4 1 48 020103031 * Screw (M4 X 8 mm 3 49 813313-4 * Screw (M5 X 12 mm PAN HD 3 50 351009000 saw Blade (1/4 in 5 303649000 BLADE TENSION LEVER 1 021118002 Washer 2 060043000 Cam assembly 1 826632 * Screw (M4 X 10 mm PAN HD 1 029185001 Compression Spring (M5.5 X 30 1 270683000 ...
Repair Sheet
Page 4
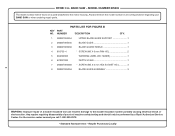
... the service center nearest you call 1-800-525-2579. * Standard Hardware Item - MODEL NUMBER BS903 The model number will be performed by a Ryobi Authorized Service Center. May Be Purchased Locally BAND SAW - KEY NO. 53 54 55 56 ...data label 1 101 984406003 key switch 1 863209002 Blade Tracking & Adjusting Label........... 1 102 900988000 miter gauge assembly 1 863209007 Blade Chart (French 1 103 080007005052 upper blade guide assembly 1 863209009 Blade Chart (English 1 104 080007005055 lower support guide 1 863209010 Blade Chart (Spanish 1 105 089140301155 hex key (2.5 mm...
... the service center nearest you call 1-800-525-2579. * Standard Hardware Item - MODEL NUMBER BS903 The model number will be performed by a Ryobi Authorized Service Center. May Be Purchased Locally BAND SAW - KEY NO. 53 54 55 56 ...data label 1 101 984406003 key switch 1 863209002 Blade Tracking & Adjusting Label........... 1 102 900988000 miter gauge assembly 1 863209007 Blade Chart (French 1 103 080007005052 upper blade guide assembly 1 863209009 Blade Chart (English 1 104 080007005055 lower support guide 1 863209010 Blade Chart (Spanish 1 105 089140301155 hex key (2.5 mm...
Repair Sheet
Page 6
...HD 2 5 863209003 WARNING LABEL (NO HANDS 1 6 870037000 DEPTH SCALE 1 7 080007005060 * SCREW (M5 X 6 mm HEX SOCKET HD 4 8 080007005056 blade guide assemBLY 3 6 WARNING: Improper repair of your BAND SAW or when ordering repair parts. May Be Purchased Locally For the service center nearest you call 1-... * Standard Hardware Item - Always mention the model number in damage to the motor housing. RYOBI 9 in. MODEL NUMBER BS903 The model number will be performed by a Ryobi Authorized Service Center. Any repairs requiring disassembly of a double insulated tool can result in all...
...HD 2 5 863209003 WARNING LABEL (NO HANDS 1 6 870037000 DEPTH SCALE 1 7 080007005060 * SCREW (M5 X 6 mm HEX SOCKET HD 4 8 080007005056 blade guide assemBLY 3 6 WARNING: Improper repair of your BAND SAW or when ordering repair parts. May Be Purchased Locally For the service center nearest you call 1-... * Standard Hardware Item - Always mention the model number in damage to the motor housing. RYOBI 9 in. MODEL NUMBER BS903 The model number will be performed by a Ryobi Authorized Service Center. Any repairs requiring disassembly of a double insulated tool can result in all...


