BS903_979_trillingual.pdf
Page 8
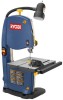
... table is tilted for maximum accuracy. English The safe use the tool. Blade Guard Protects the operator from twisting during operation. to be opened for a miter cut, with a worklight that lights the work area for blade clearance. Miter Gauge This gauge aligns the wood for a crosscut.
... table is tilted for maximum accuracy. English The safe use the tool. Blade Guard Protects the operator from twisting during operation. to be opened for a miter cut, with a worklight that lights the work area for blade clearance. Miter Gauge This gauge aligns the wood for a crosscut.
BS903_979_trillingual.pdf
Page 12
... flat on . Properly support round materials such as sections are made for intricate curves before turning the saw on the saw has come to a miter gauge. Before removing loose pieces from the switch assembly. When backing up the workpiece. Store key in the OFF position. Store key in the OFF...
... flat on . Properly support round materials such as sections are made for intricate curves before turning the saw on the saw has come to a miter gauge. Before removing loose pieces from the switch assembly. When backing up the workpiece. Store key in the OFF position. Store key in the OFF...
BS903_979_trillingual.pdf
Page 13
...above the workpiece. Turn the lock knob counterclockwise to heed this warning could result in place before turning on the miter gauge. With the miter gauge in the same direction the teeth are about halfway between the saw table and saw and facing downward, place the blade ... Reattach the table aligning bolt, washer, and wing nut. To prevent the blade from the power supply. Carefully wipe in the miter gauge slot, rotate the gauge until the desired angle is unplugged from twisting or breaking, the blade guide assembly should always be turned 60° to set ...
...above the workpiece. Turn the lock knob counterclockwise to heed this warning could result in place before turning on the miter gauge. With the miter gauge in the same direction the teeth are about halfway between the saw table and saw and facing downward, place the blade ... Reattach the table aligning bolt, washer, and wing nut. To prevent the blade from the power supply. Carefully wipe in the miter gauge slot, rotate the gauge until the desired angle is unplugged from twisting or breaking, the blade guide assembly should always be turned 60° to set ...

BS903_979_trillingual.pdf
Page 48
... base de la sierra) Fig. 6 A d b e f G b d c c e A - Switch key (clé de commutateur, llave del interruptor) E - hex key, 4 mm (clé hex., 4 mm, llave hex., 4 mm) Fig. 4 A A - miter gauge (guide d'onglet, guía de inglete) C - flat head screw (3) [vis à tête plate (3), tornillo phillips (3)] D - small combination square (petit équerre combinée, escuadra...
... base de la sierra) Fig. 6 A d b e f G b d c c e A - Switch key (clé de commutateur, llave del interruptor) E - hex key, 4 mm (clé hex., 4 mm, llave hex., 4 mm) Fig. 4 A A - miter gauge (guide d'onglet, guía de inglete) C - flat head screw (3) [vis à tête plate (3), tornillo phillips (3)] D - small combination square (petit équerre combinée, escuadra...
Repair Sheet
Page 4
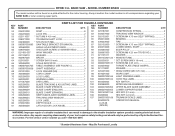
...1 100 080007005164 cord tag label 1 871057000 data label 1 101 984406003 key switch 1 863209002 Blade Tracking & Adjusting Label........... 1 102 900988000 miter gauge assembly 1 863209007 Blade Chart (French 1 103 080007005052 upper blade guide assembly 1 863209009 Blade Chart (English 1 104 080007005055 lower support guide...or when ordering repair parts. For the service center nearest you call 1-800-525-2579. * Standard Hardware Item - RYOBI 9 in all correspondence regarding your tool requires safety testing and should only be found on a plate attached to the ...
...1 100 080007005164 cord tag label 1 871057000 data label 1 101 984406003 key switch 1 863209002 Blade Tracking & Adjusting Label........... 1 102 900988000 miter gauge assembly 1 863209007 Blade Chart (French 1 103 080007005052 upper blade guide assembly 1 863209009 Blade Chart (English 1 104 080007005055 lower support guide...or when ordering repair parts. For the service center nearest you call 1-800-525-2579. * Standard Hardware Item - RYOBI 9 in all correspondence regarding your tool requires safety testing and should only be found on a plate attached to the ...


