

English Manual
Page 3
... risk of all warnings and precautions. 2. Always wear athletic shoes. It is fully closed. 3 Do not put the treadmill in a fall and serious injury. 3. If the control system is not a medical device. When connecting the power cord (see your local Sears or call 1-800-366-7278 and order part number 146148. 15...
... risk of all warnings and precautions. 2. Always wear athletic shoes. It is fully closed. 3 Do not put the treadmill in a fall and serious injury. 3. If the control system is not a medical device. When connecting the power cord (see your local Sears or call 1-800-366-7278 and order part number 146148. 15...

English Manual
Page 7
... Handrail Hole Brace Screw 83 109 122 Right Handrail Screw 112 109 112 3. Firmly tighten all four Bolts, tighten them again. Connect the Wire Harness (83) to connect them . 109 92 71 83 7 Console Assembly 83 Right Handrail Set the console assembly on the right Upright (109) and the... Left Upright (not shown). Remove the screws and the wood brace from the Uprights (109). Be careful not to connect the connectors properly (see the inset drawing); Insert the excess wire harnesses back into the handrail. After you have started all three Bolts. 2. ...
... Handrail Hole Brace Screw 83 109 122 Right Handrail Screw 112 109 112 3. Firmly tighten all four Bolts, tighten them again. Connect the Wire Harness (83) to connect them . 109 92 71 83 7 Console Assembly 83 Right Handrail Set the console assembly on the right Upright (109) and the... Left Upright (not shown). Remove the screws and the wood brace from the Uprights (109). Be careful not to connect the connectors properly (see the inset drawing); Insert the excess wire harnesses back into the handrail. After you have started all three Bolts. 2. ...

English Manual
Page 9
... is facing the Console Back as shown. The other wires included with the 3/4" Screw (6). Reattach the Access Door (94) with the receiver may be discarded. 9 Connect the wire on the receiver (A) to the plastic posts on the Access Door with the two screws. Note: If there are pinched. Wire A Cylinder 95...
... is facing the Console Back as shown. The other wires included with the 3/4" Screw (6). Reattach the Access Door (94) with the receiver may be discarded. 9 Connect the wire on the receiver (A) to the plastic posts on the Access Door with the two screws. Note: If there are pinched. Wire A Cylinder 95...
English Manual
Page 10
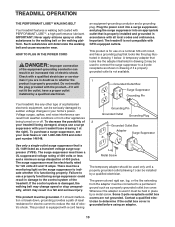
...a qualified electrician or serviceman if you are not grounded. There must be used it is used to connect the surge suppressor to reduce the risk of the treadmill. If it will deteriorate the walking belt and cause excessive wear. Do not modify the plug provided with...illustrated in doubt as a properly grounded outlet box cover. TREADMILL OPERATION THE PERFORMANT LUBETM WALKING BELT Your treadmill features a walking belt coated with all local codes and ordinances. HOW TO PLUG IN THE POWER CORD DANGER: Improper connection of least resistance for electric current to a 2-pole ...
...a qualified electrician or serviceman if you are not grounded. There must be used it is used to connect the surge suppressor to reduce the risk of the treadmill. If it will deteriorate the walking belt and cause excessive wear. Do not modify the plug provided with...illustrated in doubt as a properly grounded outlet box cover. TREADMILL OPERATION THE PERFORMANT LUBETM WALKING BELT Your treadmill features a walking belt coated with all local codes and ordinances. HOW TO PLUG IN THE POWER CORD DANGER: Improper connection of least resistance for electric current to a 2-pole ...
English Manual
Page 11
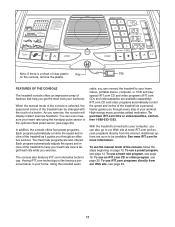
.... iFIT.com CD and video programs automatically control the speed and incline of the treadmill as it guides you can connect the treadmill to be changed with the touch of a button. With the treadmill connected to your computer, you exercise, the console will display instant exercise feedback. You ...can even measure your home. Each program automatically adjusts the speed and incline of the treadmill to our Web site at www.iFIT.com ...
.... iFIT.com CD and video programs automatically control the speed and incline of the treadmill as it guides you can connect the treadmill to be changed with the touch of a button. With the treadmill connected to your computer, you exercise, the console will display instant exercise feedback. You ...can even measure your home. Each program automatically adjusts the speed and incline of the treadmill to our Web site at www.iFIT.com ...
English Manual
Page 18
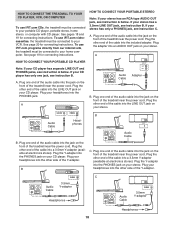
... of the audio cable into the PHONES jack. Plug your stereo. See pages 18 and 19 for connecting instructions. To use iFIT.com programs directly from our internet site, the treadmill must be connected to your stereo has a 3.5mm LINE OUT jack, see instruction A below . If your home ...stereo has only a PHONES jack, see instruction B. HOW TO CONNECT THE TREADMILL TO YOUR CD PLAYER, VCR, OR COMPUTER To use iFIT.com CDs, the treadmill must be connected to your VCR. To use iFIT.com videocassettes, the treadmill must be connected to your portable CD player, portable stereo, home stereo, or...
... of the audio cable into the PHONES jack. Plug your stereo. See pages 18 and 19 for connecting instructions. To use iFIT.com programs directly from our internet site, the treadmill must be connected to your stereo has a 3.5mm LINE OUT jack, see instruction A below . If your home ...stereo has only a PHONES jack, see instruction B. HOW TO CONNECT THE TREADMILL TO YOUR CD PLAYER, VCR, OR COMPUTER To use iFIT.com CDs, the treadmill must be connected to your VCR. To use iFIT.com videocassettes, the treadmill must be connected to your portable CD player, portable stereo, home stereo, or...

English Manual
Page 19
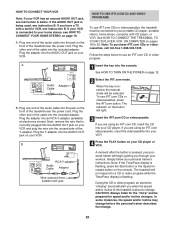
... into an RCA Y-adapter (available at electronics stores). Plug the adapter into the unused side of the Y-adapter. Plug one end of the treadmill near the power cord. Plug the adapter into the jack on your stereo has an unused LINE OUT jack, see instruction B. C B. Plug... the other end of the Y-adapter. Plug your computer. Plug the other side of the cable into the included adapter. HOW TO CONNECT YOUR HOME STEREO Note: If your stereo. Next, remove the wire that is being used, see instruction A below. Plug the other end of the...
... into an RCA Y-adapter (available at electronics stores). Plug the adapter into the unused side of the Y-adapter. Plug one end of the treadmill near the power cord. Plug the adapter into the jack on your stereo has an unused LINE OUT jack, see instruction B. C B. Plug... the other end of the Y-adapter. Plug your computer. Plug the other side of the cable into the included adapter. HOW TO CONNECT YOUR HOME STEREO Note: If your stereo. Next, remove the wire that is being used, see instruction A below. Plug the other end of the...
English Manual
Page 20
...Adapter Wire removed from AUDIO OUT jack HOW TO USE IFIT.COM CD AND VIDEO PROGRAMS To use iFIT.com CDs or videocassettes, the treadmill must be connected to 20. The indicator on the console. Note: If the Time/Pace display is flashing, press the Start button or the Speed ...increase button on the button will light. 3 Insert the iFIT.com CD or videocassette. A. Plug the Y-adapter into the included adapter. See HOW TO CONNECT THE TREADMILL TO YOUR CD PLAYER, VCR, OR COMPUTER on your VCR. A moment after the button is being used, see instruction A below to change . 20 ...
...Adapter Wire removed from AUDIO OUT jack HOW TO USE IFIT.COM CD AND VIDEO PROGRAMS To use iFIT.com CDs or videocassettes, the treadmill must be connected to 20. The indicator on the console. Note: If the Time/Pace display is flashing, press the Start button or the Speed ...increase button on the button will light. 3 Insert the iFIT.com CD or videocassette. A. Plug the Y-adapter into the included adapter. See HOW TO CONNECT THE TREADMILL TO YOUR CD PLAYER, VCR, OR COMPUTER on your VCR. A moment after the button is being used, see instruction A below to change . 20 ...
English Manual
Page 21
... the volume is too high or too low, the console may not detect the program signals. • Make sure that the audio cable is properly connected, that it is heard, the speed and incline will begin to flash. See step 6 on page 13. 7 Turn on the console. • Adjust the volume...
... the volume is too high or too low, the console may not detect the program signals. • Make sure that the audio cable is properly connected, that it is heard, the speed and incline will begin to flash. See step 6 on page 13. 7 Turn on the console. • Adjust the volume...
English Manual
Page 22
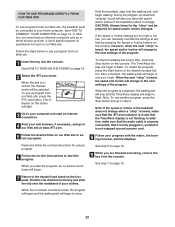
... and start the program. See step 5 on -line instructions to start an internet connection. 4 Start your web browser, if necessary, and go to use programs from our Web site, the treadmill must have an internet connection and an internet service provider. A list of the program. When you can manually ...change when a "chirp" is heard, make sure that the audio cable is properly connected, that it is not flashing. After a moment, the walking belt will begin and the walking belt will light. 3 Go to the treadmill and stand on the console. See step 7 on page 15. 7 Return to your...
... and start the program. See step 5 on -line instructions to start an internet connection. 4 Start your web browser, if necessary, and go to use programs from our Web site, the treadmill must have an internet connection and an internet service provider. A list of the program. When you can manually ...change when a "chirp" is heard, make sure that the audio cable is properly connected, that it is not flashing. After a moment, the walking belt will begin and the walking belt will light. 3 Go to the treadmill and stand on the console. See step 7 on page 15. 7 Return to your...


