
English Manual
Page 5
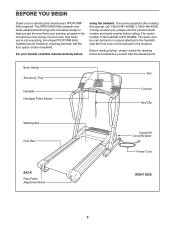
..., the unique PROFORM 545s treadmill can be folded up, requiring less than half the floor space of your benefit, read this manual, call 1-800-4-MY-HOME® (1-800-469-4663). The model number of this manual for selecting the revolutionary PROFORM® 545s treadmill. Book Holder Accessory Tray Handrail Handgrip Pulse Sensor Fan Console Key/Clip Walking...
..., the unique PROFORM 545s treadmill can be folded up, requiring less than half the floor space of your benefit, read this manual, call 1-800-4-MY-HOME® (1-800-469-4663). The model number of this manual for selecting the revolutionary PROFORM® 545s treadmill. Book Holder Accessory Tray Handrail Handgrip Pulse Sensor Fan Console Key/Clip Walking...

English Manual
Page 7
... x 1" Bolts into the right handrail. Make sure to the wire harness in the indicated location, and the right handrail. Next, hold the console assembly near the right Upright (109), and insert the Wire Harness (83) into the large hole in the left handrail as shown. Firmly tighten ...Upright (not shown). Discard the screws and brace. Tighten two 5/16" x 1" Bolts (122) into the right Upright and the lower end of the console assembly. Insert the excess wire harnesses back into the Upright. Tighten a 4" Bolt (112) three to connect them . 109 92 71 83 7 After you...
... x 1" Bolts into the right handrail. Make sure to the wire harness in the indicated location, and the right handrail. Next, hold the console assembly near the right Upright (109), and insert the Wire Harness (83) into the large hole in the left handrail as shown. Firmly tighten ...Upright (not shown). Discard the screws and brace. Tighten two 5/16" x 1" Bolts (122) into the right Upright and the lower end of the console assembly. Insert the excess wire harnesses back into the Upright. Tighten a 4" Bolt (112) three to connect them . 109 92 71 83 7 After you...

English Manual
Page 9
... of the receiver and is unplugged. Wire A Cylinder 95 94 6 3. Remove the paper from the back of the Console Back (95). 2. Reattach the Access Door (94) with the receiver may be discarded. 9 Make sure that the power cord is ...facing the Console Back as shown. Remove the indicated 3/4" Screw (6) and the Access Door (94) from the adhesive pad on the back of ... the inside of the Access Door, attach the receiver to the indicated wire extending from the Console Back (95).
... of the receiver and is unplugged. Wire A Cylinder 95 94 6 3. Remove the paper from the back of the Console Back (95). 2. Reattach the Access Door (94) with the receiver may be discarded. 9 Make sure that the power cord is ...facing the Console Back as shown. Remove the indicated 3/4" Screw (6) and the Access Door (94) from the adhesive pad on the back of ... the inside of the Access Door, attach the receiver to the indicated wire extending from the Console Back (95).
English Manual
Page 11
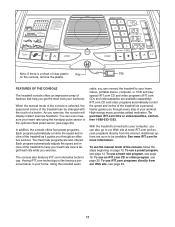
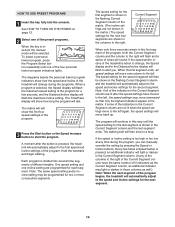
... iFIT.com interactive technology. Using the included audio cable, you through an effective workout. With the treadmill connected to your workout. FEATURES OF THE CONSOLE The treadmill console offers an impressive array of the treadmill as a personal trainer guides you can even measure your home stereo, portable stereo, computer, or ... the speed and incline of the treadmill can also go to our Web site at www.iFIT.com and access programs directly from our Web site, see page 22. 11 As you can be available. When the manual mode of the console is like having a personal trainer in...
... iFIT.com interactive technology. Using the included audio cable, you through an effective workout. With the treadmill connected to your workout. FEATURES OF THE CONSOLE The treadmill console offers an impressive array of the treadmill as a personal trainer guides you can even measure your home stereo, portable stereo, computer, or ... the speed and incline of the treadmill can also go to our Web site at www.iFIT.com and access programs directly from our Web site, see page 22. 11 As you can be available. When the manual mode of the console is like having a personal trainer in...
English Manual
Page 12
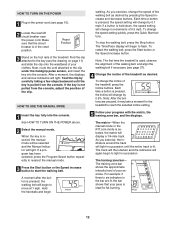
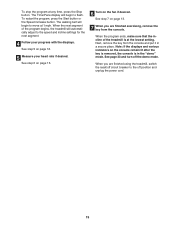
...start the walking belt. A moment after the button is not pulled from the console. To change the incline of the treadmill as desired by carefully taking a few steps backward until the entire track is ideal for the treadmill to reach the selected incline setting. 5 Follow your pace is lit. The ... increase button to the clip under the handgrip pulse sensor, and insert the key into the console. As you exercise, the indicators around the track will light. Note: The first time the treadmill is in succession until the key is inserted, the manual mode will be selected and the...
...start the walking belt. A moment after the button is not pulled from the console. To change the incline of the treadmill as desired by carefully taking a few steps backward until the entire track is ideal for the treadmill to reach the selected incline setting. 5 Follow your pace is lit. The ... increase button to the clip under the handgrip pulse sensor, and insert the key into the console. As you exercise, the indicators around the track will light. Note: The first time the treadmill is in succession until the key is inserted, the manual mode will be selected and the...
English Manual
Page 13
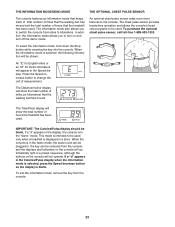
... not measuring your hands are clean. To turn on the fan, press the Fan button. Speed display-This display shows the speed of the treadmill. The display will change from one number to hold the pulse bar with Contacts your current pace (pace is detected, two dashes (- -) ...The pulse bar is selected, this manual refer to the lowest setting. When you are finished using the treadmill, switch the reset/off position and unplug the power cord. 13 Note: The console can display speed and distance in the "demo" mode. Calories/Pulse display-This display shows the approximate...
... not measuring your hands are clean. To turn on the fan, press the Fan button. Speed display-This display shows the speed of the treadmill. The display will change from one number to hold the pulse bar with Contacts your current pace (pace is detected, two dashes (- -) ...The pulse bar is selected, this manual refer to the lowest setting. When you are finished using the treadmill, switch the reset/off position and unplug the power cord. 13 Note: The console can display speed and distance in the "demo" mode. Calories/Pulse display-This display shows the approximate...
English Manual
Page 14
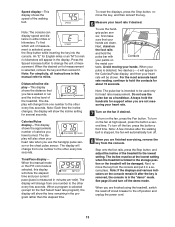
...column, an additional indicator may move back up. The diagrams beside the personal trainer program indicators show how the speed and incline of the treadmill will change , the Speed display and/or the Distance/Incline display will flash the maximum speed setting of the program for each segment. The.... (The incline settings are not lit when the speed settings move one of the preset programs. When the key is divided into the console. Note: If all speed settings will automatically adjust to the speed and incline settings for the next four segments are shown in the Current...
...column, an additional indicator may move back up. The diagrams beside the personal trainer program indicators show how the speed and incline of the treadmill will change , the Speed display and/or the Distance/Incline display will flash the maximum speed setting of the program for each segment. The.... (The incline settings are not lit when the speed settings move one of the preset programs. When the key is divided into the console. Note: If all speed settings will automatically adjust to the speed and incline settings for the next four segments are shown in the Current...
English Manual
Page 15
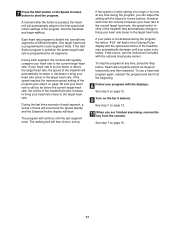
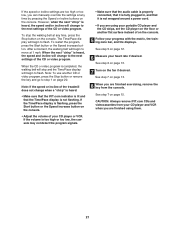
...: If the displays and various indicators on page 12. 5 Measure your progress with the displays. See step 5 on the console remain lit after the key is removed, the console is at the lowest setting. See page 23 and turn off position and unplug the power cord. 15 The Time/Pace display will... the program, press the Start button or the Speed increase button. When the program ends, make sure that the incline of the program begins, the treadmill will begin to flash. The walking belt will begin to move at any time, press the Stop button. See step 7 on the fan if desired...
...: If the displays and various indicators on page 12. 5 Measure your progress with the displays. See step 5 on the console remain lit after the key is removed, the console is at the lowest setting. See page 23 and turn off position and unplug the power cord. 15 The Time/Pace display will... the program, press the Start button or the Speed increase button. When the program ends, make sure that the incline of the program begins, the treadmill will begin to flash. The walking belt will begin to move at any time, press the Stop button. See step 7 on the fan if desired...

English Manual
Page 16
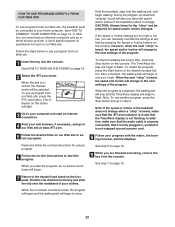
... beside the Enter button to step 6. 6 Enter a target heart rate. See the instructions included with the chest pulse sensor. 2 Insert the key fully into the console. When a heart rate program is selected, go to enter your estimated maximum heart rate; If the Self Select program is selected, the word "AGE" and...
... beside the Enter button to step 6. 6 Enter a target heart rate. See the instructions included with the chest pulse sensor. 2 Insert the key fully into the console. When a heart rate program is selected, go to enter your estimated maximum heart rate; If the Self Select program is selected, the word "AGE" and...
English Manual
Page 17
...to the first speed and incline settings of the treadmill may automatically decrease until the last segment ends. Heart rate programs cannot be stopped temporarily and then restarted. One target heart rate is programmed for each time the console compares your heart rate to the current target heart... setting is detected. Each heart rate program is pressed, the treadmill will flash. The program will then slow to a stop the program at any time during the program, you are finished exercising, remove the key from the console. To use a heart rate program again, reselect the program ...
...to the first speed and incline settings of the treadmill may automatically decrease until the last segment ends. Heart rate programs cannot be stopped temporarily and then restarted. One target heart rate is programmed for each time the console compares your heart rate to the current target heart... setting is detected. Each heart rate program is pressed, the treadmill will flash. The program will then slow to a stop the program at any time during the program, you are finished exercising, remove the key from the console. To use a heart rate program again, reselect the program ...
English Manual
Page 20
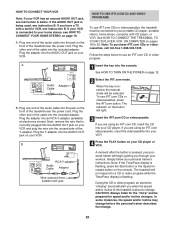
... AUDIO OUT RIGHT LEFT Audio Adapter Cable B. Plug the other end of the Y-adapter. B ANT. If you when the speed and/or incline of the treadmill near the power cord. Follow the steps below . If your workout. See HOW TO TURN ON THE POWER on your home stereo, see instruction B. Plug... one end of the audio cable into the AUDIO OUT jack on the console. If you have a TV with CD player, or VCR. A moment after the button is pressed, your personal trainer will not respond to a CD or ...
... AUDIO OUT RIGHT LEFT Audio Adapter Cable B. Plug the other end of the Y-adapter. B ANT. If you when the speed and/or incline of the treadmill near the power cord. Follow the steps below . If your workout. See HOW TO TURN ON THE POWER on your home stereo, see instruction B. Plug... one end of the audio cable into the AUDIO OUT jack on the console. If you have a TV with CD player, or VCR. A moment after the button is pressed, your personal trainer will not respond to a CD or ...
English Manual
Page 21
... video program, press the Stop button or remove the key and go to the next settings of on the console. 5 Follow your progress with the matrix, the training zone bar, and the displays. However, when the .... When the next "chirp" is flashing, press the Start button or the Speed increase button on the console. The Time/Pace display will begin to flash. See step 6 on page 13. 7 Turn on page...flashing. Note: If the speed or incline of the treadmill does not change to move at any time by pressing the Speed or Incline buttons on the console. • Adjust the volume of the CD or video...
... video program, press the Stop button or remove the key and go to the next settings of on the console. 5 Follow your progress with the matrix, the training zone bar, and the displays. However, when the .... When the next "chirp" is flashing, press the Start button or the Speed increase button on the console. The Time/Pace display will begin to flash. See step 6 on page 13. 7 Turn on page...flashing. Note: If the speed or incline of the treadmill does not change to move at any time by pressing the Speed or Incline buttons on the console. • Adjust the volume of the CD or video...
English Manual
Page 22
...sound will begin to move . 22 To restart the program, press the Start button or the Speed increase button. Note: To use a program from the console. See step 7 on page 15. 7 Return to start the program, an on -screen countdown ends, the program will begin and the walking belt will...mode will begin walking. To stop and the Time/Pace display will be prepared for using a program. 6 Follow the on-line instructions to the treadmill and stand on -line instructions for speed and/or incline changes. Find the clip attached to flash. To use another program, press the Stop ...
...sound will begin to move . 22 To restart the program, press the Start button or the Speed increase button. Note: To use a program from the console. See step 7 on page 15. 7 Return to start the program, an on -screen countdown ends, the program will begin and the walking belt will...mode will begin walking. To stop and the Time/Pace display will be prepared for using a program. 6 Follow the on-line instructions to the treadmill and stand on -line instructions for speed and/or incline changes. Find the clip attached to flash. To use another program, press the Stop ...
English Manual
Page 23
... show the total number of hours that the walking belt has moved. This mode is intended to change the unit of hours the treadmill has been used. When the console is in the demo mode, the power cord can be plugged in the "demo" mode. An optional chest pulse sensor adds even... of miles that the walking belt has moved and the total number of miles (or kilometers) that the treadmill has been used. In addition, the information mode allows you to switch the console from miles to turn off the demo mode. The chest pulse sensor provides hands-free operation and allows the...
... show the total number of hours that the walking belt has moved. This mode is intended to change the unit of hours the treadmill has been used. When the console is in the demo mode, the power cord can be plugged in the "demo" mode. An optional chest pulse sensor adds even... of miles that the walking belt has moved and the total number of miles (or kilometers) that the treadmill has been used. In addition, the information mode allows you to switch the console from miles to turn off the demo mode. The chest pulse sensor provides hands-free operation and allows the...
English Manual
Page 26
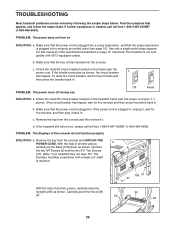
..., wait for five minutes and then press the breaker back in . above). Remove the key from the console and UNPLUG THE a POWER CORD. Remove the key from the console and then reinsert it , wait for five minutes and then press the switch back in , unplug it ... (69) as shown. If the breaker protrudes as shown. Remove 6 the two 3/4"Screws (6) and the two 3/4" Tek Screws (47). (Note: Your treadmill may not have 3/4" Tek Screws.) A phillips screwdriver with GFCI-equipped outlets. Use only a single-outlet surge suppressor that the surge suppressor is plugged in ...
..., wait for five minutes and then press the breaker back in . above). Remove the key from the console and UNPLUG THE a POWER CORD. Remove the key from the console and then reinsert it , wait for five minutes and then press the switch back in , unplug it ... (69) as shown. If the breaker protrudes as shown. Remove 6 the two 3/4"Screws (6) and the two 3/4" Tek Screws (47). (Note: Your treadmill may not have 3/4" Tek Screws.) A phillips screwdriver with GFCI-equipped outlets. Use only a single-outlet surge suppressor that the surge suppressor is plugged in ...
English Manual
Page 30
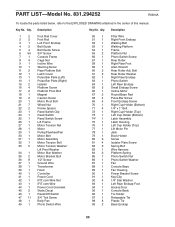
... 1 42 1 43 1 44 1 45 2 46 1 47 11 48 1 49 1 Foot Rail Cover Foot Rail Left Front Endcap Belt Guide Belt Guide Screw 3/4" Screw Console Frame Cage Nut Incline Wire Warning Decal Rear Platform Bolt Latch Cover Pulse Bar Plate (Left) Pulse Bar Plate (Right) Isolator Platform Screw Platform Pivot...Isolator Plate Screw Spring Bolt Wire Harness Platform Spring Photo Switch Nut Photo Switch Washer Fan Console Base Fan Housing Power Bracket Screw Key/Clip 1/4" Star Washer Left Rear Endcap Foot Access Door Console Back Tie Holder Releasable Tie Plastic Tie Base Endcap 30 Description Key No. Qty.
... 1 42 1 43 1 44 1 45 2 46 1 47 11 48 1 49 1 Foot Rail Cover Foot Rail Left Front Endcap Belt Guide Belt Guide Screw 3/4" Screw Console Frame Cage Nut Incline Wire Warning Decal Rear Platform Bolt Latch Cover Pulse Bar Plate (Left) Pulse Bar Plate (Right) Isolator Platform Screw Platform Pivot...Isolator Plate Screw Spring Bolt Wire Harness Platform Spring Photo Switch Nut Photo Switch Washer Fan Console Base Fan Housing Power Bracket Screw Key/Clip 1/4" Star Washer Left Rear Endcap Foot Access Door Console Back Tie Holder Releasable Tie Plastic Tie Base Endcap 30 Description Key No. Qty.


