Instruction Manual
Page 8
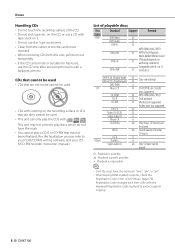
...from the center of playable discs Disc Standard Support types DVD DVD Video ‡ DVD Audio × DVD-R ‡ Remark MP3/WMA/AAC/JPEG/ DVD-RW DVD+R ‡ MPEG/DivX Playback Multi-border/Multisession/ ‡ (Playback depends on authoring conditions) DVD+RW Compatible with . DTS-CD ‡ Video CD...(For the finalization process refer to protect against copying. 8 DNX7100 CD-ROM ‡ MP3/WMA/AAC/JPEG/ CD-R CD-RW ‡ DivX playback ‡ Multisession supported Packet write not supported. HDCD % Sound quality of the CD. • Do not stick tape ...
...from the center of playable discs Disc Standard Support types DVD DVD Video ‡ DVD Audio × DVD-R ‡ Remark MP3/WMA/AAC/JPEG/ DVD-RW DVD+R ‡ MPEG/DivX Playback Multi-border/Multisession/ ‡ (Playback depends on authoring conditions) DVD+RW Compatible with . DTS-CD ‡ Video CD...(For the finalization process refer to protect against copying. 8 DNX7100 CD-ROM ‡ MP3/WMA/AAC/JPEG/ CD-R CD-RW ‡ DivX playback ‡ Multisession supported Packet write not supported. HDCD % Sound quality of the CD. • Do not stick tape ...

Instruction Manual
Page 67
Next page 3 English 67 "Dialog" makes the total sound volume becomes larger as compared with "Wide" and "Normal", allowing you are using a Dolby Digital software. 5 Returns to the original screen. ⁄ • *1 Disabled when a DVD is reduced by changing from "Wide" to "Normal" and from "Normal" to ... (Only when "Subwoofer" is set to other than "Through") 8 Returns to the original screen. Crossover Network Setup You can set up the DVD play. 1 Display the DVD SETUP screen Touch [DVD SETUP] in Audio Setup and "LPF SUB FREQ" is set to "On" in the SETUP Menu (page 66). 2 Setup each item 1...
Next page 3 English 67 "Dialog" makes the total sound volume becomes larger as compared with "Wide" and "Normal", allowing you are using a Dolby Digital software. 5 Returns to the original screen. ⁄ • *1 Disabled when a DVD is reduced by changing from "Wide" to "Normal" and from "Normal" to ... (Only when "Subwoofer" is set to other than "Through") 8 Returns to the original screen. Crossover Network Setup You can set up the DVD play. 1 Display the DVD SETUP screen Touch [DVD SETUP] in Audio Setup and "LPF SUB FREQ" is set to "On" in the SETUP Menu (page 66). 2 Setup each item 1...

Instruction Manual
Page 84
...3 Select the Audio Control item 1 1 Switches to the selected Audio Control screen. Audio Control Audio Control Menu Displays the Audio Control menu to set the sound effect function of this unit. 1 Display the control screen Audio Control You can adjust the front/rear and right/left volume balance. 2 Adjusts the front... function On or Off. THe stream (Dolby Digital, dts, Linear PCM, MPEG, MP3, WMA or AAC) is displayed. 5 Returns to the original screen. 84 DNX7100 If turned "On", high and low tones are automatically enhanced during low volume. 4 Displays the present source information.
...3 Select the Audio Control item 1 1 Switches to the selected Audio Control screen. Audio Control Audio Control Menu Displays the Audio Control menu to set the sound effect function of this unit. 1 Display the control screen Audio Control You can adjust the front/rear and right/left volume balance. 2 Adjusts the front... function On or Off. THe stream (Dolby Digital, dts, Linear PCM, MPEG, MP3, WMA or AAC) is displayed. 5 Returns to the original screen. 84 DNX7100 If turned "On", high and low tones are automatically enhanced during low volume. 4 Displays the present source information.

Instruction Manual
Page 85
... you suddenly switch to another source may be extremely loud. • You may not set some models of power amp boost to "+18". Offset", the sound generated if you have set for tone curve setup. You can be setup for tone curves. 3 Displays the Tone curve setup screen. (page 86) 4 Returns...
... you suddenly switch to another source may be extremely loud. • You may not set some models of power amp boost to "+18". Offset", the sound generated if you have set for tone curve setup. You can be setup for tone curves. 3 Displays the Tone curve setup screen. (page 86) 4 Returns...

Instruction Manual
Page 86
Touch [Zone Control] in the Audio Control Menu (page 84). 2 Set the Zone Control 1 3 2 2 4 5 1 Turns the Zone Function (that sets different source sounds for front and rear speakers) On or Off. 2 Sets the front and rear audio source separately. (This button appears when the Zone function is selected) ... 5 1 6 2 7 3 8 4 9 1 Bass adjustment items are displayed. 2 Middle adjustment items are displayed. 3 Treble adjustment items are displayed. 4 Bass DC Extend settings (Only when Bass is On.) 86 DNX7100
Touch [Zone Control] in the Audio Control Menu (page 84). 2 Set the Zone Control 1 3 2 2 4 5 1 Turns the Zone Function (that sets different source sounds for front and rear speakers) On or Off. 2 Sets the front and rear audio source separately. (This button appears when the Zone function is selected) ... 5 1 6 2 7 3 8 4 9 1 Bass adjustment items are displayed. 2 Middle adjustment items are displayed. 3 Treble adjustment items are displayed. 4 Bass DC Extend settings (Only when Bass is On.) 86 DNX7100
Instruction Manual
Page 87
... zone function is set the "Area" to "Reverse", the audio source that is output at the AV OUTPUT terminal is switched depending on the front sound source. 3 Switches the front and rear audio sources. (This button appears when the Zone function is On.) Use "Reverse" to change over the front and... volume of the rear channel. (This button appears when the Zone function is also switched to the same source. ⁄ • When the rear speaker sound is switched, the audio source that is output at the AV OUTPUT terminal is On.) 5 Returns to the original screen. ⁄ • There are not...
... zone function is set the "Area" to "Reverse", the audio source that is output at the AV OUTPUT terminal is switched depending on the front sound source. 3 Switches the front and rear audio sources. (This button appears when the Zone function is On.) Use "Reverse" to change over the front and... volume of the rear channel. (This button appears when the Zone function is also switched to the same source. ⁄ • When the rear speaker sound is switched, the audio source that is output at the AV OUTPUT terminal is On.) 5 Returns to the original screen. ⁄ • There are not...
Instruction Manual
Page 94
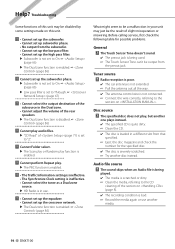
... calling service, first check the following table for the specified disc. ✔ The disc is severely scratched. ☞ Try another media. 94 DNX7100 The Touch Sensor Tone doesn't sound. ✔ The preout jack is being played. ✔ The media is scratched or dirty. ☞ Clean the media, referring to On... for possible problems. General ? The specified disc does not play audio files. ▲ "CD Read" of slight misoperation or miswiring. The sound skips when an Audio file is being used. ☞ The Touch Sensor Tone can't be disabled by some settings made on this unit may...
... calling service, first check the following table for the specified disc. ✔ The disc is severely scratched. ☞ Try another media. 94 DNX7100 The Touch Sensor Tone doesn't sound. ✔ The preout jack is being played. ✔ The media is scratched or dirty. ☞ Clean the media, referring to On... for possible problems. General ? The specified disc does not play audio files. ▲ "CD Read" of slight misoperation or miswiring. The sound skips when an Audio file is being used. ☞ The Touch Sensor Tone can't be disabled by some settings made on this unit may...

Instruction Manual
Page 95
... in the mode that was set with (page 50). ☞ Please set the receive mode setting to this unit. English 95 HD Radio source ? No sound can be heard, or the volume is low. ✔ The preset broadcast station is bad or unstable.
... in the mode that was set with (page 50). ☞ Please set the receive mode setting to this unit. English 95 HD Radio source ? No sound can be heard, or the volume is low. ✔ The preset broadcast station is bad or unstable.

Installation Manual
Page 9
... is installed securely in place. Accessory 5 Make sure that the unit is unstable, it in place. Installation for Monitor/Player Unit Screw (M4X8) (commercially available) Firewall or metal support Self-tapping screw (commercially available) Metal mounting strap (commercially ...available) Bend the tabs of the mounting sleeve with a screwdriver or similar utensil and attach it may malfunction (eg, the sound may skip). Installation on Toyota, Nissan or Mitsubishi Car using Brackets Accessory 9 (M5x6mm) or Accessory 0 (M5x7mm) Car Bracket Accessory 9 (M5x6mm)...
... is installed securely in place. Accessory 5 Make sure that the unit is unstable, it in place. Installation for Monitor/Player Unit Screw (M4X8) (commercially available) Firewall or metal support Self-tapping screw (commercially available) Metal mounting strap (commercially ...available) Bend the tabs of the mounting sleeve with a screwdriver or similar utensil and attach it may malfunction (eg, the sound may skip). Installation on Toyota, Nissan or Mitsubishi Car using Brackets Accessory 9 (M5x6mm) or Accessory 0 (M5x7mm) Car Bracket Accessory 9 (M5x6mm)...


