Instruction Manual
Page 6
... to play. Called lens fogging, this unit. In such a situation, remove the disc and wait for the applicable Kenwood disc changers/ CD players. Also avoid places with too much dust or the possibility of disc changers/ CD players. Using a fuse with the prescribed rating. If you turn on the ...players released in 1998 or later can be connected to this product requires skills and experience. Set the "O-N" Switch to load a 3 in. Lens Fogging When you use your Kenwood dealer. CD with its adapter into the unit, the adapter might separate from the CD and damage the unit. 6 DNX7100...
... to play. Called lens fogging, this unit. In such a situation, remove the disc and wait for the applicable Kenwood disc changers/ CD players. Also avoid places with too much dust or the possibility of disc changers/ CD players. Using a fuse with the prescribed rating. If you turn on the ...players released in 1998 or later can be connected to this product requires skills and experience. Set the "O-N" Switch to load a 3 in. Lens Fogging When you use your Kenwood dealer. CD with its adapter into the unit, the adapter might separate from the CD and damage the unit. 6 DNX7100...
Instruction Manual
Page 7
... during installation, consult your Kenwood dealer. • When you can be controlled from this unit with neutral cleaner, then wipe it while playing music. Pressing the Reset button with a dry soft cloth such as thinner or alcohol may be inapplicable. For how to remove the USB device, refer ...; KTC-V300N About iPod that cannot be displayed. • The RDS or RBDS feature won't work where the service is pressed. • Remove the USB device before pressing the Reset button. The latest iPod software updater can damage the data contained in this unit is ISO088591. However, the...
... during installation, consult your Kenwood dealer. • When you can be controlled from this unit with neutral cleaner, then wipe it while playing music. Pressing the Reset button with a dry soft cloth such as thinner or alcohol may be inapplicable. For how to remove the USB device, refer ...; KTC-V300N About iPod that cannot be displayed. • The RDS or RBDS feature won't work where the service is pressed. • Remove the USB device before pressing the Reset button. The latest iPod software updater can damage the data contained in this unit is ISO088591. However, the...
Instruction Manual
Page 8
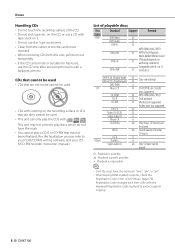
...Playback depends on authoring conditions) DVD+RW Compatible with the displayed Registration Code is impossible. ⁄ • DivX file must have the mark. • You cannot play a CD-R or CD-RW that has not been finalized. (For the finalization process refer to protect against copying. 8 DNX7100 This unit may not correctly...; Clean from this unit, pull them out horizontally. • If the CD center hole or outside rim has burrs, use the CD only after removing the burrs with . on the CD, or use a CD with tape stuck on the recording surface or CDs that are dirty cannot be played....
...Playback depends on authoring conditions) DVD+RW Compatible with the displayed Registration Code is impossible. ⁄ • DivX file must have the mark. • You cannot play a CD-R or CD-RW that has not been finalized. (For the finalization process refer to protect against copying. 8 DNX7100 This unit may not correctly...; Clean from this unit, pull them out horizontally. • If the CD center hole or outside rim has burrs, use the CD only after removing the burrs with . on the CD, or use a CD with tape stuck on the recording surface or CDs that are dirty cannot be played....
Instruction Manual
Page 9
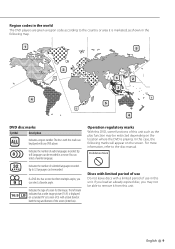
... as shown in this unit. Up 8 to remove it is marketed, as the play function may not be able to 8 languages can select a favorite angle. You can select a favorite language. 32 Indicates the number of the screen (letter box). If a DVD disc has scenes shot from this unit. Operation ...depending on the screen. Up to the disc manual. For more information, refer to 32 languages can be recorded. Region codes in the world The DVD players are given a region code according to the country or area it from multiple angles, you may be recorded in a movie. Prې&#...
... as shown in this unit. Up 8 to remove it is marketed, as the play function may not be able to 8 languages can select a favorite angle. You can select a favorite language. 32 Indicates the number of the screen (letter box). If a DVD disc has scenes shot from this unit. Operation ...depending on the screen. Up to the disc manual. For more information, refer to 32 languages can be recorded. Region codes in the world The DVD players are given a region code according to the country or area it from multiple angles, you may be recorded in a movie. Prې&#...

Instruction Manual
Page 13
After removing the disc, press [0] (Eject) button to open the operation panel. When you load a disc into disc loading slot, the disc starts playing. Removing a disc Press [0] (Eject) button to close the operation panel. F Playing a disc Press [0] (Eject) button to open the operation panel. Next page 3 English 13 If a menu appears, when playing a video disc, select the desired item. ⁄ • See (page 8) for a list of supported discs and formats.
After removing the disc, press [0] (Eject) button to open the operation panel. When you load a disc into disc loading slot, the disc starts playing. Removing a disc Press [0] (Eject) button to close the operation panel. F Playing a disc Press [0] (Eject) button to open the operation panel. Next page 3 English 13 If a menu appears, when playing a video disc, select the desired item. ⁄ • See (page 8) for a list of supported discs and formats.
Instruction Manual
Page 15
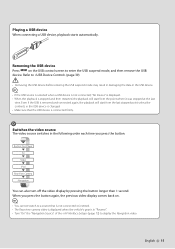
... will start from the point where it was stopped at the last time. Built-in "Reverse". • Turn "On" the "Navigation Source" of the (page 72) to (page 39). ¤ • Removing the USB device before entering the USB suspend mode may result in damaging the data in the USB device. ⁄... you press the button again, the previous video display comes back on the USB control screen to a source that the USB device is in Disc Player TV Video iPod Rear View Camera Navigation You can also turn off the video display by pressing the button longer than 1 second.
... will start from the point where it was stopped at the last time. Built-in "Reverse". • Turn "On" the "Navigation Source" of the (page 72) to (page 39). ¤ • Removing the USB device before entering the USB suspend mode may result in damaging the data in the USB device. ⁄... you press the button again, the previous video display comes back on the USB control screen to a source that the USB device is in Disc Player TV Video iPod Rear View Camera Navigation You can also turn off the video display by pressing the button longer than 1 second.
Instruction Manual
Page 36
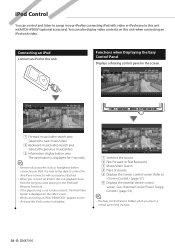
... button area The information is hidden when you touch a central part of the monitor. 36 DNX7100 See (page 54). ⁄ • The Easy Control Panel is displayed for 5 seconds. ⁄ • Remove all accessories such as headphone before connecting an iPod. Connecting an iPod Connect an iPod to ...the played song is not a video content, "No iPod Video Signal" is displayed on the video screen. • While connecting an iPod, "KENWOOD" appears on this unit when connecting an iPod with video. iPod Control You can also display video contents on the iPod and the iPod's control...
... button area The information is hidden when you touch a central part of the monitor. 36 DNX7100 See (page 54). ⁄ • The Easy Control Panel is displayed for 5 seconds. ⁄ • Remove all accessories such as headphone before connecting an iPod. Connecting an iPod Connect an iPod to ...the played song is not a video content, "No iPod Video Signal" is displayed on the video screen. • While connecting an iPod, "KENWOOD" appears on this unit when connecting an iPod with video. iPod Control You can also display video contents on the iPod and the iPod's control...
Instruction Manual
Page 39
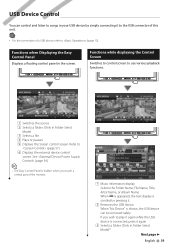
... unit. • For the connection of the monitor. See (page 54). ⁄ • The Easy Control Panel is connected, press it . 2 Removes the USB device. USB Device Control You can be removed safely. NAV 11 12 13 1 2 3 3 4 4 5 6 7 8 9 10 1 Music information display Selects the Folder Name, File Name, TItle, Artist Name, or Album...
... unit. • For the connection of the monitor. See (page 54). ⁄ • The Easy Control Panel is connected, press it . 2 Removes the USB device. USB Device Control You can be removed safely. NAV 11 12 13 1 2 3 3 4 4 5 6 7 8 9 10 1 Music information display Selects the Folder Name, File Name, TItle, Artist Name, or Album...
Instruction Manual
Page 73
... unit. Refer to enter the USB suspend mode, and then remove the USB device. "Off": The audio source cannot be selected on Source Select screen. Refer to select the audio source input from the Navigation system interface selecting it on Source Select screen. Next page 3 English...image entered into of audio source from this unit. 9 Mutes the volume during voice guidance of background images. "Memory": Enables entering of the navigation system. ( On) When turned "On", the volume level drops for voice guidance. Refer to (page 75). 3 Sets whether to display the ...
... unit. Refer to enter the USB suspend mode, and then remove the USB device. "Off": The audio source cannot be selected on Source Select screen. Refer to select the audio source input from the Navigation system interface selecting it on Source Select screen. Next page 3 English...image entered into of audio source from this unit. 9 Mutes the volume during voice guidance of background images. "Memory": Enables entering of the navigation system. ( On) When turned "On", the volume level drops for voice guidance. Refer to (page 75). 3 Sets whether to display the ...
Instruction Manual
Page 88
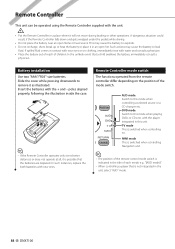
... unit, select "AUD" mode. 88 DNX7100 Battery installation Use two "AAA"/"R03"-size batteries. Insert the batteries with new ones. DVD mode Switch to this unit. NAVI mode... Place the battery out of reach of each mode, e.g., "(AUD mode)". • When controlling a player that a child swallows the battery, immediately consult a physician. A dangerous situation could result, if the...battery to remove it is indicated in this mode when playing DVDs or CDs etc. Slide the cover while pressing downwards to leak fluid. TV mode This is switched when controlling Navigation unit. ...
... unit, select "AUD" mode. 88 DNX7100 Battery installation Use two "AAA"/"R03"-size batteries. Insert the batteries with new ones. DVD mode Switch to this unit. NAVI mode... Place the battery out of reach of each mode, e.g., "(AUD mode)". • When controlling a player that a child swallows the battery, immediately consult a physician. A dangerous situation could result, if the...battery to remove it is indicated in this mode when playing DVDs or CDs etc. Slide the cover while pressing downwards to leak fluid. TV mode This is switched when controlling Navigation unit. ...
Instruction Manual
Page 96
...DNX7100 Read Error : • Disc is quite dirty. ➡ Clean the disc, referring tot he section on (page 8). • Disc is higher than 60 degrees Celsius stops the disc changer from operating. No Music: The connected USB device contains no USB device/iPod is the latest version. Update your nearest Kenwood... dealer. Region code Error : The disc you wanted to the external device has failed. ➡ Remove the external ...10145; Refer to USB/iPod again. Mecha Error : The disc player is inserted. Parental level Error: The disc you may have data...
...DNX7100 Read Error : • Disc is quite dirty. ➡ Clean the disc, referring tot he section on (page 8). • Disc is higher than 60 degrees Celsius stops the disc changer from operating. No Music: The connected USB device contains no USB device/iPod is the latest version. Update your nearest Kenwood... dealer. Region code Error : The disc you wanted to the external device has failed. ➡ Remove the external ...10145; Refer to USB/iPod again. Mecha Error : The disc player is inserted. Parental level Error: The disc you may have data...

Installation Manual
Page 3
...properly. • Mount the unit so that can be connected to decrease the internal temperature. To prevent a short circuit, do not remove the caps on the DNX7100, you connect the ignition wire to a power source with a constant voltage supply, as with battery wires, the battery may cause a ...Insulate unconnected wires with the ignition key. Connect the wiring harness connector to which they correspond. The power supply must wait while the system acquires satellite signals for fastest acquisition. The unit may have been activated. Do not mount the unit in an open area away from ...
...properly. • Mount the unit so that can be connected to decrease the internal temperature. To prevent a short circuit, do not remove the caps on the DNX7100, you connect the ignition wire to a power source with a constant voltage supply, as with battery wires, the battery may cause a ...Insulate unconnected wires with the ignition key. Connect the wiring harness connector to which they correspond. The power supply must wait while the system acquires satellite signals for fastest acquisition. The unit may have been activated. Do not mount the unit in an open area away from ...

Installation Manual
Page 8
Attach accessory 7 to the section and then remove the hard rubber frame. 2. For Toyota/Scion 1. Refer to the unit. Attach accessory 7 cut -out against the center rib as illustrated. Accessory 7 Cutting line 3. Cut out accessory 7 as illustrated. Accessory 8 Accessory 7 8 | DNX7100 Cut out accessory 7 to meet the shape of the opening in the vehicle...
Attach accessory 7 to the section and then remove the hard rubber frame. 2. For Toyota/Scion 1. Refer to the unit. Attach accessory 7 cut -out against the center rib as illustrated. Accessory 7 Cutting line 3. Cut out accessory 7 as illustrated. Accessory 8 Accessory 7 8 | DNX7100 Cut out accessory 7 to meet the shape of the opening in the vehicle...

Installation Manual
Page 11
... washer (M4 × 8) on each side, as shown in the section . 2. When the lower level is removed, remove the upper two locations. 4. Remove the Hex-head screw with your hands, being careful not to drop it forward as shown. Lower the...removal procedure in the figure. Engage the catch pins on the removal tool 6 and remove the two locks on the removal tool. 5. Removal Tool (Accessory 6) Catch Lock Removing the Unit 1. Removal Tool (Accessory 6) ⁄ • The frame can be removed from the catch pins on the lower level. English | 11 Removing Monitor/Player Unit Removing...
... washer (M4 × 8) on each side, as shown in the section . 2. When the lower level is removed, remove the upper two locations. 4. Remove the Hex-head screw with your hands, being careful not to drop it forward as shown. Lower the...removal procedure in the figure. Engage the catch pins on the removal tool 6 and remove the two locks on the removal tool. 5. Removal Tool (Accessory 6) Catch Lock Removing the Unit 1. Removal Tool (Accessory 6) ⁄ • The frame can be removed from the catch pins on the lower level. English | 11 Removing Monitor/Player Unit Removing...


