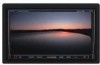
Instruction Manual
Page 2
...Video File/Picture File Watching 28 Function During Playback Screen 28 Functions When Displaying the Easy Control Panel 28 Functions While Displaying the Control Screen 29 Picture Control 30 Folder Select 30 Radio Listening 31 Functions When Displaying the Easy Control Panel 31 Functions While Displaying the Control Screen 31 Seek Mode 32 Auto Memory 32 Manual memory 33 Preset Select 33 Radio Text 34 Set Station Name 34 Direct Search 34 Traffic Information 35 Search for Program Type 35 2 DNX7100 Basic Operations 12 iPod Control 36 Connecting an iPod...
...Video File/Picture File Watching 28 Function During Playback Screen 28 Functions When Displaying the Easy Control Panel 28 Functions While Displaying the Control Screen 29 Picture Control 30 Folder Select 30 Radio Listening 31 Functions When Displaying the Easy Control Panel 31 Functions While Displaying the Control Screen 31 Seek Mode 32 Auto Memory 32 Manual memory 33 Preset Select 33 Radio Text 34 Set Station Name 34 Direct Search 34 Traffic Information 35 Search for Program Type 35 2 DNX7100 Basic Operations 12 iPod Control 36 Connecting an iPod...
Instruction Manual
Page 3
...iPod Setup 71 System Setup 71 AV Interface Setup 72 User Interface 73 Entering Background 74 Background Delete 75 Background Select 76 Touch Panel Adjustment 76 Clock Setup 77 Monitor Setup 78 Security Code Setup 79 Deactivating Security Code 81 SAT ESN Watch Setup 81 Setup Memory 82 EXT SW Setup 83 Audio Control 84 Audio Conrol Menu 84 Audio Control 84 Equalizer Control 85 Tone Setup 86 Zone Control 86 Remote Controller 88 Battery installation 88 Remote Controller mode switch 88 Common operations (AUD mode) 89 DVD/VCD/CD/Audio files (DVD mode...
...iPod Setup 71 System Setup 71 AV Interface Setup 72 User Interface 73 Entering Background 74 Background Delete 75 Background Select 76 Touch Panel Adjustment 76 Clock Setup 77 Monitor Setup 78 Security Code Setup 79 Deactivating Security Code 81 SAT ESN Watch Setup 81 Setup Memory 82 EXT SW Setup 83 Audio Control 84 Audio Conrol Menu 84 Audio Control 84 Equalizer Control 85 Tone Setup 86 Zone Control 86 Remote Controller 88 Battery installation 88 Remote Controller mode switch 88 Common operations (AUD mode) 89 DVD/VCD/CD/Audio files (DVD mode...
Instruction Manual
Page 6
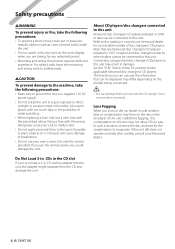
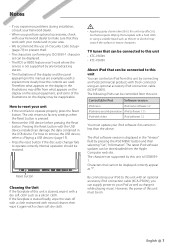
... safety's sake, leave the mounting and wiring work to professionals. 2CAUTION To prevent damage to the machine, take the following precautions: • Make sure to ground the unit to a negative 12V DC power supply. • Do not install the unit in a spot exposed to load a 3 in the CD player of disc changers/ CD players. Using a fuse with the wrong rating may differ depending...
... safety's sake, leave the mounting and wiring work to professionals. 2CAUTION To prevent damage to the machine, take the following precautions: • Make sure to ground the unit to a negative 12V DC power supply. • Do not install the unit in a spot exposed to load a 3 in the CD player of disc changers/ CD players. Using a fuse with the wrong rating may differ depending...
Instruction Manual
Page 7
... Kenwood dealer. • When you can supply power to your iPod as well as charge it while playing music. The character set can be downloaded from what appears on the display in the illustrations may scratch the surface or erases characters. Pressing the Reset button with the USB device installed can be displayed. • The RDS or RBDS feature won't work with your model and in your unit...
... Kenwood dealer. • When you can supply power to your iPod as well as charge it while playing music. The character set can be downloaded from what appears on the display in the illustrations may scratch the surface or erases characters. Pressing the Reset button with the USB device installed can be displayed. • The RDS or RBDS feature won't work with your model and in your unit...

Instruction Manual
Page 10
...; Playable disc file format ISO 9660 Level 1/2, Joliet, Romeo, Long file name. • The maximum number of characters for display (CD-R/RW/DVD±R/RW) File/Folder name: 128 characters MP3 ID3 Tag version 1.x: 30 characters • Limitation of structure for USB device connection, usage of the CA-U1EX (option) is longer than the USB compatible cable is played. • Playable AAC file ".m4a" file encoded by...
...; Playable disc file format ISO 9660 Level 1/2, Joliet, Romeo, Long file name. • The maximum number of characters for display (CD-R/RW/DVD±R/RW) File/Folder name: 128 characters MP3 ID3 Tag version 1.x: 30 characters • Limitation of structure for USB device connection, usage of the CA-U1EX (option) is longer than the USB compatible cable is played. • Playable AAC file ".m4a" file encoded by...
Instruction Manual
Page 15
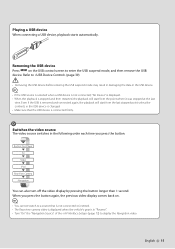
... removed and connected again, the playback will start from the point where it was stopped at the last time. D Switches the video source The video source switches in Disc Player TV Video iPod Rear View Camera Navigation You can also turn off the video display by pressing the button longer than 1 second. Built-in the following order each time you press the button again, the previous video display comes back on the USB control screen to display the Navigation video. Playing a USB device When connecting a USB device...
... removed and connected again, the playback will start from the point where it was stopped at the last time. D Switches the video source The video source switches in Disc Player TV Video iPod Rear View Camera Navigation You can also turn off the video display by pressing the button longer than 1 second. Built-in the following order each time you press the button again, the previous video display comes back on the USB control screen to display the Navigation video. Playing a USB device When connecting a USB device...
Instruction Manual
Page 31
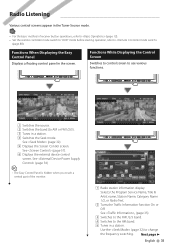
... receiver button operations, refer to (page 12). • Set the remote controller mode switch to "AUD" mode before starting operation, refer to (page 88). See , (page 35). 3 Switches to the FM1/2/3 band. 4 Switches to use various functions. NAV NAV 5 6 1 2 2 3 3 4 1 Switches the source. 2 Switches the band (to change the frequency switching. Selects the Program Service Name, Title & Artist name, Station Name, Category Name 1/2, or Radio Text. 2 Turns the Traffic Information function On or Off. See (page 57). 6 Displays the external device control screen. Use...
... receiver button operations, refer to (page 12). • Set the remote controller mode switch to "AUD" mode before starting operation, refer to (page 88). See , (page 35). 3 Switches to the FM1/2/3 band. 4 Switches to use various functions. NAV NAV 5 6 1 2 2 3 3 4 1 Switches the source. 2 Switches the band (to change the frequency switching. Selects the Program Service Name, Title & Artist name, Station Name, Category Name 1/2, or Radio Text. 2 Turns the Traffic Information function On or Off. See (page 57). 6 Displays the external device control screen. Use...
Instruction Manual
Page 32
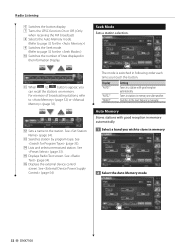
... 35). y Displays the external device control screen. Auto Memory Stores stations with good reception automatically. See (page 34). t Displays Radio Text screen. Tunes in stations in following order each time you touch the button. Switches to store in memory 2 Select the Auto Memory mode 32 DNX7100 e Searches station by program type. See (page 34). See (page 54) The mode is switched in memory one after another. See (page 33). Display "AUTO1" "AUTO2" "MANU" Setting Tunes in a station with good...
... 35). y Displays the external device control screen. Auto Memory Stores stations with good reception automatically. See (page 34). t Displays Radio Text screen. Tunes in stations in following order each time you touch the button. Switches to store in memory 2 Select the Auto Memory mode 32 DNX7100 e Searches station by program type. See (page 34). See (page 54) The mode is switched in memory one after another. See (page 33). Display "AUTO1" "AUTO2" "MANU" Setting Tunes in a station with good...
Instruction Manual
Page 55
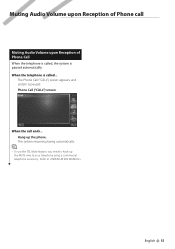
Phone Call ("CALL") screen When the call Muting Audio Volume upon Reception of Phone Call When the telephone is called ... English 55 Muting Audio Volume upon Reception of Phone call ends... Hang up the MUTE wire to . The system resumes playing automatically. ⁄ • To use the TEL Mute feature, you need to hook up the phone. Refer to your telephone using a commercial telephone accessory. When the telephone is paused. The Phone Call ("CALL") screen appears, and system is called , the system is paused automatically.
Phone Call ("CALL") screen When the call Muting Audio Volume upon Reception of Phone Call When the telephone is called ... English 55 Muting Audio Volume upon Reception of Phone call ends... Hang up the MUTE wire to . The system resumes playing automatically. ⁄ • To use the TEL Mute feature, you need to hook up the phone. Refer to your telephone using a commercial telephone accessory. When the telephone is paused. The Phone Call ("CALL") screen appears, and system is called , the system is paused automatically.
Instruction Manual
Page 57
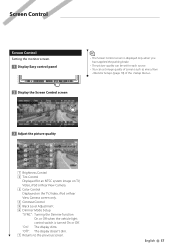
... applied the parking brake. • The picture quality can be set for each source. • You can set image quality of screens such as menu from (page 78) of the . 3 Adjust the picture quality 6 1 1 2 2 3 3 4 4 5 5 7 1 Brightness Control 2 Tint Control Displayed for an NTSC system image on TV, Video, iPod or Rear View Camera. 3 Color Control Displayed on the TV, Video, iPod or Rear View Camera screen only. 4 Contrast Control 5 Black Level Adjustment 6 Dimmer Mode Setup "SYNC": Turning the Dimmer function On or Off when the vehicle light control switch is turned On or...
... applied the parking brake. • The picture quality can be set for each source. • You can set image quality of screens such as menu from (page 78) of the . 3 Adjust the picture quality 6 1 1 2 2 3 3 4 4 5 5 7 1 Brightness Control 2 Tint Control Displayed for an NTSC system image on TV, Video, iPod or Rear View Camera. 3 Color Control Displayed on the TV, Video, iPod or Rear View Camera screen only. 4 Contrast Control 5 Black Level Adjustment 6 Dimmer Mode Setup "SYNC": Turning the Dimmer function On or Off when the vehicle light control switch is turned On or...
Instruction Manual
Page 69
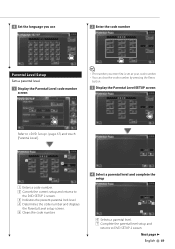
... you use 2 Enter the code number Parental Level Setup Sets a parental level. 1 Display the Parental Level code number screen ⁄ • The number you enter first is set as your code number. • You can clear the code number by pressing the Reset button. 3 Display the Parental Level SETUP screen Refer to (page 67) and touch [Parental Level]. 2 1 3 4 5 1 Enters a code number. 2 Cancels the current setup and returns to the DVD SETUP 2 screen. 3 Indicates the present parental lock level...
... you use 2 Enter the code number Parental Level Setup Sets a parental level. 1 Display the Parental Level code number screen ⁄ • The number you enter first is set as your code number. • You can clear the code number by pressing the Reset button. 3 Display the Parental Level SETUP screen Refer to (page 67) and touch [Parental Level]. 2 1 3 4 5 1 Enters a code number. 2 Cancels the current setup and returns to the DVD SETUP 2 screen. 3 Indicates the present parental lock level...
Instruction Manual
Page 71
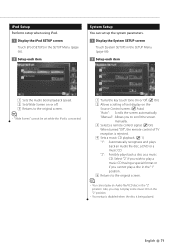
... the original screen. ⁄ • "Wide Screen" cannot be set up the system parameters. 1 Display the System SETUP screen Touch [System SETUP] in the "2" position. • Your setup is disabled when the disc is connected. 1 2 3 4 5 1 Turns the key touch tone On or Off. ( On) 2 Allows scrolling of TV reception is rejected. 4 Sets a music CD playback. ( 1) "1": Automatically recognizes and plays back an Audio file disc, a DVD or a music CD. English 71 "Manual": Allows you cannot play a disc in...
... the original screen. ⁄ • "Wide Screen" cannot be set up the system parameters. 1 Display the System SETUP screen Touch [System SETUP] in the "2" position. • Your setup is disabled when the disc is connected. 1 2 3 4 5 1 Turns the key touch tone On or Off. ( On) 2 Allows scrolling of TV reception is rejected. 4 Sets a music CD playback. ( 1) "1": Automatically recognizes and plays back an Audio file disc, a DVD or a music CD. English 71 "Manual": Allows you cannot play a disc in...
Instruction Manual
Page 72
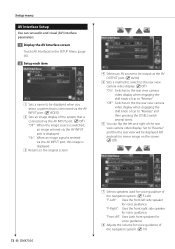
... the system that is connected via the AV INPUT port, this image is displayed. 3 Returns to the original screen. 72 DNX7100 4 5 6 4 Selects an AV source to be displayed left side speaker for voice guidance. "Off": Switches to the the rear view camera video display when engaging the shift knob of car to "Reverse" and then pressing the [V.SEL] switch several times. 6 You can set audio and visual (AV) interface parameters. 1 Display the AV Interface screen Touch...
... the system that is connected via the AV INPUT port, this image is displayed. 3 Returns to the original screen. 72 DNX7100 4 5 6 4 Selects an AV source to be displayed left side speaker for voice guidance. "Off": Switches to the the rear view camera video display when engaging the shift knob of car to "Reverse" and then pressing the [V.SEL] switch several times. 6 You can set audio and visual (AV) interface parameters. 1 Display the AV Interface screen Touch...
Instruction Manual
Page 74
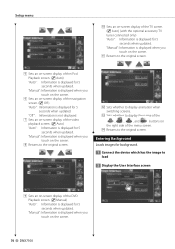
... tuner connected only) "Auto": Information is displayed for 5 seconds when updated. "Manual": Information is displayed for 5 seconds when updated. e Sets whether to display the name of the , , , and buttons on -screen display of the navigation screen. ( Off ) "Auto": Information is displayed for background. 1 Connect the device which has the image to the original screen. "Off": Information is not displayed. 7 Sets an on the right side of the DVD Playback screen. ( Manual) "Auto": Information is displayed for 5 seconds when updated. Entering Background...
... tuner connected only) "Auto": Information is displayed for 5 seconds when updated. "Manual": Information is displayed for 5 seconds when updated. e Sets whether to display the name of the , , , and buttons on -screen display of the navigation screen. ( Off ) "Auto": Information is displayed for background. 1 Connect the device which has the image to the original screen. "Off": Information is not displayed. 7 Sets an on the right side of the DVD Playback screen. ( Manual) "Auto": Information is displayed for 5 seconds when updated. Entering Background...
Instruction Manual
Page 79
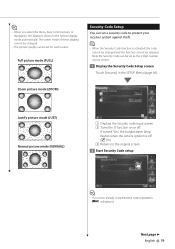
... . Zoom picture mode (ZOOM) 1 2 Justify picture mode (JUST) Normal picture mode (NORMAL) 3 1 Displays the Security code input screen. 2 Turns the SI function on or off . ( On) 3 Returns to protect your receiver system against theft. ⁄ • When the Security Code function is activated, the code cannot be changed . • The picture qua¡lity can be set as the 4 digit number of your choice. 1 Display the Security Code Setup screen Touch [Security] in the full-size display mode automatically...
... . Zoom picture mode (ZOOM) 1 2 Justify picture mode (JUST) Normal picture mode (NORMAL) 3 1 Displays the Security code input screen. 2 Turns the SI function on or off . ( On) 3 Returns to protect your receiver system against theft. ⁄ • When the Security Code function is activated, the code cannot be changed . • The picture qua¡lity can be set as the 4 digit number of your choice. 1 Display the Security Code Setup screen Touch [Security] in the full-size display mode automatically...
Instruction Manual
Page 94
... use another disc instead. Cannot play . ▲ The PBC function is enabled. ! • The Traffic Information setting is ineffective. • The Synchronize Clock setting is ineffective. • Cannot select the tuner as a Dual zone source. ▲ HD Radio is not set to "2". ! Cannot set up the high pass filter. ▲ Subwoofer is in a different slot from the preout jack. Audio file source ? The sound skips when an Audio file...
... use another disc instead. Cannot play . ▲ The PBC function is enabled. ! • The Traffic Information setting is ineffective. • The Synchronize Clock setting is ineffective. • Cannot select the tuner as a Dual zone source. ▲ HD Radio is not set to "2". ! Cannot set up the high pass filter. ▲ Subwoofer is in a different slot from the preout jack. Audio file source ? The sound skips when an Audio file...
Instruction Manual
Page 96
... he section on the display. Connect an USB device/iPod, and change the source to operate correctly, the cause of the failure appears on (page 8). • Disc is upside down. ➡ Load the disc with the car chassis. ➡ Wire or insulate the speaker cord as a source although no playable audio file. Some trouble may not be able to any source other than USB/iPod. Update your nearest Kenwood dealer. Hot Error : When the internal...
... he section on the display. Connect an USB device/iPod, and change the source to operate correctly, the cause of the failure appears on (page 8). • Disc is upside down. ➡ Load the disc with the car chassis. ➡ Wire or insulate the speaker cord as a source although no playable audio file. Some trouble may not be able to any source other than USB/iPod. Update your nearest Kenwood dealer. Hot Error : When the internal...
Instruction Manual
Page 100
... a trademark of DVD Format/Logo Licensing Corporation registered in a residential installation. and are available for one or more of this equipment may cause harmful interference to high-definition video. "Dolby" and the double-D symbol are designed to -use radio frequency energy. These limits are trademarks of Digital Theater Systems, Inc. DivX media Files contain highly compressed video with the instructions. Certified...
... a trademark of DVD Format/Logo Licensing Corporation registered in a residential installation. and are available for one or more of this equipment may cause harmful interference to high-definition video. "Dolby" and the double-D symbol are designed to -use radio frequency energy. These limits are trademarks of Digital Theater Systems, Inc. DivX media Files contain highly compressed video with the instructions. Certified...

Installation Manual
Page 3
... the fuse blows, first make sure to install the unit so that in turn on the ends of the left speaker to a power source with a constant voltage supply, as with vinyl tape or other similar material. English | 3 battery. 2. Make the proper input and output wire connections for the first time, it will acquire satellites quickly each unit. 3. Connect the speaker wires of the unit are being connected to the system, connect the connectors either...
... the fuse blows, first make sure to install the unit so that in turn on the ends of the left speaker to a power source with a constant voltage supply, as with vinyl tape or other similar material. English | 3 battery. 2. Make the proper input and output wire connections for the first time, it will acquire satellites quickly each unit. 3. Connect the speaker wires of the unit are being connected to the system, connect the connectors either...
Installation Manual
Page 7
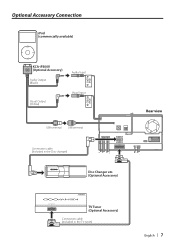
Optional Accessory Connection iPod (commercially available) iPod AUDIO IN KCA-iP300V (Optional Accessory) Audio Output (Black) Visual Output (Yellow) Audio Input Visual Input iPod VIDEO IN USB terminal USB terminal Connection cable (Included in the Disc changer) Disc Changer etc. (Optional Accessory) Rear view TV ANTENNA INPUT TO MONITOR UNIT TV Tuner (Optional Accessory) Connection cable (Included in the TV tuner) English | 7
Optional Accessory Connection iPod (commercially available) iPod AUDIO IN KCA-iP300V (Optional Accessory) Audio Output (Black) Visual Output (Yellow) Audio Input Visual Input iPod VIDEO IN USB terminal USB terminal Connection cable (Included in the Disc changer) Disc Changer etc. (Optional Accessory) Rear view TV ANTENNA INPUT TO MONITOR UNIT TV Tuner (Optional Accessory) Connection cable (Included in the TV tuner) English | 7


