Instruction Manual
Page 3
...66 Audio Setup 66 Crossover Network Setup 67 DVD Setup 67 Language Setup 68 Parental Level Setup 69 DivX Setup 70 Software Information 70 iPod Setup 71 System Setup 71 AV Interface Setup 72 User Interface 73 Entering Background 74 Background Delete 75 Background Select 76 Touch Panel Adjustment 76 Clock Setup... Setup 86 Zone Control 86 Remote Controller 88 Battery installation 88 Remote Controller mode switch 88 Common operations (AUD mode) 89 DVD/VCD/CD/Audio files (DVD mode) 90 TV (TV mode) 91 Radio (AUD mode) 92 NAVI (NAVI mode) 92 Help? Error...
...66 Audio Setup 66 Crossover Network Setup 67 DVD Setup 67 Language Setup 68 Parental Level Setup 69 DivX Setup 70 Software Information 70 iPod Setup 71 System Setup 71 AV Interface Setup 72 User Interface 73 Entering Background 74 Background Delete 75 Background Select 76 Touch Panel Adjustment 76 Clock Setup... Setup 86 Zone Control 86 Remote Controller 88 Battery installation 88 Remote Controller mode switch 88 Common operations (AUD mode) 89 DVD/VCD/CD/Audio files (DVD mode) 90 TV (TV mode) 91 Radio (AUD mode) 92 NAVI (NAVI mode) 92 Help? Error...
Instruction Manual
Page 73
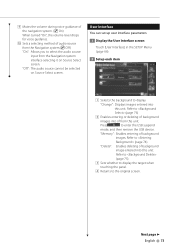
...Refer to (page 76) 2 Enables entering or deleting of background images into of background image entered into this unit. Press to display. Next page 3 English 73 "Delete": Enables deleting of from the Navigation system interface selecting it on Source Select screen. "Off": The ... this unit. Refer to the original screen. p Sets a selecting method of the navigation system. ( On) When turned "On", the volume level drops for voice guidance. "Memory": Enables entering of background images. Refer to (page 75). 3 Sets whether to display the target when touching...
...Refer to (page 76) 2 Enables entering or deleting of background images into of background image entered into this unit. Press to display. Next page 3 English 73 "Delete": Enables deleting of from the Navigation system interface selecting it on Source Select screen. "Off": The ... this unit. Refer to the original screen. p Sets a selecting method of the navigation system. ( On) When turned "On", the volume level drops for voice guidance. "Memory": Enables entering of background images. Refer to (page 75). 3 Sets whether to display the target when touching...
Instruction Manual
Page 74
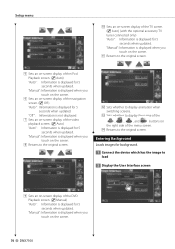
... is displayed when you touch on the screen. 6 Sets an on-screen display of the navigation screen. ( Off ) "Auto": Information is displayed when you touch on the screen. 74 DNX7100 "Manual": Information is displayed for 5 seconds when updated. "Manual": Information is displayed when you... an on -screen display of the iPod Playback screen. ( Auto) "Auto": Information is displayed for 5 seconds when updated. Entering Background Loads images for background. 1 Connect the device which has the image to load 2 Display the User Interface screen 11 9 Sets an on -screen display ...
... is displayed when you touch on the screen. 6 Sets an on-screen display of the navigation screen. ( Off ) "Auto": Information is displayed when you touch on the screen. 74 DNX7100 "Manual": Information is displayed for 5 seconds when updated. "Manual": Information is displayed when you... an on -screen display of the iPod Playback screen. ( Auto) "Auto": Information is displayed for 5 seconds when updated. Entering Background Loads images for background. 1 Connect the device which has the image to load 2 Display the User Interface screen 11 9 Sets an on -screen display ...
Instruction Manual
Page 75
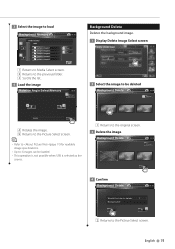
... previous folder. 3 Scrolls the list. 4 Load the image Rotation Angle Select/Memory 10:10 5 Cancel 4 4 Background Delete Deletes the background image. 1 Display Delete Image Select screen 2 Select the image to be deleted Background Delete 10:10 1 Cancel aaaaa Enter 4 Rotates the image. 5 Returns to the Picture Select screen. ⁄... • This operation is not possible when USB is selected as the source. 1 Returns to the original screen. 3 Delete the image Background Delete 10:10 Cancel Enter 4 Confirm Background Delete 10:10 Would You Like to the Pictrue Select screen.
... previous folder. 3 Scrolls the list. 4 Load the image Rotation Angle Select/Memory 10:10 5 Cancel 4 4 Background Delete Deletes the background image. 1 Display Delete Image Select screen 2 Select the image to be deleted Background Delete 10:10 1 Cancel aaaaa Enter 4 Rotates the image. 5 Returns to the Picture Select screen. ⁄... • This operation is not possible when USB is selected as the source. 1 Returns to the original screen. 3 Delete the image Background Delete 10:10 Cancel Enter 4 Confirm Background Delete 10:10 Would You Like to the Pictrue Select screen.

Instruction Manual
Page 76
... panel setup 2 Select a image for background Background Change 1 Default 10:10 2 Cancel Enter 1 Returns to the original screen. 2 Returns to the initial background. 3 Set the image as the background Background Change 10:10 Default Cancel Enter 1 ...1 Returns to the original screen. 3 Adjust the Touch panel 2 3 Follow the instruction on the screen and touch the center of . 2 Cancels the adjustment and returns to the Touch Panel Adjust screen. 3 Resets to the initial status. 76 DNX7100
... panel setup 2 Select a image for background Background Change 1 Default 10:10 2 Cancel Enter 1 Returns to the original screen. 2 Returns to the initial background. 3 Set the image as the background Background Change 10:10 Default Cancel Enter 1 ...1 Returns to the original screen. 3 Adjust the Touch panel 2 3 Follow the instruction on the screen and touch the center of . 2 Cancels the adjustment and returns to the Touch Panel Adjust screen. 3 Resets to the initial status. 76 DNX7100


